Photoshop brushes are powerful tools that enable artists and designers to achieve a vast array of creative effects within their digital projects. Among the many ways to customize brush behavior, controlling brush rotation is a fundamental technique for adding detail, realism, and stylistic flair. This tutorial will guide you through the various methods available in Photoshop for rotating brush tips, from fundamental panel adjustments to more advanced techniques, ensuring you can precisely orient your brushes for any given task.
Understanding Brush Rotation Fundamentals
At its core, a Photoshop brush is defined by its "brush tip" or "stamp." When you apply a brush stroke, Photoshop essentially stamps this tip repeatedly along the path of your brush. The rotation of this tip dictates its orientation on the canvas. For instance, if you've created a custom brush that represents eyelashes, and it's initially oriented horizontally, you'll need to rotate it to a vertical position to properly apply it to an eyelid.
The default position of many brushes, including custom ones, is often at a 0° rotation, meaning they are perfectly upright. However, depending on the nature of the brush tip and the desired outcome, you might need to adjust this angle significantly. A common scenario involves needing a brush to face a specific direction for each stroke, or even incrementally rotating it with each impression. The current method, which involves navigating to the brush shape settings, rotating a circular diagram with an arrow, can be quite time-consuming, especially when precise, small adjustments are needed with every application of the brush.
The Brush Settings Panel: A Direct Approach
The primary and most direct method for rotating a brush tip in Photoshop is through the Brush Settings panel. This panel offers a comprehensive suite of options for fine-tuning brush behavior, including its shape, spacing, scattering, and crucially, its angle.
To access these settings, first ensure you have the Brush Tool (B) selected. Then, you can either navigate to Window > Brush Settings or, more conveniently, right-click anywhere on your canvas. This action will bring up a pop-up menu displaying your currently selected brush and a selection of other brushes. Within this menu, you'll find options to directly adjust the brush's properties.
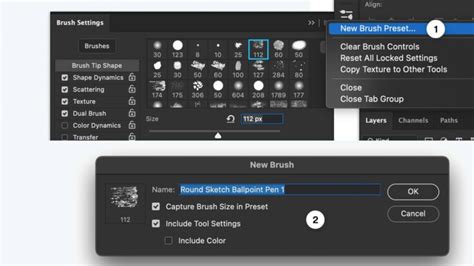
Look for the "Brush Tip Shape" section within the Brush Settings panel. This area contains a circular diagram that visually represents your brush tip. An arrow within this circle indicates the current orientation. You can directly click and drag this arrow to rotate the brush tip. For more controlled adjustments, holding down the Shift key while dragging will constrain the angle changes to increments of 15 degrees, making it easier to snap to common angles like 90° or -90°.
Alternatively, within the "Brush Tip Shape" section, you will find an "Angle" input field. Here, you can numerically input the desired rotation angle. If you accidentally capture the brush size in a preset, your brush might unexpectedly change size when you rotate it. It's essential to ensure that brush size is not inadvertently included in saved brush presets if you intend to rotate it independently.
Keyboard Shortcuts for Swift Rotation
For users who frequently need to adjust brush angles, especially with each stroke, relying solely on the Brush Settings panel can be inefficient. Fortunately, Photoshop offers keyboard shortcuts that significantly speed up the process of rotating brushes.
When the Brush Tool (B) is active, you can directly manipulate the brush angle using your keyboard. Tapping or holding down the Left Arrow key will decrease the brush angle, while tapping or holding the Right Arrow key will increase it. These adjustments are typically made in single-degree increments by default.
As mentioned earlier, holding down the Shift key in conjunction with the arrow keys modifies the increment to 15 degrees. This is incredibly useful for quickly snapping to common rotational values, such as setting a brush to 90° or -90°. This method bypasses the need to open the Brush Settings panel repeatedly, making your workflow much more fluid.
Secret Brush Rotation Shortcuts in Photoshop
Flipping Brushes: Horizontal and Vertical Inversion
Beyond simple rotation, Photoshop also allows you to flip brush tips horizontally or vertically. This is particularly useful when you need a mirrored version of an existing brush. For instance, if you've created a brush for the left eyelash, you might need a flipped version for the right eye.
Flipping can be accomplished within the Brush Settings panel, specifically within the "Brush Tip Shape" options. You will find dedicated controls for "Flip X" (horizontal flip) and "Flip Y" (vertical flip). Applying these will invert the brush tip along the respective axis.
A practical application of this is creating distinct brushes for paired elements. If you've made a brush for eyelashes that sits sideways and needs to be turned, you can rotate it as needed. Then, if you plan to use this rotated brush again, especially for the opposite side (e.g., for the other eye), it's often more efficient to create a second brush specifically for that purpose. You can take your original brush, flip it using the "Flip X" option, and then use this flipped version to create a new brush preset. This way, you have distinct brushes for the right and left sides, ready for immediate use without needing to re-apply transformations each time. The advantage of creating separate brush presets is that you can then scale these brushes as you would any regular brush, without needing to resort to Edit > Transform > Scale every time.
Advanced Techniques and Considerations
While the built-in Photoshop tools are powerful, some users seek even more dynamic control over brush rotation, especially concerning how it interacts with the stroke itself.
Dynamic Rotation Based on Pen Tilt
For users with graphics tablets like the Wacom Intuos 4, pen tilt can be a natural way to control brush angle. By tilting the pen, you can intuitively change the orientation of the brush tip as you draw. However, a common frustration is the lack of on-screen visual feedback before you make the stroke. This makes it difficult to precisely control the angle, rendering the feature less useful for certain applications.
If you find that the brush is rotating with the stroke but not in the desired orientation, you need to adjust the initial rotation of the brush alpha within its general settings. The Brush Settings panel usually provides a preview of the stroke, which can aid in making these adjustments easier.
Actions for Automating Rotations
For repetitive tasks involving specific brush rotations, creating an Action can be a significant time-saver. If you find yourself needing to apply a brush at a particular angle repeatedly, an Action can automate the selection of that angle.
To create such an Action:
- Open the Actions Panel (
Window > Actions). - Select your desired Action Set or create a new one.
- Click the "Create New Action" icon.
- Give your Action a descriptive name.
- Click "Record."
- Immediately select your first Brush Angle Preset. Do not click anything else in Photoshop until you are ready to stop recording.
- Once you have made your selection, click the "Stop" button in the Actions Panel.
Now, when you need to apply that specific brush angle, you can simply select this Action and play it. This automates the process of selecting the correct brush preset, saving you clicks and time.
Exploring External Tools and Vector-Based Workflows
While Photoshop offers robust brush manipulation, some complex tiling or repeating pattern needs might be better handled in other software. For instance, vector-based programs can offer advanced methods for distributing bitmap images along a vector curve.
Microsoft's free "Expression Design 4," for example, allowed users to place multiple alternating bitmap images along a stroke, with separate start and end images. These could tile, stretch, or scatter, all while following an editable vector curve. This approach offers a high degree of precision and the ability to rasterize to any resolution later. The concept of "clone" features in vector software, where you can duplicate and shift objects (e.g., by 2048 pixels for a 2048-pixel texture), can also be used to create repeating textures.
This method is not unique to Expression Design; any vector software that supports distributing bitmap images along a vector curve and offers shape cloning or instance capabilities can achieve similar results. While video tutorials for these specific workflows might be scarce, exploring the capabilities of vector-based pattern creation tools can unlock powerful solutions for complex repeating textures and brush-like effects that maintain scalability.
Conclusion
Mastering brush rotation in Photoshop is a fundamental skill that unlocks a new level of control and expressiveness in your digital art. Whether you prefer the direct manipulation within the Brush Settings panel, the efficiency of keyboard shortcuts, the utility of flipping options, or the automation provided by Actions, Photoshop offers a range of tools to suit your workflow. For highly specialized tiling and pattern needs, exploring vector-based alternatives can also yield impressive results. By understanding and utilizing these techniques, you can ensure your brushes are always oriented precisely as you envision, enhancing the quality and impact of your designs.