Lightroom, whether the Classic or cloud-based version, offers a powerful, non-destructive editing environment. This means your original image files remain untouched, with all your creative adjustments stored separately. When it comes time to share your work, print it, or archive it, you don't "save" in the traditional sense; instead, you export. This process creates new files, embedding your edits and allowing you to control various output parameters like filename, color space, pixel dimensions, and resolution. Understanding the nuances of exporting is crucial for maintaining image quality and ensuring your photos look their best across different platforms and mediums.
The Export Workflow: Accessing the Options
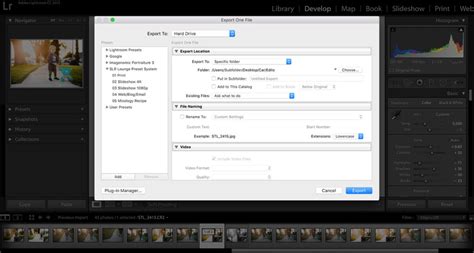
Initiating the export process in Lightroom is straightforward and can be accessed through multiple pathways. For Lightroom Classic users, you can navigate to 'File' in the main menu and select 'Export' from the drop-down list. Alternatively, within the Library module, a dedicated 'Export' button is conveniently located. A quicker method, especially when you have specific images in mind, is to right-click on any selected photo in your filmstrip and choose 'Export > Export' from the contextual menu.
The top of the Export dialog box will clearly indicate the number of photos you have selected for export. This visual cue helps confirm that you are about to process the intended batch of images.
For those using the cloud-based Lightroom (often referred to as Lightroom CC or Lightroom Mobile), the process is similarly intuitive. Look for a 'Share' icon, typically found in the upper right corner of the interface. Tapping this icon will present you with various sharing and export options, including the ability to export your edited photos.
Understanding Lightroom's Non-Destructive Workflow
A fundamental concept to grasp when working with Lightroom is its non-destructive editing methodology. When you import photos into Lightroom, the original image data is never altered. Instead, Lightroom creates a special preview of your original image, and all the edits you make are recorded and stored separately in the catalog. This catalog acts as a detailed instruction manual for how your images should appear.
When you re-open an edited image, Lightroom uses the information in the catalog to generate a new, updated preview that incorporates all your previous adjustments. This ensures that your original files are always preserved, offering flexibility and the ability to revert to earlier states or make further modifications without any degradation of the source material.
The export process then takes these edits and "bakes" them into a new file. You have the option to export a derivative image, such as a JPEG or TIFF, with your edits permanently applied. Alternatively, you can choose to export the "original + settings," which creates a copy of your original file alongside a separate file containing all the applied settings.
Export Presets: Streamlining Your Workflow
To simplify the export process and ensure consistency, Lightroom Classic offers a range of built-in export presets. These presets are pre-configured settings designed for common export scenarios, such as outputting photos for the web, for print, or for specific platforms. If you find yourself frequently exporting photos with the same set of parameters, utilizing presets can save considerable time and effort.
To use a preset, simply select it from the left-hand side of the Export dialog box. The chosen settings will then be applied to your export. You can also create and save your own custom presets based on your specific needs and preferences. If you wish to export your photos using a specific preset, you can select and export that preset. Choosing 'File > Export' and then selecting a preset from the left side of the Export dialog box allows you to skip directly to step 6 of the export process. For users who want to specify a main folder for all their presets, the 'Choose Parent Folder' option is available.
It's important to note that when you select one or more export presets, certain sections in the Export Settings, such as the Post-Processing section and those added by third-party plugins, may be hidden. Selecting the checkbox for a preset does not automatically update its export settings within the dialog box; you will still need to review and adjust them if necessary.
Key Export Settings Explained
The Export dialog box in Lightroom presents a comprehensive set of options to tailor your exported images. Understanding each panel is key to achieving the desired output.
File Settings: Format and Color Space
The 'File Settings' panel is where you determine the fundamental characteristics of your exported files.
File Format: You have a wide array of choices for your exported photos, including JPEG, PSD (Photoshop Document), PSB (Large Document Format), TIFF (Tagged Image File Format), PNG (Portable Network Graphics), DNG (Digital Negative), or even the original file format.
- JPEG: This is the most commonly used format due to its excellent balance of file size and quality, making it ideal for web use, email, and general sharing. JPEG employs lossy compression, meaning some image data is discarded to reduce file size. While this is generally imperceptible at higher quality settings, repeated saving and recompression can lead to a degradation of quality over time.
- TIFF: TIFF files use lossless compression, preserving all image data and thus maintaining the highest possible quality. This makes them perfect for archival purposes, professional printing, and further editing in pixel-based editors like Photoshop. The downside is significantly larger file sizes compared to JPEGs. Lightroom Mobile, in particular, offers LZW compression at 16 bits for TIFFs, a feature that has been removed from some other versions.
- PSD/PSB: These formats are native to Adobe Photoshop and are suitable if you plan extensive post-processing in Photoshop, preserving layers and other Photoshop-specific information.
- DNG: Adobe's Digital Negative format is a raw file format that can embed metadata and, in some cases, even a full-resolution JPEG preview. It's a good option for long-term archival of raw data.
- Original: Exporting in the original format will create a copy of your original file, but it will not include any of your Develop module adjustments.
Color Space: The choice of color space is critical and depends on the intended use of your image.
- sRGB: This is the standard color space for the web and most consumer devices. It's a safe choice for images destined for online viewing or general display.
- Adobe RGB: This color space offers a wider gamut than sRGB, encompassing more colors, and is often preferred for print output as it can reproduce a broader range of colors that may not be visible in sRGB.
- ProPhoto RGB: This is the largest color space available in Lightroom and captures the widest range of colors, including those outside the visible spectrum for humans. It's primarily used for professional workflows, especially when transferring images to Photoshop for extensive editing, as it ensures the most data is retained. However, ProPhoto RGB images can appear desaturated or odd in color-managed applications that don't support its wide gamut, such as standard web browsers.
Image Sizing: Dimensions and Resolution
The 'Image Sizing' panel allows you to control the physical dimensions and resolution of your exported files.
- Dimensions: You can specify the exact pixel dimensions for your exported image. Options include "Small," which limits the longest edge to 2048 pixels, or "Custom," where you can input specific pixel values for the long and short edges. It's generally advisable to avoid altering the size significantly here if you want to maintain the highest quality. For print, specific dimensions like 4" x 6" at 300 ppi are common.
- Resolution: This refers to the number of pixels per inch (ppi). For print, 300 ppi is a standard for high-quality output. For screen display, resolution is less critical as pixel dimensions are more important.
- Resizing: Lightroom offers options to resize your image to fit specific dimensions or to a long edge. For exporting a "Full resolution master," you would typically uncheck the "Resize to Fit" checkbox.
Output Sharpening: Enhancing Detail
The 'Output Sharpening' section enables you to apply sharpening specifically tailored to how the image will be viewed or printed. You can choose from options like "Screen" or "Print," and further refine the sharpening amount based on the type of paper or surface. This ensures your images appear crisp and detailed when viewed in their final medium.
Watermarking: Protecting Your Work
Lightroom allows you to easily add text or graphic watermarks to your exported images. This is a crucial step for photographers who want to protect their work from unauthorized use.
- Include Watermark: Check this box to enable watermarking.
- Settings Icon: Clicking this icon opens customization options.
- Font, Size, Opacity, Rotation, Anchor: You can precisely control the appearance and placement of your text watermark.
- PNG or JPG File: You can also upload a custom PNG or JPG file to use as a watermark.
Metadata: Embedding Information
You can choose to include various types of metadata with your exported files. This can range from copyright information and contact details to camera settings and keywords. Including metadata is important for copyright protection and for organizing your image library.
Post-Processing: Further Actions
The 'Post-Processing' section offers options for what happens after the export is complete. You can choose to open the exported image in another application, such as Photoshop or Photoshop Elements, for further editing. This is a seamless way to integrate Lightroom into a broader editing workflow.
Specific Export Scenarios and Recommendations
Exporting for Web vs. Print
The intended use of your exported photo dictates many of your settings.
- For Web:
- File Format: JPEG is usually the best choice due to its smaller file size and wide compatibility.
- Quality: A quality setting of 65-80 is often sufficient for web use, balancing quality and file size.
- Color Space: sRGB is essential for consistent display across web browsers and devices.
- Image Sizing: Resize to fit the intended display dimensions on websites or social media.
- For Print:
- File Format: TIFF is generally preferred for its lossless quality, especially for professional printing. JPEG can be used for less critical prints, but ensure a high quality setting.
- Quality: For JPEGs, aim for a quality setting of 80 or higher.
- Color Space: Adobe RGB is often recommended for print to capture a wider color gamut.
- Image Sizing: For high-quality prints, export at the native resolution of your camera or a resolution suitable for the print size (e.g., 300 ppi for 4x6 or 8x10 prints). Avoid upscaling images, as this can lead to a loss of quality.
Exporting RAW Files with Edits
When you need to preserve the original RAW data along with your edits, you can choose to export the "Original + Settings." This creates a copy of your original RAW file and a separate file containing all the adjustments you've made. This is invaluable for archival purposes or if you anticipate needing to re-edit the image extensively in the future.
Exporting HDR Images
Lightroom offers advanced options for High Dynamic Range (HDR) images. Gain Map technology provides a solution for consistent and adaptive display of HDR images. When exporting HDR content, you can choose specific file formats and color spaces that support HDR, ensuring that the expanded dynamic range of your images is preserved.
Sharing and Collaboration Features
Lightroom also integrates robust sharing and collaboration tools.
- Group Albums: You can create shareable albums with friends and family, allowing them to view or even contribute to the album. You can generate a web link for easy sharing.
- Collaborative Editing: For shared albums, you can grant others permission to edit photos, enabling multiple people to work on the same image. Edits are tracked, and you can view different versions of the photo in the Versions panel.
- Sharing to Social Media: Lightroom Mobile makes it easy to share directly to platforms like Instagram. If HDR is enabled, the app can include HDR information in an AVIF file for compatible platforms.
- Portfolio Integration: Lightroom allows you to publish your creative work directly to services like Adobe Portfolio, Blurb, and WHCC, streamlining the process of showcasing and distributing your photography.
Troubleshooting Export Issues
While the export process is generally smooth, occasional issues can arise.
- No Internet Connection: Ensure your device is connected to the internet, especially if you are using cloud-based Lightroom or exporting to cloud services.
- Insufficient Storage: Make sure you have enough free storage space on your device or external drive to accommodate the exported files.
- Syncing Problems: In cloud-based Lightroom, sync issues can sometimes prevent exports. Check for any pending syncs or sync problems indicated in the application.
Maintaining Image Quality Through Export
Exporting images from Lightroom does not inherently mean a loss of quality. By understanding and correctly applying the various export settings, you can ensure your photos meet your expectations. The key lies in knowing the intended use of your image. Experimenting with different settings and comparing the output is crucial for mastering the art of exporting. Remember that while JPEG is convenient, formats like TIFF offer superior quality for professional applications and archival storage. Always consider the trade-offs between file size, compatibility, and image fidelity when making your selections.