Hand-lettering in Procreate is a captivating and accessible skill for both beginners and seasoned digital artists. This tutorial delves into the best practices for creating stunning hand-lettered pieces within the Procreate app, transforming words into compelling visual illustrations. The journey from a simple quote to a polished artwork is both fun and rewarding, offering a gateway into a popular illustration technique. Many believe that proficient handwriting is a prerequisite for hand-lettering, but this is a misconception; anyone can cultivate the ability to create beautiful hand-lettered pieces. The key lies in viewing words and letters not merely as text, but as individual illustrations.
Essential Tools and Setup for Procreate Hand-Lettering
To embark on your Procreate hand-lettering adventure, the essential supplies are straightforward: the Procreate app, an iPad, and a stylus. For those brand new to Procreate, even drawing with a finger can be a starting point. However, to achieve the nuanced strokes characteristic of calligraphy, an Apple Pencil is highly recommended due to its pressure-sensitivity. This sensitivity allows for the creation of thin upstrokes and thick downstrokes, mimicking traditional calligraphy techniques.
For those new to iPad lettering and seeking to learn how to use hand-lettering practice sheets in Procreate, the process is quite intuitive. Once you have access to a resource library containing lettering practice sheets, navigate to the "Hand Lettering Practice Sheets" section. It is advisable to begin with an "8 basic strokes practice sheet" before progressing to alphabet worksheets for both uppercase and lowercase letters, and even themed worksheets. The method for downloading these files may vary depending on how they are packaged. If the file is a zip archive, it needs to be downloaded to the Files App, and then tapped to unzip.
The Foundation: Thumbnail Sketching and Composition
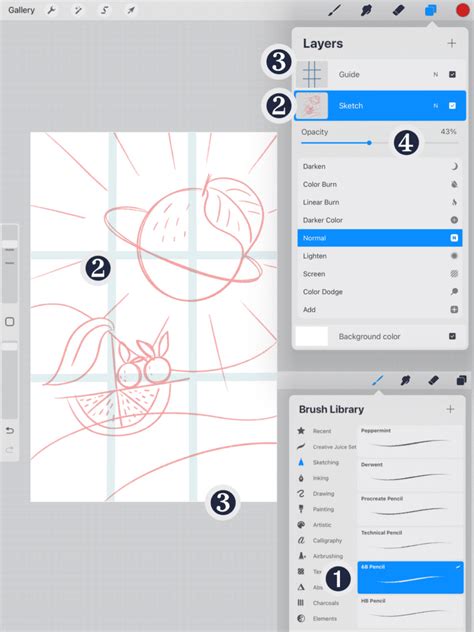
Much like any other illustration, the creation of a hand-lettered quote commences with a thumbnail sketch. This preliminary sketch serves to translate initial ideas onto paper, or in this digital context, onto the screen. When sketching within Procreate, utilizing the built-in "Peppermint" brush in a bright red hue can be highly beneficial, as it allows for clear differentiation from the final artwork.
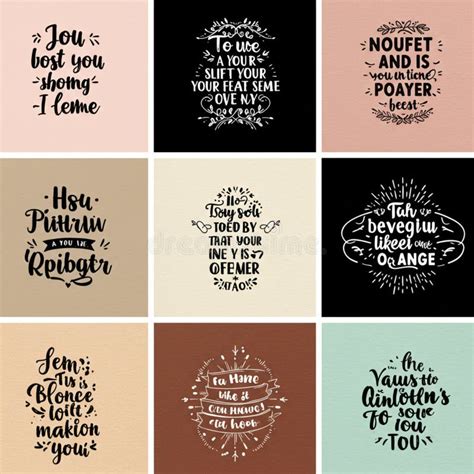
Begin by writing out the quote you intend to hand-letter. For instance, the quote "Do what you love" can serve as a practical example, or you can select a quote that resonates personally. Writing out the quote allows for an understanding of the letterforms and how they might be arranged. It's important to note that most hand-lettered illustrations are not presented in a single line; rather, they are typically composed to be visually engaging and aesthetically pleasing. Remember, the goal is to create an illustration, not just display text.
Experiment with different lettering styles. Consider how mixing cursive and block fonts might enhance the overall design. In the "Do what you love" example, the word "Love" might look particularly striking in cursive, allowing the preceding words to be artfully arranged within its curves. This compositional process will naturally vary depending on the chosen quote, but the sketching phase is an opportune moment to explore diverse configurations without fear of making mistakes.
Once a satisfactory composition is identified, it can be isolated and moved to its own layer using the Selection tool. After selecting the composition, perform a three-finger swipe down on the screen. Open the Layers panel, swipe left on the original sketch layer, and delete it. This action isolates the final composition sketch on its dedicated layer. If the sketch was created on a diagonal, it may require adjustment in size and position on the canvas using the Transform tool.
Refining Your Sketch for Precision
With the composition positioned correctly on the canvas, the next crucial step is to refine the sketch. Thumbnail sketches are often loose and can appear somewhat unpolished. For refining hand-lettering sketches, a thicker brush that approximates the final illustration's appearance is ideal. Refining the sketch also facilitates adherence to drawing guides for enhanced precision.
Subsequently, reduce the opacity of the thumbnail sketch in the Layers panel. This is achieved by tapping "N" next to the layer and adjusting the opacity scrubber. Ensure that you are working on a new layer for your refined sketch and select a larger brush. While this refined sketch doesn't need to be perfect, it should serve as a clearer guide for the subsequent illustration process.
Bringing Your Hand-Lettering Illustration to Life
This is where the creative process truly takes flight - the actual illustration. Employing a textured brush can lend an organic, hand-drawn aesthetic to the artwork. After selecting a preferred brush, create a new layer for your illustration and begin tracing over your refined sketch. This stage offers the freedom to personalize the artwork through diverse color palettes and brushes, aligning with individual artistic style. It is highly recommended to create a new layer for each element of the illustration, facilitating easier manipulation later on. For instance, in the "Do what you love" example, "Do what you" and "Love" could be illustrated on separate layers.
The resulting illustration might appear intentionally slightly imperfect, contributing to the desired hand-drawn ambiance.
Elevating Your Hand-Lettering with Effects
To further enhance the hand-lettered artwork, a drop shadow can be applied to create a faux-3D effect. To achieve this, select the layer to which the shadow will be added. In the Layers panel, swipe left on the layer and choose "duplicate." This creates an identical copy of the layer. Select a desired color for the drop shadow from the color palette. Drag the colored circle from the top-left of the screen onto the hand-lettering you wish to shadow. Keep the stylus on the screen and drag it to the right until all letters are recolored. Then, drag this drop shadow layer beneath the original hand-lettering layer. It's important to ensure that the edges of the shadow align seamlessly with the letters to create a cohesive look.
Utilizing Practice Sheets and Guides in Procreate
For those specifically interested in "procreate practice sheets tutorial," the integration of practice sheets is fundamental. These sheets provide structured exercises to build confidence and refine technique. After downloading practice sheets, they can be imported into Procreate.
To import a practice sheet:
- Tap the wrench icon (Settings).
- Navigate to "Add."
- Select "Insert a file" or "Insert a photo," depending on how the sheet was saved.
- Locate and tap the saved practice sheet file or photo.
Crucially, create a new layer above the imported practice sheet layer. This ensures that the original worksheet remains undisturbed. Open the brush library and select a brush from the "Calligraphy" brush set, such as the "script" brush or "brush pen."
When practicing, trace the letters on the new layer, applying varying pressure with the Apple Pencil to achieve thin upstrokes and thick downstrokes. If more space is needed, simply add another layer and toggle off the current one.
Creating Custom Calligraphy Guides
For those seeking to create their own calligraphy guides, Procreate offers built-in drawing guides and a clever method for generating slanted lines.
- Set up the Canvas: Create a new canvas of any size. Ensure the background color is pure white.
- Enable Drawing Guide: Go to the wrench icon > "Canvas" > turn on "Drawing Guide."
- Edit Drawing Guide: Click "Edit Drawing Guide." Choose a dark color for high contrast. Adjust the "Grid Size" to a smaller value.
- Create Slanted Lines: Turn off the drawing guide. Take a screenshot of the iPad screen (power and volume-up buttons simultaneously).
- Insert Screenshot: Go to the wrench icon > "Add" > "Insert a photo" and import the screenshot.
- Transform and Slant: With "Uniform" and "Magnetics" turned on, enlarge the screenshot to fill the screen. Use the "Freeform" transform tool and tap-and-hold the top-center dot. Drag it to the right to achieve the desired slant for calligraphy. Resize the image again to fill the canvas.
- Apply Multiply Blend Mode: In the Layers panel, tap the imported grid layer and change its blend mode to "Multiply." This knocks out the white, allowing any background color to show through. The opacity of this grid layer can also be reduced for less distraction.
How to draw a name beautifully in procreate (ribbon effect) #Shorts
Understanding Procreate Layers and Tools
Procreate's layer system is fundamental to efficient digital art creation. Understanding how to manage layers, use clipping masks, and alpha lock can significantly streamline the workflow.
- Layers: Each element of an illustration can reside on its own layer, allowing for independent editing and manipulation.
- Alpha Lock: This feature restricts painting to the existing pixels on a layer. To use it, tap the layer name in the Layers panel and select "Alpha Lock." This is useful for recoloring or adding texture to existing artwork without affecting transparent areas.
- Clipping Masks: A clipping mask constrains a layer's content to the shape of the layer beneath it. Create a base layer, then turn the layer above it into a clipping mask. This is particularly useful for applying textures or patterns within specific shapes, like lettering. Clipping masks offer non-destructive editing, allowing for easier experimentation.
- Layer Groups: To organize multiple layers, select them and choose "Group." This helps maintain a tidy Layers panel, especially for complex projects.
- Transform Tool: This tool allows for resizing, rotating, skewing, and distorting layers or selections.
- Selection Tool: Used to select specific areas of a canvas for editing, transforming, or copying.
- Blend Modes: Found next to the layer name ('N' for Normal), blend modes alter how layers interact with each other based on mathematical formulas. "Multiply" is commonly used for darkening or creating shadows.
Exploring Brushes and Styles
Procreate offers a vast array of brushes, both pre-installed and downloadable. For hand-lettering and calligraphy, brushes from the "Calligraphy" set are a good starting point. However, many artists develop or acquire specialized brushes designed for specific lettering styles. For instance, the "Loveleigh Brush" is a popular free option for beginners, offering pressure-sensitive color changes.
The Procreate Mega Bundle brush set by Alexis Gentry is also recommended for its comprehensive selection of hand-lettering and drawing brushes. Experimentation with different brushes is key to discovering those that best suit individual preferences and the desired aesthetic.
Modern vs. Traditional Calligraphy in Procreate
Calligraphy created in Procreate falls under the umbrella of modern calligraphy due to the digital tools employed. While traditional styles like Copperplate or Spencerian can be emulated, the inherent nature of digital tools allows for greater creative freedom and experimentation. The absence of physical constraints like inkwells and paper stacks makes digital calligraphy highly accessible.
Community and Continuous Learning
Engaging with the Procreate community, particularly on platforms like Instagram, can provide inspiration and valuable feedback. Sharing your work and seeking advice from other artists is an integral part of the learning process. Numerous free resources, including blogs and YouTube channels, offer further guidance on Procreate lettering and calligraphy. Courses like "The ABCs of Procreate" and "Procreate Lettering Projects" can help demystify brush creation and the process of transforming quotes into hand-lettered art.
Remember that every accomplished Procreate artist began with a foundational understanding and practice. The journey into Procreate calligraphy and lettering involves a learning curve, but by focusing on fundamentals and consistent practice, rapid advancement is achievable. The key is to resist feeling overwhelmed by the extensive settings and options. With dedication, your iPad lettering skills will undoubtedly grow.