Masking hair in Photoshop is a perennial challenge for many users, often representing a significant hurdle in achieving professional-looking composite images. While Photoshop's tools have evolved, particularly with updates to the "Select & Mask" module, achieving a perfect hair mask still requires a nuanced approach. This tutorial will guide you through various techniques, from initial selections to intricate refinements, empowering you to tackle even the most complex hair textures and styles.
The Evolution of Hair Masking in Photoshop
Historically, masking hair in Photoshop was a painstaking process, often involving intricate manual brushing or complex channel manipulations. The introduction of features like "Select Subject" and the enhancements within the "Select & Mask" workspace have significantly streamlined this workflow. However, it's crucial to understand that even with modern advancements, a one-click solution for perfect hair masking remains elusive. Instead, a combination of intelligent automated tools and careful manual refinement is typically required.
The journey from rudimentary selections to sophisticated masking has been marked by incremental improvements. In Photoshop 2020/2021, an update to the "Select & Mask" module introduced a refine mode toggle, offering more control over edge detection. More recently, Photoshop CC 2023 has further refined these capabilities, adding additional options that, with proper tweaking, can yield exceptional results. Pairing these newer features with established techniques ensures a robust workflow for almost any image.
Initial Selection: Laying the Foundation
Before diving into the intricacies of hair refinement, the first step is to establish a reasonably accurate initial selection of your subject. Several methods can achieve this, each with its own strengths and weaknesses.
Select Subject: The Automated Approach
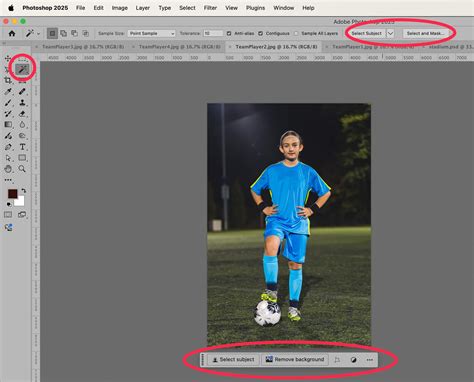
A good starting point is Photoshop's "Select Subject" feature. This intelligent tool automatically identifies and attempts to create a selection around the main subjects in your photograph.
- Accessing Select Subject: Navigate to the "Select" menu and choose "Subject."
- Refining the Selection: Upon initial selection, you might notice that while the main body of the subject is well-defined, finer details, particularly along the hair and softer edges, can be cut off. This is where subsequent refinement becomes essential.
Quick Actions: A Streamlined Alternative
For a rapid initial mask, the "Properties" panel offers a "Quick Actions" section.
- Locating Quick Actions: In the "Properties" panel, find the "Quick Actions" section.
- Remove Background: Click on "Remove Background." This function aims to isolate the subject by removing the background, effectively creating a mask. While efficient, this often requires significant refinement, especially for hair.
The Pen Tool: Precision for Simpler Edges
While not ideal for complex hair, the Pen Tool remains invaluable for creating crisp, accurate selections of objects with well-defined edges, or for isolating specific parts of a subject like arms or hands. It’s a tool that prioritizes precision over speed and is best suited for subjects where hair is not the primary masking challenge.
Refining the Mask: The Art of Select & Mask
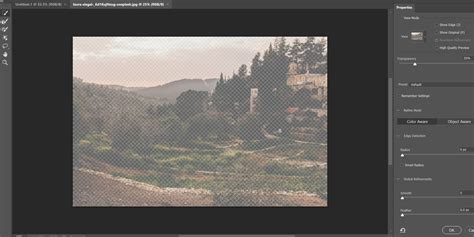
Once an initial selection is made, the "Select & Mask" workspace becomes your primary arena for detailed refinement, especially for hair. This workspace provides a suite of tools designed to handle complex edges, including hair.
- Entering Select & Mask: Access the "Select & Mask" workspace by going to "Select" > "Select & Mask," or by using the keyboard shortcut:
Command-Option-R(macOS) orCtrl-Alt-R(Windows). - View Modes for Clarity: To better assess your mask, experiment with different "View Modes." A highly effective option for scrutinizing hair detail is "On Black." This mode displays your selection against a solid black background, making it easier to identify stray pixels, halos, and areas where the mask is not fully opaque. You can access this by selecting "View Mode" and choosing "On Black" from the options.
Leveraging Refine Mode
Within the "Select & Mask" workspace, the "Refine Mode" settings are crucial for hair masking.
- Object Aware and Color Aware: For hair, the "Refine Mode" offers powerful options. Before making any brush strokes, expand the "Refine Mode" section. Select "Object Aware." This setting allows Photoshop's algorithms to better understand the subject's form and differentiate between foreground and background, particularly helpful for wispy hair. Depending on the specific image, you might find that setting "Refine Mode" to "Color Aware" produces superior results by focusing on the color differences between the hair and the background. Experimentation is key here, as the optimal setting can vary significantly based on the image's characteristics.
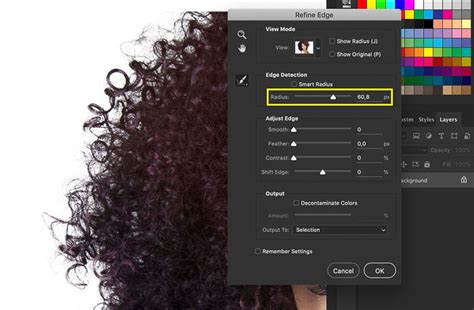
- The Refine Edge Tool: On the left-hand toolbar within "Select & Mask," you'll find the "Refine Edge" tool. It's often described as looking like a hand holding a brush, but upon closer inspection, it appears more like fine hairs with a brush. This tool is specifically designed for delicate edge refinement.
- Using the Refine Edge Tool: Select the "Refine Edge" tool. Your goal is to carefully drag this cursor along the edges of the hair. Keep the brush primarily on the edge of the subject, moving outwards rather than deeply into the subject. This technique helps Photoshop analyze and refine the transition between the hair and the background, preserving fine strands. Adjust your brush size as needed to accommodate different areas of the hair.
Adjusting Sliders for Fine-Tuning
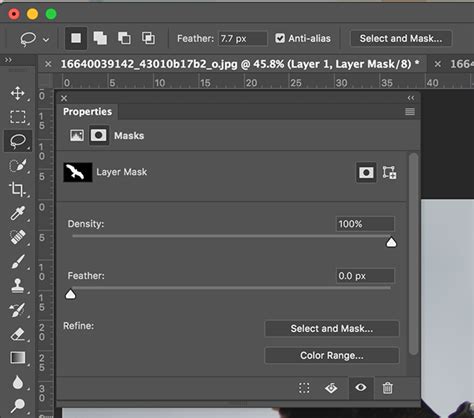
Once you've utilized the "Refine Edge" tool, the sliders in the "Properties" panel of the "Select & Mask" workspace offer further control.
- Radius: Adjusting the radius can help Photoshop differentiate between foreground and background elements. A larger radius might capture more of the background, while a smaller one focuses on finer details.
- Smooth: This slider helps to smooth out jagged or pixelated edges. Use it sparingly, as over-smoothing can make hair appear artificial.
- Feather: Feathering softens the edge of the mask, creating a gradual transition. This is useful for blending but should be used with caution on hair to avoid a blurry or hazy appearance.
- Contrast: Increasing contrast can help sharpen the mask edges, making them more defined.
- Shift Edge: This slider allows you to expand or contract the mask. Shifting it inwards can help remove slight background halos, while shifting it outwards can bring back subtle hair details.
Experiment with these sliders, observing the changes in your "View Mode" to achieve the desired balance between detail and clean edges.
The Plain Brush Tool for Manual Cleanup
After using the "Refine Edge" tool and adjusting sliders, some manual cleanup is often necessary.
- Selecting the Plain Brush: Select the standard Brush tool (shortcut 'B') from the left toolbar.
- Cleaning Up: Use this brush to manually paint over any remaining unwanted areas or to fill in gaps. Ensure your brush is set to a soft edge for blending. Pay close attention to areas where the mask might be too opaque or too transparent.
Advanced Technique: Channel Masking for Ultimate Detail
For exceptionally challenging hair masking scenarios, especially those with fine flyaways against complex backgrounds, channel masking can provide unparalleled precision. This method leverages the contrast information within the image's color channels.
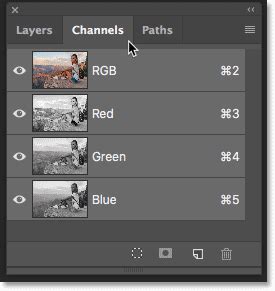
- Open the Channels Panel: Locate and open the "Channels" tab, typically found next to the "Layers" tab. The Channels panel displays the individual color channels (Red, Green, Blue) that compose your image.
- Identify the High-Contrast Channel: Examine each channel to find the one that exhibits the most contrast between your subject's hair and the background. Often, the blue channel provides the best separation.
- Duplicate the Channel: Once you've identified the most suitable channel, duplicate it by dragging it onto the "New Channel" icon at the bottom of the panel.
- Enhance Contrast with Levels: With the duplicated channel selected, go to "Image" > "Adjustments" > "Levels" (or use the shortcut
Command-L/Ctrl-L). Use the sliders to further exaggerate the contrast. Move the black slider to the right and the white slider to the left to make the hair appear as black as possible against a white background, or vice versa, depending on your goal. The aim is to create a stark black and white representation. - Create a Selection from the Channel: Hold down
Ctrl(Windows) orCmd(macOS) and click on the thumbnail of your duplicated and adjusted channel. This will load the channel's tonal information as a selection. You should now have an ultra-detailed selection that captures almost every strand of hair. - Invert and Apply (if necessary): Depending on whether your subject is black or white in the channel, you might need to invert the selection (
Select>InverseorShift-Ctrl-I/Shift-Cmd-I) to ensure you've selected the subject rather than the background. - Return to Layers and Apply Mask: Go back to your "Layers" panel, ensure your original layer is selected, and then click the "Add Layer Mask" icon at the bottom of the panel. This will apply the detailed channel selection as a layer mask.
Fine-Tuning the Mask: The Black and White View
A powerful method for fine-tuning any mask, including hair, is to view it in isolation as a black and white image.
- Alt/Option-Click the Mask: In the "Layers" panel, hold down
Alt(Windows) orOption(macOS) and click directly on the layer mask thumbnail. This will temporarily display the mask itself in your main image window, rendered in grayscale. Black areas represent transparency, white areas represent opacity, and shades of gray represent partial transparency. This view makes subtle imperfections, halos, and stray pixels much more apparent. - Using the Brush for Precision:
- Default Colors: Press
Don your keyboard to reset your foreground and background colors to the default black and white. - Switch Colors: Press
Xto toggle between black and white. You'll want to use the color that corresponds to the area you need to mask out (black to hide, white to reveal). - Brush Settings: Select the normal Brush tool (
B). For fine adjustments, consider using a brush with a mid-to-low opacity. This allows for more subtle blending and gradual correction. - Targeting Imperfections: Carefully paint over any "misty grey" areas or unwanted background elements that have crept into the mask. Work from the outside of the subject inwards, taking care not to paint over actual hair detail.
- Filling Gaps: Use the brush in white to fill in any areas where the mask has incorrectly removed parts of the subject.
- Default Colors: Press
ADVANCED Hair Masking In Photoshop - MASK HAIR From BUSY Backgrounds - Photoshop Tutorial
- Returning to Normal View: Once you're satisfied with the black and white refinement, hold down
AltorOptionand click the mask thumbnail again to return to your normal image view.
Post-Masking Refinements and Creative Applications
Copying Masks for Layer Comps
Sometimes, you might want to apply the same mask to multiple layers for consistent compositing.
- Select the Source Mask: In the "Layers" panel,
Ctrl-click (Windows) orCmd-click (macOS) on the mask thumbnail of the layer you want to copy from. This loads the mask as a selection. - Create a New Mask: Select the target layer, click the "Add Layer Mask" icon, and then fill the new mask with white (
Edit>Fill>White). - Paste the Selection: With the new mask selected, paste the copied selection (
Edit>Paste). This transfers the mask.
Using Generative Fill for Hair Patching
Photoshop's Generative Fill feature, while known for object removal and creation, can also be a surprisingly effective tool for subtle hair corrections or additions.
- Select the Area: Use a selection tool (like the Lasso tool) to draw a selection around a problematic area of hair or a section where you need to blend or extend.
- Access Generative Fill: Click "Generative Fill" in the contextual taskbar.
- Enter a Prompt (or leave blank): You can leave the prompt blank to allow Photoshop to intelligently fill based on the surrounding pixels, or you can provide a prompt like "hair strands" or "blend hair."
- Generate Variations: Photoshop will generate several variations. Review these in the Properties panel and choose the one that best integrates with your existing mask. This can be a faster alternative to manual brushing for minor fixes.
The Importance of Practice
Mastering hair masking in Photoshop is an iterative process. The complexity of hair-its texture, color, lighting, and the background against which it's set-means that no single technique will work perfectly for every image.
- Experiment with Images: Don't be afraid to practice with a variety of images featuring different hair types, from fine and wispy to thick and curly.
- Combine Techniques: The most successful hair masks often result from a thoughtful combination of automated tools (like Select Subject and Select & Mask's AI features) and precise manual adjustments using channels and brushes.
- Utilize Sample Files: Photoshop often provides sample files that can be used to practice these techniques. If you want to use these assets beyond the tutorial, consider purchasing licenses from Adobe Stock.
By understanding the evolution of these tools, employing the right techniques for initial selection and refinement, and dedicating time to practice, you can overcome the challenges of hair masking and elevate your digital image manipulation skills.