The digital age has presented photographers with unparalleled control and image fidelity, yet there remains a magnetic pull towards the aesthetic of classic analog film. Among the pantheon of beloved film stocks, Kodak Gold 200 stands out as a budget superstar, renowned for its ability to imbue images with a sense of sunshine and nostalgia. This consumer-grade film, once relegated to the casual shooter, has become a coveted aesthetic in the digital realm, not for its technical perfection, but for its ability to capture emotion and a specific sense of time and place that digital purity often misses. Translating this analog magic into a reliable digital Lightroom preset is a challenge that moves far beyond clicking a single slider; it requires a deep understanding of the film's fundamental characteristics and a meticulous approach to digital editing.
Understanding the Soul of Kodak Gold 200
Kodak Gold 200 is famous for its vibrant, warm colors. The film stock's distinctive palette is characterized by a substantial boost in yellows and oranges, creating a cheerful and inviting visual experience. The greens, rather than appearing harsh and digital, often lean towards a yellowish-green or a slightly muted olive tone, contributing to the film's warm and organic feel. This specific rendering of colors is a key element to replicate when aiming for an authentic Kodak Gold 200 look in digital photography.
Beyond its color rendition, the film stock isn't high-contrast like slide film, but it possesses a specific dynamic range performance that digital shooters must replicate. One defining feature of classic film, including Kodak Gold 200, is the "film fade," or lifted black point. Digital blacks are often too deep and solid, lacking the subtle, organic transition that film provides. This lifted black point gives images a softer, more vintage appearance. Furthermore, the shadows in Kodak Gold 200 often contain a subtle, slight greenish or teal tint, a nuance that adds depth and complexity to the overall color palette.
Kodak Gold 200 is a consumer-grade film, meaning it isn't ultra-fine-grained like professional stocks such as Portra or Ektar. This characteristic translates to a noticeable, yet pleasing, grain structure in the final image. Mastering the Kodak Gold 200 preset means mastering the contrast between warm yellow-red tones and slightly faded, green-tinged shadows, all topped off with a characteristic film grain. This is a complex mix that requires precise, file-specific adjustments, moving beyond the capabilities of a simple, static preset.
The Pitfalls of Static Presets
Photographers frequently attempt to create the Gold 200 aesthetic using a simple XMP preset, believing the hard work is done once the settings are saved. A Lightroom preset is essentially a recorded list of slider positions. Imagine creating a perfect Gold 200 preset for a bright, sunny portrait at 2:00 PM, with specific White Balance, shadow lift, and strong yellow shifts. The problem isn't the preset itself, but its inability to adapt to varying shooting conditions.
Before applying any film emulation, it's crucial to treat your digital RAW file with the same fundamental White Balance and Exposure correction a film lab would handle during the scanning process. Every photo needs a manually or automatically corrected white balance that neutralizes the ambient light, eliminating any strong color casts, before you introduce the warm Gold 200 style. Rough exposure must also be manually adjusted to bring the image to a technically correct middle point.
Static presets cannot adapt to varying light conditions, resulting in inconsistent color and exposure across a shoot. This creates an enormous workflow bottleneck. Professionals must first standardize their digital RAW files by manually correcting White Balance and Exposure to create a neutral base. The digital file must be analyzed and corrected individually before the style is applied. This is precisely the problem that a dedicated AI editing platform, such as Imagen, solves.
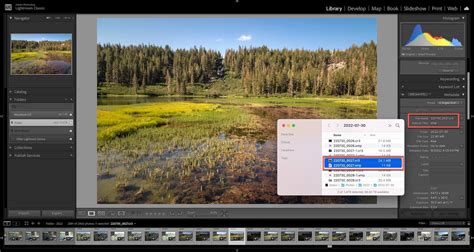
Building a Definitive Kodak Gold 200 Preset: A Step-by-Step Manual Approach
Creating a usable Kodak Gold 200 preset requires meticulous work across several panels in the Develop Module of Lightroom. This is a step-by-step tutorial for manually building the look, which can then be saved as a custom preset.
1. Base Profile and Calibration
Start by selecting the correct base profile. Avoid the default Adobe Color or Adobe Standard if you can. Next, jump down to the Calibration panel. This panel is often overlooked but is one of the most powerful tools for true film emulation.
- Red Primary Hue: Adjust between +5 to +10. This introduces that classic reddish warmth into the whole image.
- Red Primary Saturation: Adjust between +5 to +10. This boosts the overall saturation without affecting the greens too much.
- Green Primary Hue: Adjust between -10 to -15. This shifts the digital-looking greens towards a more natural, yellow-green film tone.
2. The Tone Curve: The Heart of the Film Look
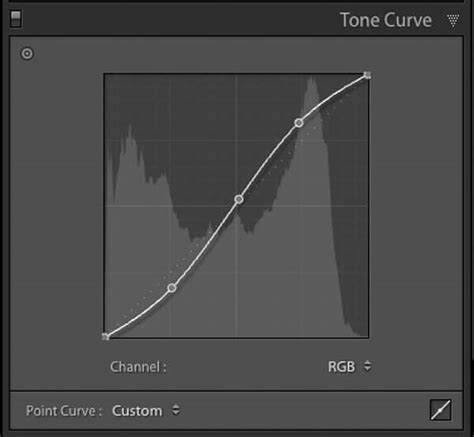
The Tone Curve is the single most important tool for replicating the film look. The aim is for a gentle S-curve to increase mid-tone contrast, but with a specific lift in the dark areas.
- Lift the Black Point (The Fade): Grab the bottom-left point on the curve (the deepest shadows) and drag it upward slightly. Move the point upward only, keeping it locked to the left axis; do not pull it inward. This replicates the characteristic "film fade."
- Set the Shadow Point: Create a point slightly above the new black point.
- Establish Contrast (The S-Curve): Add two more points: one in the lower-mid quadrant (Shadows/Darks) and push it down slightly, and one in the upper-mid quadrant (Highlights/Lights) and push it up slightly.
- Manage Highlights: Take the top-right point and move it slightly inward and down to protect highlights from blowing out.
3. Color Grading for Nuance
This is where you refine the specific colors that Kodak Gold 200 is known for. Modern Lightroom uses the Color Grading panel, which is much more versatile than the old Split Toning tool.
- Shadows: Introduce a subtle green or teal tint to the shadows to mimic the film's characteristic shadow color shift.
- Midtones: Slightly warm the midtones to enhance the overall golden feel.
- Highlights: You might add a very subtle yellow or orange tint to the highlights, but be careful not to overdo it, as Gold 200 doesn't typically have overly warm highlights.
4. HSL (Hue, Saturation, Luminance) Adjustments
Fine-tune individual color ranges to match the film's unique rendering.
- Yellows and Oranges: Boost saturation and potentially shift the hue slightly towards red to achieve that vibrant, sunny look.
- Greens: Desaturate slightly and shift the hue towards yellow to achieve the characteristic muted, yellowish-green tones.
- Reds: Adjust saturation and luminance to enhance the warmth.
5. Grain: Adding Texture
Replicating film grain is about texture, not noise.
- Amount: Start low, between 25 and 40.
- Size: Set between 20 and 35.
- Roughness: Adjust to taste, typically around 40-60.
The Role of AI in Film Emulation and Workflow Efficiency
Building a perfect Kodak Gold 200 preset is a rigorous, multi-step process. It starts with precise Color Calibration, moves through the essential Tone Curve lift for the film fade, and requires detailed manipulation of the HSL and Color Grading panels to inject the golden warmth and green shadow bias. Saving these final steps as a custom XMP file creates your perfect starting point.
However, as professionals, we don’t just deliver one beautiful photo; we deliver a complete, cohesive story. Whether it’s a 1,000-image wedding or a high-volume portrait session, every photo must feel like it belongs in the same set, possessing the exact same Kodak Gold 200 vibe. This is exactly the problem that a dedicated AI editing platform solves.
When you use a platform like Imagen, the foundational correction process is handled intelligently. Imagen’s Personal AI Profile learns how you handle initial color correction and exposure on a per-image basis. It then applies this learned foundation and then layers on the stylistic parameters that make up the Gold 200 look, ensuring consistency even when shooting in drastically different light.
Training Your Personal AI Profile
How does Imagen learn your specific, nuanced Gold 200 preset? When you create a Personal AI Profile with Imagen, you must first provide it with a collection of at least 3,000 edited photos. You take 3,000 of your best images-spanning sunny, shady, indoor, and outdoor scenarios-and manually apply your Gold 200 look to every one of them in Lightroom Classic. You then upload those 3,000 corrected and styled images to Imagen. Once the profile is ready, you can send an unedited project to Imagen, and it will intelligently apply your learned aesthetic, correcting for light differences in each frame.
If you don’t have 3,000 images edited in a consistent Gold 200 style yet, Imagen offers a Lite Personal AI Profile option where you can upload your custom Kodak Gold 200 XMP preset and answer a few style questions. Alternatively, you can choose from Talent AI Profiles, which might feature rich, warm color casts and lifted tones that can serve as a fantastic base for your own aesthetic, even if not explicitly named "Kodak Gold."
The core difference is that a standard XMP preset applies a fixed value to all photos, leading to very low batch consistency and requiring heavy manual tweaking after application. In contrast, an Imagen AI Profile is individually corrected based on the image content, guaranteeing high stylistic consistency across highly variable lighting and learning from your final edits to fine-tune the profile over time.
Streamlining the Workflow: Beyond Presets
The move from film to digital emulation requires far more than a simple preset. Imagen solves the workflow bottleneck by learning the nuance of your custom film look and intelligently applying it to each image, saving up to 96% of your manual editing time.
Once you’ve successfully trained your Personal AI Profile with your custom Kodak Gold 200 aesthetic, the day-to-day workflow becomes dramatically simplified. Before applying that perfect Gold 200 look, you must decide which photos are keepers. Culling is arguably the most tedious and time-consuming part of post-production.
Manual culling in Lightroom Classic involves flagging, starring, or color-coding images in the Loupe view, a slow, repetitive process subject to eye fatigue. Imagen’s AI Culling, however, analyzes the entire shoot to shortlist the best shots based on sharpness, exposure, and emotional context. This process mimics the human selection process, delivering a highly accurate shortlist in minutes, eliminating blurry or poorly exposed shots automatically. Furthermore, you can cull with Edited Previews-the AI applies your Gold 200 style before you review the culls, providing a clear advantage. Imagen’s Culling Studio drastically cuts down time spent in this initial phase.
Are AI Tools Changing Photo Batch Editing Workflows? - Image Review Studio
Continuous Evolution of Your Aesthetic
Your aesthetic is dynamic; it doesn’t stop evolving just because you built an AI profile. As you continue to shoot and edit, you might find yourself consistently tweaking a specific setting-maybe adding a bit more green to the shadows or slightly increasing the yellow luminance. Imagen facilitates this through its Fine-Tune process. After Imagen delivers the edited project back to your Adobe software, you perform any necessary final tweaks. Then, you click "Send for Fine-Tuning." This continuous learning loop ensures that your Gold 200 aesthetic remains perfectly aligned with your current style, not the style you had six months ago.
If you have an immediate, systematic change you need to apply-say, you decide your Gold 200 needs to be universally warmer-you don’t have to wait for a Fine-Tune. You can use Profile Adjustments to manually refine settings like White Balance, Exposure, Tone, and Color directly within the Imagen app.
Beyond Color and Tone: Comprehensive Editing
Beyond the core color and tone adjustments, film emulation and professional editing often require precise adjustments that go beyond simple global sliders. Tools like crop and straighten for compositional excellence, and localized adjustments for portrait retouching (smooth skin, whiten teeth) are crucial. The Smooth Skin and Whiten Teeth AI tools apply localized, subtle adjustments that enhance the subject without removing the film’s character or making the skin look plasticky. The Subject Mask tool allows the AI to automatically identify and isolate the main subject for targeted enhancements.
The end-to-end Imagen workflow transforms the post-production experience. It starts by quickly shortlisting the best photos using AI Culling, which even applies your desired Gold 200 previews for quick selection. The system then applies your customized film aesthetic, correcting for light differences in each frame. Crucially, your aesthetic isn’t static; it constantly evolves through the Fine-Tune process.
Seamless Integration and File Security
Imagen recognizes that not every professional relies solely on Lightroom Classic. When you edit a RAW file in Adobe Camera Raw (ACR) via Photoshop or Bridge, the edit data is typically saved in an XMP sidecar file next to the original RAW file. Seamlessly, when using non-Classic Adobe tools, Imagen simply reads the XMP data from your original photo folders for training and then writes the new, edited XMP data back to those same folders. This flexibility means you don’t have to change your working environment to benefit from the speed of AI editing.
For professional photographers handling gigabytes of RAW files, a robust backup and storage solution is non-negotiable. Integrated Backup within Imagen, when uploading a project for culling or editing via a Lightroom Classic catalog, automatically backs up the high-resolution files to the cloud in the background without interrupting your primary workflow. You can choose to back up Original photos or Optimized photos. Why is this relevant to the Gold 200 preset? Because your beautifully crafted film emulation only matters if the original files are safe.
Alternatives and the Value of a Nuanced Approach
While many vendors offer large packs of presets and profiles that claim to replicate hundreds of film stocks, these tools often rely on a foundational preset structure. Their effectiveness, however, still relies entirely on the photographer’s ability to correct White Balance and Exposure manually before applying the look, making the workflow non-scalable.
Manual outsourcing services can provide exceptional quality control and the ability to articulate subjective style points, but they are highly dependent on communication, can be costly, and typically result in slower turnaround times. Alternative RAW processors like Capture One or DXO PhotoLab offer their own tools and color science engines with film simulation options, but the depth of emulation and workflow integration can vary.
A professional workflow demands more than just a beautiful preset. It requires robust tools that support integration across various platforms and prioritize file security. Imagen offers seamless Extended Adobe Compatibility, allowing users of Lightroom, Photoshop, and Bridge to integrate effortlessly. Furthermore, the integrated Cloud Storage provides a secure, efficient, single-platform solution for backing up and managing high-resolution files.
The quest to perfectly translate the Kodak Gold 200 aesthetic to digital is entirely worthwhile. It’s about more than just applying a filter; it’s about understanding the essence of the film and leveraging technology to achieve that look consistently and efficiently. While free presets offer a starting point, the true power lies in a deeper understanding and the application of advanced tools that adapt to the complexities of real-world shooting and editing. The Kodak Gold 200 look, with its warm tones and nostalgic feel, continues to captivate, and with the right approach, its digital emulation can be a powerful asset in any photographer's arsenal.