The digital canvas of Adobe Photoshop offers boundless creative possibilities, from intricate photo retouching to the creation of complex graphic designs. To achieve pixel-perfect layouts and ensure precise object placement, Photoshop provides powerful tools: grids and guides. These visual aids act as an invisible framework, helping designers, photographers, and digital artists maintain accuracy and consistency in their work. Whether you're crafting a poster, designing a website, or fine-tuning a photograph, understanding how to effectively use grids and guides can significantly elevate the quality and professionalism of your final output.
The Fundamental Role of Grids and Guides
At their core, grids and guides in Photoshop serve as invaluable aids for creating meticulously organized and accurately positioned elements within your project. A grid manifests as a wireframe mesh overlaying your image, offering a structured background for alignment. Conversely, guides are customizable, pinpointed lines that allow for the precise positioning and alignment of objects or text. The utility of these tools is readily apparent: imagine wanting to place text at a very specific location in a photograph. While one could resort to tedious trial and error, the Photoshop grid provides an elegant and efficient solution. This inherent capability to facilitate accurate layouts and element positioning is the basic concept behind the Photoshop grid.
Understanding the Grid Overlay
The visual appearance of the grid overlay, often appearing grayish-black, is a stylistic choice that can be customized. This overlay is not merely decorative; it’s a functional tool designed to enhance precision. The grid’s primary function is to provide a visual reference point, enabling users to align elements with a high degree of accuracy. This is particularly crucial in fields like web design, where exact pixel dimensions and alignment are paramount for user experience and aesthetic appeal. For photographers, grids can help in straightening horizons or ensuring symmetrical compositions.
Activating and Customizing Your Grid
Turning on and configuring the grid in Photoshop is a straightforward process, yet it offers a wealth of customization options to suit diverse project needs.
Enabling the Grid
To bring the grid into view, navigate to the View menu at the top of your Photoshop workspace. From the dropdown, select Show, and then click on Grid. Instantly, a grid will appear overlaid on your document. For a quick toggle, you can also use the keyboard shortcut: Ctrl + ' (on Windows) or Cmd + ' (on Mac). This shortcut allows you to rapidly show or hide the grid without needing to navigate through menus, which is exceptionally useful when you want to quickly check the visual impact of your design without the grid's distraction.
Customizing Grid Settings
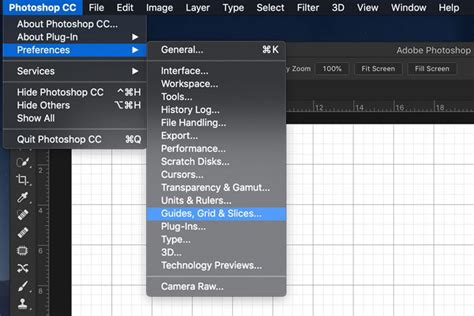
The true power of Photoshop's grids lies in their extensive customizability. You can tailor the grid to your specific workflow and project requirements by accessing the preferences. Go to Photoshop > Preferences > Guides, Grid, and Slices (or Edit > Preferences > Guides, Grid, & Slices on Windows). This opens a dialog box where you have complete control over the grid's appearance and behavior.
Grid Color and Style
Within the grid preferences, you can define the color of the grid lines. The default grayish-black is often chosen for its unobtrusive nature, but you can select any color that best complements your image or design. The advice given is to use colors that have very little presence in your images, ensuring the grid doesn't obscure the actual content. For instance, using a black grid on a night scene or a white grid on a daylight scene would render the grid practically invisible. You can also choose the type of line for your grid, with options including solid lines, dashed lines, or dots. While lines often offer the best visibility, some designers find them distracting. The choice here is largely a matter of personal preference and the specific demands of your project.
Grid Spacing and Subdivisions
One of the most critical parameters for grids is the distance between grid lines. This setting dictates how often Photoshop should repeat the grid lines. You can change both the distance and the unit of measurement. For web work, using pixels is standard. However, if you are creating images for print, you might opt for inches or centimeters. For example, if you are designing for a 1024 x 768 pixel monitor resolution, setting up your new document as 960 pixels wide and 768 pixels high is a common practice. Then, within the grid preferences, setting the "Gridline every" option to 80 pixels would create a twelve-column grid across a 960-pixel document.
Furthermore, you can divide each grid line into any number of subsections. This feature is incredibly useful for creating modular layouts or for finer alignment needs. You can choose a different number of subdivisions at your convenience. For instance, one could decide to have grid lines every 100 pixels and four subdivisions per grid line. This means each of the main grid lines would contain four subdivisions of 25 pixels each. To better visualize the difference between subdivisions and grid lines, especially when working with smaller pixel dimensions, you might increase the primary grid line spacing.
Leveraging Snapping for Enhanced Precision
The concept of "snapping" in Photoshop is a powerful feature that significantly streamlines the design and editing process by making your elements automatically align to specific visual aids.
Understanding Snap Functionality
Snapping is not a social media platform, but rather a tool designed to make your life in Photoshop much easier. When snapping is enabled, objects, selections, and even brush strokes will automatically “stick” to the nearest grid line, guide, or other defined edges. This eliminates the need for painstaking manual alignment and ensures that elements land precisely where you intend them to.
Activating Snap to Grid
To enable snapping to the grid, go to the View menu, select Snap To, and then check Grid. Once this is selected, you will find that objects will automatically click or snap into place on your grid lines as you move them. This feature is invaluable for creating consistent spacing and accurate alignment, especially when working with multiple elements.
The Snapping Shortcut
As a shortcut for ensuring your object or text snaps right into place in accordance with the grid, you can often leverage modifier keys. While the primary activation is through the menu, holding down the Shift key while dragging an object can sometimes enhance snapping behavior or temporarily enable a specific type of snap. Experimentation with these shortcuts can lead to a more fluid workflow.
How to Turn on Snap in Photoshop
Introducing Guides: Customizable Alignment Lines
While grids offer a uniform structure, guides provide a more flexible and personalized approach to alignment. They are indispensable for marking specific positions or creating custom layouts.
Creating Guides
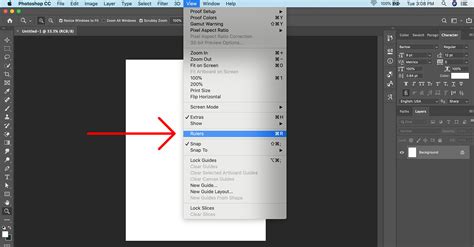
To create a guide, you first need to ensure your rulers are visible. Go to View > Rulers. Once the rulers are displayed along the top and left edges of your document, you can create a guide by placing your cursor on the vertical ruler and dragging it onto your canvas. Similarly, you can drag from the horizontal ruler to create a horizontal guide. The cursor will change to indicate that you are about to place a guide.
Manipulating Guides
Once created, guides can be easily repositioned. With the Move Tool (V) selected, simply click and drag a guide to its new location. To delete a guide, you can drag it off the canvas or select it and press the Delete key. A convenient shortcut for deleting a guide is to Option-click (Mac) or Alt-click (Windows) directly on the guide.
Locking and Clearing Guides
To prevent accidental movement of your guides, you can lock them in place. Navigate to View > Lock Guides. When guides are locked, they cannot be moved or deleted until they are unlocked. To remove all guides from your canvas at once, go to View > Clear Guides.
Smart Guides: Automatic Alignment Assistance
Photoshop also features "Smart Guides," which are incredibly helpful for aligning objects relative to each other or to the document edges. When Smart Guides are enabled (View > Show > Smart Guides), they automatically appear as you move or create objects, providing visual cues for alignment. This feature is particularly useful when working with multiple layers or complex compositions, as it offers real-time feedback on how elements are aligning.
Advanced Grid and Guide Techniques
Beyond the basic activation and customization, Photoshop offers advanced features and techniques for utilizing grids and guides to their full potential.
The Rule of Thirds Grid
A common compositional technique in photography and design is the "Rule of Thirds," which divides an image into nine equal parts by two horizontal and two vertical lines. To display this grid, you can customize your standard grid settings. Go to Preferences > Guides, Grid & Slices. Set the "grid lines every" feature to percent and the subdivisions to three. This will create three grid lines in every 100 percent of the canvas layout, effectively displaying the Rule of Thirds.
New Guide Layout
For more complex layout structures, such as creating a multi-column grid for a brochure or a comic book, Photoshop's "New Guide Layout" feature is invaluable. Navigate to View > New Guide Layout. Here, you can specify the target (Canvas, Artboard, etc.), guide color, the number of columns and rows, their width and height, gutter spacing (the space between columns/rows), and margins. You can also save custom guide layouts as presets for future use.
Creating Guides from Shapes
A powerful, albeit less commonly known, feature is the ability to create guides directly from shapes. If you have a shape layer selected, you can go to View > New Guide From Shape. This will convert the boundaries of your selected shape into guides, which can be extremely useful for precise alignment and replication. This capability extends to Type layers and pixel-based layers as well.
Pixel Grid for Fine Detail Work
When working at very high zoom levels (above 500%), Photoshop displays a "Pixel Grid." This grid shows individual pixels and can be crucial for tasks that require absolute pixel-level precision, such as aligning vector shapes to ensure they start and end on full pixels, thereby avoiding anti-aliased edges. The "Snap Vector Tools and Transforms to Pixel Grid" preference in Photoshop's preferences can further enhance this capability.
Practical Applications and Use Cases
The application of grids and guides extends across various creative disciplines, significantly enhancing workflow and final output quality.
Layout and Composition in Design
For graphic designers, grids are fundamental for creating balanced and visually appealing layouts. They help in aligning text, images, and other design elements, ensuring a consistent and professional look. Whether designing a poster, a brochure, or marketing materials, grids provide the underlying structure for a well-organized composition. The "Rule of Thirds" and "Golden Ratio" are compositional techniques that can be easily implemented using guides.
Precision in Photography and Photo Editing
Photographers can utilize grids to straighten horizons, ensure symmetrical compositions, or precisely crop images. During post-production, grids help in aligning elements that might be slightly off, such as architectural features or background elements, ensuring a polished final image. For instance, if a building in the background of a portrait appears slightly tilted, a grid can assist in correcting this distortion.
Web and UI/UX Design
In web design and user interface (UI) development, grids are paramount. They ensure that elements are aligned correctly, spacing is consistent, and the overall layout is responsive and user-friendly. Designing with a grid in mind from the outset helps in creating a structured and scalable design that translates well across different screen sizes and devices.
Creating Symmetrical Artwork
For artists creating symmetrical designs, such as mandalas or character art, a central vertical guide is an indispensable tool. By mirroring elements across this guide, perfect symmetry can be achieved, resulting in a clean and balanced aesthetic.
Proportional Character and Object Design
When designing characters or complex objects, maintaining correct proportions is crucial. Rulers and grids allow designers to measure and scale elements accurately in relation to each other, ensuring a cohesive and proportionally sound final design.
Learning and Mastering Photoshop's Precision Tools
Adobe offers a wealth of resources for those looking to deepen their understanding of Photoshop's capabilities, including its grid and guide tools.
Adobe Tutorials and Resources
Adobe provides numerous official tutorials, tips, and courses that cater to both beginners and experienced users. These resources are often short, concise, and focused, allowing for efficient learning of specific techniques. Engaging with these materials can help users discover advanced tricks and best practices for using grids and guides effectively.
Photoshop Bootcamps and Courses
For intensive, hands-on learning, Photoshop bootcamps and specialized courses are an excellent option. These programs offer structured guidance, expert support, and practical experience with the software, allowing participants to gain proficiency in a relatively short period.
Freelancing and Practice
Actively using Photoshop for freelance projects or personal endeavors is one of the best ways to enhance skills. The practical application of tools like grids and guides in real-world scenarios solidifies understanding and helps in developing an intuitive workflow.
By mastering the grid and guide tools in Photoshop, designers and artists can unlock a new level of precision and control, transforming their creative visions into perfectly crafted digital realities. These tools are not just for making things look neat; they are fundamental to creating professional, functional, and aesthetically pleasing designs that meet the demands of modern digital and print media.