For a considerable period, Adobe Premiere Pro and Apple’s Final Cut Pro reigned as the predominant non-linear editors (NLEs) in the market. However, an unexpected contender has emerged in recent years, steadily establishing itself as a significant force within the industry. DaVinci Resolve, initially conceived as an advanced color grading application, underwent a substantial transformation after being acquired by Blackmagic Design in 2009. Since then, DaVinci Resolve has evolved into one of the most powerful editing applications available, catering to both professional video creators and aspiring amateurs.
This beginner’s tutorial to DaVinci Resolve aims to cover all essential aspects of editing video with this versatile platform. Users of DaVinci Resolve 17 and DaVinci Resolve 18 will find this guide readily applicable. We will explore a variety of editing techniques and workflows, compatible with both Mac and Windows operating systems.
It's important to note that while DaVinci Resolve excels in many areas, it is not a comprehensive solution for captioning and transcribing videos. For such functionalities, external tools like Simon Says, along with its integrated Resolve extension, are recommended.
Understanding the Editing Interface in DaVinci Resolve
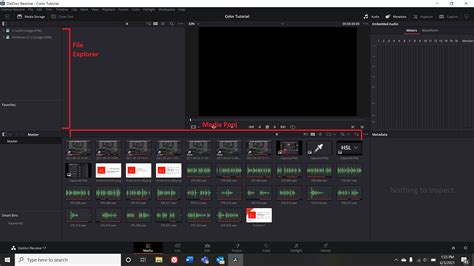
DaVinci Resolve might initially appear complex, but its interface is designed to be quite intuitive once you become familiar with its layout. Upon launching DaVinci Resolve, you will be presented with a pop-up window that allows you to create a new project or open existing ones. Once a new project is created, an empty DaVinci Resolve window will appear, featuring seven distinct workstations accessible from the bottom of the screen. These "pages" serve as your primary navigation within Resolve.
The Seven Workspaces of DaVinci Resolve
Media Page: This page opens by default and is your gateway to importing footage, creating new bins (folders), and managing timelines with ease. It’s where your raw assets are organized before editing begins.
Cut Page: Designed for rapid editing, the Cut Page offers a streamlined timeline editor. It's ideal for creating first, rough cuts of your video or for quickly scrubbing through footage to identify the best B-roll clips.
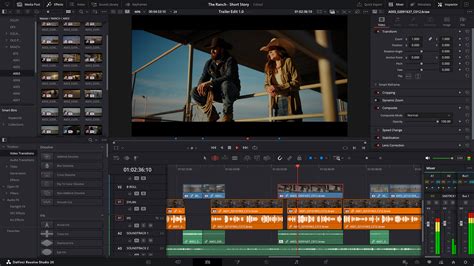
Edit Page: Often referred to as the "swiss army knife" of DaVinci Resolve, the Edit Page is where most editors will spend the majority of their time. It provides easy access to scaling options, transitions, the effects library, and a straightforward way to manage video clips.
Fusion Page: This is an incredibly advanced visual effects editor. It offers a vast array of compositing and plugin options, along with powerful tools for creating stunning motion graphics. The Fusion page utilizes a node-based editor, which, despite a steep learning curve, can yield exceptional results once mastered.
Color Page: DaVinci Resolve’s renowned strength lies in its Color Page, a dream for colorists. It houses an extensive suite of sophisticated tools for color correction and color grading, including readily available LUT presets.
Fairlight Page: This page is a boon for those working with extensive audio files. Audio monitors are easily accessible at the top, while a comprehensive timeline at the bottom allows for intricate audio editing and mixing.
Deliver Page: The final destination for your project, the Deliver Page allows you to export your finished video creation to your computer or directly to various social media platforms.
Experimenting with each workspace is encouraged to discover which best suits your individual needs and workflow. You also have the flexibility to customize your workspace and create saved layouts for quick access. Further customization extends to keyboard layouts, with detailed guides available for understanding keyboard customization and shortcuts within DaVinci Resolve.
Project Management and Media Import
Creating a New Project
As mentioned, the option to create a new DaVinci Resolve project is available immediately upon opening the software. Alternatively, you can initiate a new project by navigating to File > New Project.
DaVinci Resolve's project management system is built around a disk database. Instead of saving individual project files scattered across your hard drive, your projects are centrally stored, simplifying organization and retrieval. For this beginner’s tutorial, we've focused on setting up a project for individual use.
Upon the first launch of DaVinci Resolve, you'll encounter the Project Manager page. From here, select "New Project." You'll then be prompted to give your project a name before clicking "Create."
Before diving into editing, it’s advisable to adjust your project settings. Access this by going to File > Project Settings or by clicking the cog icon in the lower right-hand corner of the interface. While many settings can be left at their defaults for now, it's crucial to ensure your Timeline frame rate and Timeline resolution align with the video files you intend to import. These settings are typically found under the "Master Settings" section. If you're unsure, you'll have another opportunity to adjust the frame rate when importing your footage.
Importing Media
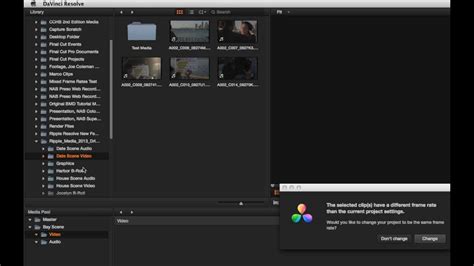
To begin any creative endeavor, you'll need to import your media. Importing video clips is as simple as going to File > Import > Media or using the keyboard shortcut ⌘I on Mac or CTRL + I on Windows. You can also drag and drop footage directly from your file explorer into your media pool.
Performing this action within the Media Page grants you access to all your footage metadata upon clicking on a clip. You can also mark specific sections of your footage by using the "Mark In" and "Mark Out" arrows located beneath the playback window. Marking in and out points is incredibly useful for selecting particular segments of your footage, which is particularly handy when incorporating B-roll.
Working with Timelines and Clips
Creating and Managing Timelines
Once your media is imported, the next step is to organize it within a timeline. To create a new timeline, right-click within the media pool and select Timelines > Create New Timeline (or use ⌘N on Mac and CTRL + N on Windows). You can also access this function via File > New Timeline.
A pop-up window will then appear, allowing you to configure your timeline settings. By default, the timeline will adopt your project's settings. You can modify these project settings by clicking the gear icon in the lower right-hand corner, adjusting parameters such as frame rate and resolution. If you require your timeline to differ from your project settings, deselect the "Use Project Settings" checkbox. This action unlocks options to change the timeline's format.
After creation, your new timeline will automatically appear in the media pool. To enhance organization, you can create new bins (folders) by right-clicking in the media pool and selecting "New Bin." These bins can house footage, timelines, audio files, and other project assets, ensuring a tidy workspace.
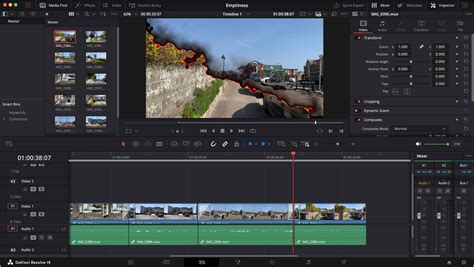
Editing Clips in the Timeline
To place footage into your timeline, simply drag and drop it from the media pool. The top section of the timeline provides a suite of editing tools to manipulate your footage:
Selection Mode (Hotkey “A”): This is your primary tool for moving footage around the timeline. You can shorten or lengthen clips by dragging their edges, indicated by a white marker.
Trim Mode (Hotkey “T”): This mode allows you to trim clips without affecting the surrounding clips or the overall timeline structure.
Dynamic Trim Mode (Hotkey “W”): This advanced trimming mode allows you to trim or move clips while actively editing, without interfering with other elements on the timeline.
Blade Tool (Hotkey “B”): This tool enables you to create precise cuts within your footage. A visible line will appear on your footage, indicating the point of the cut.
Incorporating Audio and Music
Audio and music are integrated into your project much like video footage. Importing audio and music clips follows the same process: File > Import > Media or ⌘I / CTRL + I. You can also drag and drop audio files directly from your file explorer into the media pool.
The Fairlight Page is where audio editing truly shines. This dedicated audio workspace provides quick and easy access to a comprehensive range of audio effects and mixers, allowing for professional sound design and mixing.
Adding Effects and Transitions
Applying Transitions
Adding transitions in DaVinci Resolve is a straightforward process, similar to applying video effects. While transitions can be created manually, most users opt for the readily available templates.
Transitions can be accessed by clicking the "Effects" icon (often depicted as a magic wand) in the upper left-hand corner of the interface. This action opens a small window at the bottom of the screen, categorizing video transitions, audio transitions, motion graphics, and OpenFX plugins.
To apply a transition, simply drag and drop your desired effect onto the desired location in your timeline, typically between two video clips. Right-clicking on a transition allows you to add it to your favorites for quick access, which is incredibly handy for frequently used effects. The duration of a transition can be adjusted by scaling the white transition box that appears over the footage.
Introduction to DaVinci Resolve - [Full Course] for Beginners (2026)
Utilizing Effects
DaVinci Resolve comes bundled with numerous high-quality plugins that allow for the addition of various effects to your videos. While some of the newest and most advanced effects may be exclusive to the paid DaVinci Resolve Studio version, the free version still offers a substantial library of effects to explore.
Within the Effects Library, you can navigate to categories like "OpenFX" for a wide range of creative options. For instance, applying a "Vignette" effect can subtly enhance the focus of your footage. You can also apply effects to an entire section of your timeline by using "Adjustment Clips." These are found under Effects Library > Effects > Adjustment Clip and can be dragged onto a new layer in the timeline, affecting all clips below them.
Furthermore, the software can be enhanced by adding custom templates and macros. Since DaVinci Resolve 18, the proxy workflow option has been significantly improved and expanded, making the creation, management, and switching between proxy and full-resolution media much more efficient.
Color Grading and Correction in DaVinci Resolve
Understanding the Color Page
The Color Page is the heart of DaVinci Resolve's color manipulation capabilities, offering a professional-grade environment for colorists. Before embarking on color grading, it's essential to visit Project Settings (accessible via the gear icon). Within Project Settings, navigate to the Color Management tab to adjust your color space settings.
Color spaces dictate how DaVinci Resolve processes the color information within your footage. For beginners, the key settings to focus on are "Color Science," "Color Processing Mode," and "Output Color Space." It's generally recommended to leave these at their default values when starting out.
DaVinci Resolve employs a Node Editor for its coloring process, a feature that distinguishes it from many traditional NLEs. Nodes offer an exceptional level of control, allowing for the precise connection of different effects in a web-like structure, known as a node tree.

Creating a new node is as simple as right-clicking within the node editor and selecting Add Node. Each node can be assigned different effects and color adjustments, facilitating an incredibly fast and intuitive workflow.
At the bottom of the Color Page, you'll find a comprehensive array of powerful color tools, each represented by an icon:
Curves: Provides granular control over basic coloring features. The RGB Curve, for instance, is used to adjust image contrast. A simple "S curve" can effectively boost highlights and deepen shadows. Curves are created by clicking on the line within the color graph to form a draggable dot. Right-clicking the dot resets the curve.
Primary Wheels: These are the cornerstone of color adjustments in DaVinci Resolve. Similar to curves but in a wheel format, they include:
- Gain Wheel: Adjusts the intensity of highlights.
- Lift Wheel: Controls the intensity of shadows.
- Gamma Wheel: Manages the intensity of mid-tones.
- Offset Wheel: Affects the entire image's brightness and color balance.You can also shift the color of your shadows, highlights, and mid-tones by moving the white dot within the wheels towards a specific color.
Scopes: Located on the lower right-hand side, the Scopes panel is crucial for accurately assessing your image's exposure levels. Human perception of color can be unreliable, and monitor calibration can vary, making scopes an indispensable tool for achieving true color accuracy. Clicking the drop-down menu at the top of the Scopes panel allows you to display various scope types, each serving different analytical purposes.
Color Correction Techniques
For basic color correction, you can utilize the "Black Balance" and "White Balance" tools. The Black Balance tool (represented by a crosshair with a black box) helps set the black level by allowing you to select an area in your shot that should be pure black. If your shot is too dark, dragging the "Lift" slider (below the trackball) can restore detail in the shadows.
Similarly, the White Balance tool (found in the lower left of the Color page) assists in setting the white level by enabling you to select an area that should appear white. If your shot is too washed out, adjusting the "Gain" slider can bring back detail in the highlights. The "Sat" value controls the overall color saturation of your image.
The Magic Mask tool has also been enhanced to support object selection and tracking, simplifying the isolation and adjustment of specific elements within a scene. While tools like the "Object Removal" feature exist, they are more advanced and beyond the scope of this introductory tutorial.
Adding Text and Titles
Creating Text Elements
To incorporate text into your DaVinci Resolve project, navigate to the Effects Library in the top left-hand corner. This will reveal a small pop-up window in the lower left-hand corner. You can create basic text by selecting "Title" and then "Text." Dragging and dropping this "Text" icon onto your timeline will generate a simple text layer.
You can then edit the text's properties, such as font, size, color, and position, within the video tab located in the upper right-hand section of the screen. Additional options for visual enhancements like drop shadows and background shapes are also available. For animated text, you can utilize keyframes within the video tab by clicking the diamond icon next to any effect.
DaVinci Resolve offers two primary text tools: "Text" and "Text+". The "Text" option is ideal for quickly generating 2D titles. You can modify fonts, add drop shadows, and even include a colored background shape to help the text stand out. "Text+" is a more sophisticated tool, leveraging Blackmagic's compositing software, DaVinci Resolve Fusion. While "Text+" provides greater creative possibilities, it can be more demanding on your computer's resources and may have a steeper learning curve.
Pro Tip: Always double-check that you have selected the correct title before making edits, as you need to manually click on the title in the timeline first.
Exporting Your Project
Delivering Your Final Video
Once your project is finalized - with all clips, transitions, titles, and other elements in place - it's time to export. Ensure your project is loaded in Resolve and that all components are precisely as you intend them to be. It's also wise to revisit the Project Settings tab (the gear icon) to confirm all export parameters are correct.
After confirming all settings, navigate to the Deliver page. By default, this page is set to "Custom Export," but a comprehensive list of presets is available for various platforms and formats.
Once you are completely satisfied with all export settings, scroll to the bottom of the export tab and click "Add to Render Queue." This action adds your file to the right-hand side of the screen under the "Render Queue" tab. You can add multiple projects to the queue for simultaneous rendering.
For a more in-depth understanding of exporting in DaVinci Resolve, a dedicated article is available that details everything you need to know.
Advanced Features and Workflow Enhancements
Multicam Editing
While multicam editing might seem complex for a beginner’s tutorial, DaVinci Resolve offers robust multicam tools. DaVinci Resolve 18 and later versions feature improved syncing options and proxy handling, which significantly streamline multicam edits, especially for remote or collaborative projects.
Proxy Workflows
DaVinci Resolve's proxy workflow has seen substantial improvements, making it easier to create, manage, and switch between proxy and full-resolution media. This is particularly beneficial for those working with high-resolution footage or on less powerful hardware, as it allows for smoother playback and editing.
Keyboard Customization
Customizing keyboard shortcuts can dramatically speed up your editing workflow. DaVinci Resolve allows you to assign shortcuts to virtually any command or tool. You can access keyboard customization from the DaVinci Resolve menu at the top left of the screen. The visual interface displays all available commands and their assigned shortcuts, making it easy to identify and reassign keys.
Subtitle and Captioning Tools
The Edit page includes an intuitive set of tools for closed captioning and subtitles, supporting the import of various file formats like TTML, SRT, and XML. You can relink subtitle entries in the media pool or create them from scratch, eliminating the need for expensive third-party software. Subtitles appear in the timeline above your video tracks and can be moved and trimmed like any other media.
Markers
Markers are small indicators that can be placed on clips or timelines to serve as reminders for specific tasks or points of interest during the editing process. They are invaluable for organizing complex projects and ensuring that no detail is overlooked.
Exploring Further with DaVinci Resolve
DaVinci Resolve is an incredibly powerful and versatile software, offering a free version that is perfectly suited for both professionals and beginners. The constant addition of new features and its robust capabilities ensure that it remains a top choice for video editing.
With this guide, you now possess a solid foundation for getting started with DaVinci Resolve. As you become more comfortable with the basics, you can begin to explore the more advanced pages like Fusion for visual effects, Color for intricate grading, and Fairlight for sophisticated audio post-production. Don't forget that leveraging DaVinci Resolve LUTs and intro templates can further enhance your creative output.
For those looking to deepen their understanding, Blackmagic Design offers certified training programs with curriculum designed for both new users and established professionals. These hands-on lessons cover a wide range of topics, from cutting interviews and dramatic scenes to mastering sound editing, color correction, and visual effects compositing.
Whether you are new to video editing or seeking to transition from another NLE, DaVinci Resolve provides the tools and flexibility to elevate your creative projects. The journey from opening the software for the first time to sharing your finished video project is an exciting one, and DaVinci Resolve is an excellent companion for that endeavor.