Adobe Photoshop stands as a cornerstone in the realm of digital art and image manipulation, an indispensable tool for professionals and hobbyists alike. Its versatility spans graphic design, photography, web development, and even casual photo enhancement for personal use. While the sheer volume of tools and features can present a learning curve, understanding its fundamental concepts unlocks the door to creating impressive digital artwork. From intricate photo composites to simple adjustments, Photoshop empowers users to transform their creative visions into reality.
The Foundation: Understanding the Photoshop Workspace and Core Concepts
Upon launching Photoshop, you're greeted by the workspace, a dynamic environment designed for efficient editing. At its heart lies the canvas, your primary working area, which can be customized to any desired size. When starting a new project, it's often beneficial to select a blank document preset, readily accessible through tabs at the top of the window. These presets often pre-configure essential settings, allowing you to dive into your creative process more quickly.
Resolution, Color Modes, and Layers: The Building Blocks of Your Image
Two critical settings to consider when creating a new document are resolution and color mode. Resolution dictates the level of detail in your image by defining the number of pixels packed into a single square inch. A higher pixel density (measured in pixels per inch, or ppi) results in a more detailed image, but also a larger file size. For standard web use, 72 ppi is typically sufficient, while print projects often require higher resolutions.
The color mode determines how colors are calculated and displayed within your image. RGB Color is the standard for digital displays and web content. For professional printing, CMYK Color is generally used. Within any color mode, a higher bit depth allows for a broader spectrum of colors to be displayed, offering greater nuance and fidelity.
Perhaps the most crucial concept in Photoshop is layers. Think of layers as transparent sheets stacked upon one another. Working in layers allows you to add, adjust, and manipulate different elements-be it portions of photos, text, shapes, or textures-independently, without affecting the content on other layers. This non-destructive workflow is paramount, as it enables you to easily undo or refine any changes you're not satisfied with.
When you create or open a new image, you begin with a single Background layer. This layer is often locked by default. To unlock it and convert it into a regular layer, you typically need to double-click it in the Layers panel and confirm in the subsequent dialog box. If the Layers panel is not visible, you can open it by pressing F7 on your keyboard or by navigating to the "Window" menu and selecting "Layers."
Navigating the Layers Panel: Control and Organization
The Layers panel, usually found in the bottom-right area of the workspace, is your command center for managing layers. Each layer has an eyeball icon next to its name, which toggles its visibility. This is incredibly useful for comparing different versions of your work or for isolating specific elements. You can also lock layers by clicking the padlock icon to prevent accidental alterations.
To create a new layer, you can click the "Create a New Layer" button (a small square with a plus sign inside) at the bottom of the Layers panel, or go to the "Layer" menu and select "New" > "Layer." Edits made to a specific layer will only impact that layer, though layer modes (set to "Normal" by default) can alter how layers interact with those below them. Experimenting with different layer modes can unlock a wide array of creative effects.
When you're ready to combine multiple layers into a single one, you can hide the layers you don't want to merge by clicking their eye icons. Then, select the layers you wish to combine and go to the "Layer" menu, choosing "Merge Layers." To merge all visible layers into one, select "Flatten Image."
Essential Tools for Image Manipulation and Creation
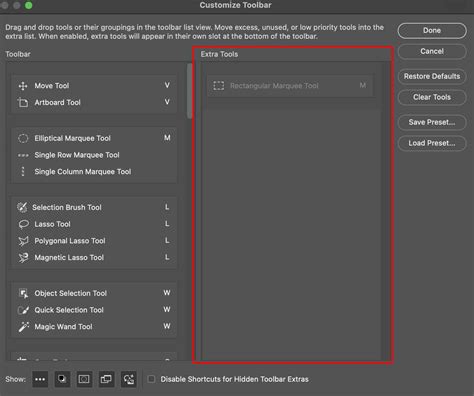
The toolbar, a vertical bar typically located on the left side of the workspace, houses the vast array of tools Photoshop offers. Understanding the function of these tools is key to effective image editing.
Selection Tools: Isolating and Manipulating Parts of Your Image
Selection tools are fundamental for isolating specific areas of an image for editing.
- Marquee Tools: Found by clicking and holding the square icon made of a dotted line, these tools allow you to make selections with predefined shapes, such as rectangles and ellipses.
- Lasso Tools: For more freeform selections, the lasso tools are invaluable. The standard lasso lets you draw a freehand selection, while the magnetic lasso attempts to snap to the edges of objects, making it easier to trace outlines.
- Object Selection Tool: This intelligent tool allows you to simply draw a rough outline around an object, and Photoshop will automatically detect and select it.
- Quick Selection Tool: Often considered one of the most useful, this tool works like a brush, allowing you to "paint" over an area to select it. It's a combination of the Magic Wand and Magnetic Lasso, efficiently selecting pixels based on color and texture.
- Magic Wand Tool: This tool selects pixels of similar color. The tolerance setting in the options bar controls how picky it is about selecting similar colors.
Once an area is selected, you'll see "marching ants" - a blinking, dashed line - outlining the selection. You can then copy, edit, or remove the selected content. To deselect an area, press Control + D (on Windows) or Command + D (on Mac).
Brushes and Painting Tools: Adding and Modifying Pixels
Brushes are used to add pixels to an image, effectively allowing you to paint or draw.
- Brush Tool: This is the primary tool for painting. You can adjust its size, hardness (which affects the sharpness of the brush edge), and opacity (how transparent the paint is) in the options bar at the top of the workspace.
- Eraser Tool: Used to remove pixels from a layer.
- Blur Tool: This tool softens and diffuses pixels, making areas appear blurry.
- Sharpen Tool: The opposite of the blur tool, it tightens and consolidates pixels, making edges appear sharper.
- Dodge and Burn Tools: These tools lighten (Dodge) and darken (Burn) specific areas of an image, respectively. The Sponge Tool adjusts the saturation of an area. It's wise to duplicate your layer before using these tools to avoid damaging the original image.
Retouching and Repair Tools: Perfecting Your Images
Photoshop offers powerful tools for cleaning up and enhancing photographs.
- Spot Healing Brush Tool: Ideal for removing small blemishes, dust spots, or unwanted objects. Simply click on the area you want to fix, and Photoshop will intelligently blend it with the surrounding pixels.
- Clone Stamp Tool: This tool allows you to sample pixels from one area of an image and paint them onto another. It's incredibly useful for removing larger distractions or for replicating textures.
Shape and Drawing Tools: Incorporating Vector Elements
Beyond pixel-based editing, Photoshop allows for the creation of vector shapes.
- Shape Tools: Found under an icon that typically displays a rectangle, these tools allow you to draw perfect circles, squares, and other geometric shapes. These shapes are vector-based, meaning they can be scaled infinitely without losing quality.
- Pen Tool: A more advanced tool for creating precise paths and custom shapes. It uses anchor points and Bezier curves to define lines and curves, offering a high degree of control.
Text Tool: Adding Typography to Your Designs
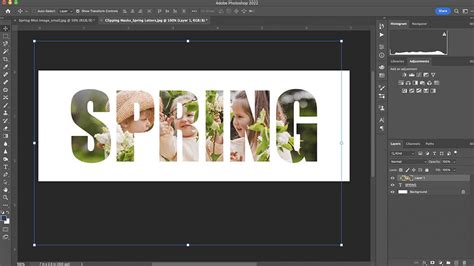
The Text Tool (represented by a "T" icon) allows you to add text to your images. When you select the Text Tool and click on your canvas, it automatically creates a new text layer. You can then type your content, and adjust font, size, color, and alignment using the options at the top of the workspace. For further manipulation, you can convert text to a shape by right-clicking the text layer and selecting "Convert to shape."
Color Selection and Gradients: Setting the Mood
- Color Swatches Panel: This panel displays a range of colors. The foreground and background colors are shown as overlapping squares. Clicking on these squares allows you to select new colors from a color picker.
- Eyedropper Tool: If you want to sample a color that already exists in your image, use the Eyedropper Tool. Click on the desired color, and it will be set as your foreground color.
- Gradient Tool: This tool creates smooth transitions between multiple colors. You define a starting and ending point, and Photoshop blends the selected colors along that line.
Advanced Techniques and Creative Possibilities
Once you have a grasp of the basic tools, you can explore more advanced features to elevate your creations.
Layer Masks: Non-Destructive Editing for Precision
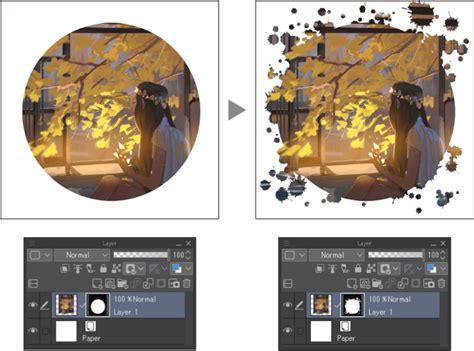
Layer masks are a powerful non-destructive editing technique. They allow you to selectively hide or reveal parts of a layer without permanently deleting pixels. When you create a layer mask, it appears as a thumbnail next to the layer's image thumbnail in the Layers panel. Painting with black on the mask hides the layer's content, while painting with white reveals it. Shades of gray create semi-transparency. This is invaluable for compositing images, such as adding a person from one photo into a landscape.
Adjustments and Filters: Transforming Your Images
Photoshop offers a vast array of adjustments and filters to modify the appearance of your images.
- Adjustments: Found under the "Image" menu, options like Levels and Curves allow you to control an image's brightness, contrast, and color balance. Levels lets you define absolute white and black points, while Curves provides more granular control over tonal range by allowing you to manipulate a graph.
- Filters: The Filter Gallery (accessible via "Filter" > "Filter Gallery") offers a wide variety of artistic and corrective effects. You can use filters like Gaussian Blur to soften an image, Add Noise to create texture, or various distortion filters to create unique visual effects.
Neural Filters: AI-Powered Editing
Neural Filters leverage Adobe Sensei AI to automate complex edits. These smart filters can perform tasks like skin smoothing, colorization of black and white photos, style transfer, and much more, often with just a few clicks. To access them, go to "Filter" > "Neural Filters." You may need to download specific filters before use.
Adobe Photoshop - AI features 2024 - Neural Filters
Transform Tools: Resizing, Rotating, and Warping
The Transform tools (found under "Edit" > "Transform") allow you to scale, rotate, skew, stretch, or warp any selection, layer, or group of layers. This is essential for compositing, correcting perspective, or creatively distorting elements.
Saving and Exporting Your Work
Once your masterpiece is complete, you need to save it appropriately.
- Save Commands: Go to the "File" menu and choose "Save," "Save As," or "Save a Copy."
- Save (.PSD): It's crucial to save your work in Photoshop's native format, .PSD, if you intend to continue editing it later. This preserves all your layers, masks, and other editable elements.
- Exporting to Other File Types: If you're ready to share your image or use it in another application, you'll need to export it to a common file format.
- JPEG: Ideal for photographs and web use, offering good compression with minimal quality loss.
- PNG: Supports transparency, making it suitable for graphics with transparent backgrounds.
- GIF: Also supports transparency and is often used for simple animations.
- PDF: Useful for print documents and sharing vector-based elements.
Photoshop also offers cloud document saving and various export options tailored for different platforms and uses.
Photoshop on the Web and AI Assistant
For quick edits or users who prefer a browser-based experience, Photoshop on the web offers a free, downloadable-free solution. It provides many of Photoshop's core editing tools, allowing you to create and refine images directly in your browser.
Furthermore, the Photoshop AI Assistant (beta) is transforming the editing process. You can describe your desired edits in natural language, and the AI will attempt to complete them, offer suggestions, or provide step-by-step instructions. This generative AI capability allows for rapid image creation and manipulation, bringing ideas to life at the speed of imagination.
With its extensive capabilities, Adobe Photoshop remains an unparalleled tool for digital creativity, empowering users of all skill levels to achieve professional-quality results.