For photographers venturing into the expansive realm of digital imagery, mastering post-processing software is as crucial as understanding aperture or shutter speed. Adobe Lightroom Classic stands as a cornerstone in this domain, offering a powerful suite of tools for organizing, editing, and exporting photographic work. This guide is meticulously crafted for those beginning their journey, aiming to demystify the core functionalities of Lightroom Classic and establish a solid foundation for a professional workflow.
Understanding Lightroom Classic: More Than Just an Editor
Lightroom Classic is not merely a photo editor; it's a comprehensive digital asset management system designed by photographers, for photographers. While other software like Photoshop excels in pixel-level manipulation, Lightroom Classic is optimized for the workflow of managing and processing large volumes of images efficiently. Its primary functions revolve around three key areas: organizing your photos, post-processing them, and exporting them for various uses. This integrated approach streamlines the entire photographic process, from the moment images are captured to their final presentation.
It is important to distinguish Lightroom Classic from its cloud-based counterpart, Lightroom CC. Lightroom Classic is a desktop-based application favored by many professional photographers for its robust features and local control over files. Lightroom CC, on the other hand, is designed for cloud syncing across multiple devices, offering a more accessible, albeit less feature-rich, experience for users on the go. For the purpose of this tutorial, our focus remains squarely on the capabilities of Adobe Lightroom Classic.
The Importance of Organization: Setting Up for Success
A professional workflow in photography hinges on a well-defined system for organizing digital assets. This begins even before images are imported into Lightroom. The initial step involves establishing a dedicated storage solution.
Strategic Storage Solutions
Saving your photographic work directly to your computer's internal drive is a common pitfall for beginners, quickly leading to storage limitations and potential data loss. To circumvent this, investing in an external hard drive specifically for your photography business is highly recommended, regardless of your current experience level. External drives not only free up space on your primary computer but also safeguard your valuable work.
Several reputable and affordable external drive options are available, including the WD My Passport, Seagate Portable Hard Drive, LaCie Rugged Mini External Hard Drive, and the SanDisk Portable SSD. Many photographers have found success with the WD My Passport for its reliability. For those managing a larger volume of work, solutions like the LaCie 2big Dock RAID 16TB offer substantial capacity and performance. Starting with at least 2 terabytes or, ideally, 4 terabytes is a wise initial investment.
Developing a Filing System
Beyond the hardware, a systematic approach to folder organization is paramount. A suggested method is to group your work chronologically by year. Within each year folder, create subfolders for new imports, ideally named using a year-month-date format, followed by a brief description of the shoot. For instance, a shoot from January 15, 2023, might be labeled "2023-01-15_BlueHourSA". Within this dated folder, an additional subfolder labeled "Footage" can be created, with further subdivisions for "Photo Raw" or "Video Raw" if necessary. This structured approach ensures that finding specific images becomes an intuitive and efficient process.
Navigating the Lightroom Classic Interface: Modules and Layout
Lightroom Classic's interface is divided into distinct modules, each dedicated to a specific aspect of the photographic workflow. These modules are typically accessed via tabs located at the top right of the application window.
- Library: This module is your command center for importing, organizing, rating, and selecting images.
- Develop: This is where the magic of post-processing occurs, allowing for detailed adjustments to color, tone, and other image characteristics.
- Map: Used to geotag your photos and view them on a map.
- Book: Facilitates the creation of custom photo books.
- Slideshow: Enables the creation of dynamic slideshows from your images.
- Print: Offers advanced controls for printing your photographs.
- Web: Allows for the creation of web galleries and image exports optimized for online sharing.
While all modules serve a purpose, beginners will find themselves spending the majority of their time in the Library and Develop modules.
The Lightroom Catalog: The Brains of the Operation
A fundamental concept in understanding Lightroom Classic is the "catalog." A Lightroom catalog is a database file that stores all the information about your imported images, including their location on your hard drive, metadata, keywords, and crucially, all the editing adjustments you make.
It's vital to grasp that Lightroom Classic does not alter your original image files directly. Instead, it records your edits within the catalog file. When you export an image, Lightroom applies these recorded edits to create a new, processed file. This non-destructive editing approach is a cornerstone of Lightroom's power, ensuring that your original files remain untouched and can be re-edited at any time.
When you first launch Lightroom Classic, you'll be prompted to create a new catalog. It's a good practice to create a dedicated catalog for your photography work. The location of this catalog file is important; storing it on your primary computer's fastest drive (like an SSD) can improve performance.
Importing Your Images: The Gateway to Editing
The import process is the first step in bringing your photographs into Lightroom's management system.
The Import Dialogue Box
To import images, navigate to the Library module and click the "Import" button in the bottom left corner, or go to File > Import Photos and Video. The Import dialogue box is designed to work logically from left to right.
- Source (Left Panel): This is where you specify where your photos are currently located. This could be a memory card connected to your computer, a folder on your external hard drive, or another location.
- Options (Middle Panel): Here, you choose how Lightroom should handle the files. For new imports, selecting "Copy" is the standard practice. This ensures that your original files remain on the memory card (or source location) while a copy is made to your designated destination. You can also select individual photos to import or "Check All" to import all visible thumbnails.
- Destination (Right Panel): This is a critical step. You must specify where Lightroom should save the copied images on your hard drive. As previously emphasized, this should ideally be your external hard drive. You can also set up file renaming conventions and apply metadata or keywords during the import process, although for beginners, it might be best to focus on establishing a robust folder structure first and handle these elements later.
Adobe Lightroom Classic - Disable auto-opening the Import dialog box
Upon clicking the "Import" button, Lightroom will begin copying and cataloging your selected images. This process can take some time depending on the number and size of the files.
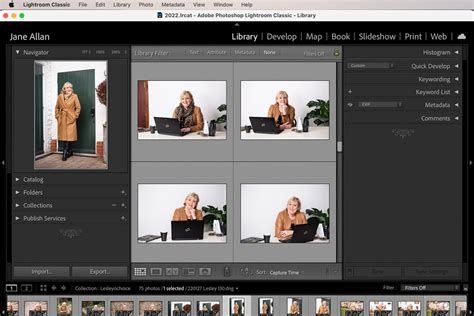
Working in the Library Module: Organization and Selection
Once imported, your photos reside in the Library module. The left-hand panel typically displays your folder structure and any collections you've created. The central area shows either a grid of thumbnails or a single, larger image view.
Grid View and Filmstrip
The default view in the Library module is the "Grid view," presenting thumbnails of your images. This is excellent for quickly scanning through a large number of photos. You can switch to a "Loupe view" (single image) to examine photos more closely. The "Filmstrip" at the bottom of the screen allows you to navigate between images in the Loupe view.
Enhancing Organization: Ratings, Flags, and Collections
Lightroom offers several tools to help you sort and select your best images:
- Flags: You can "Pick" (select) or "Reject" (discard) images. This is a quick way to cull unwanted shots.
- Star Ratings: Assign star ratings (1 to 5) to further categorize your images based on quality or importance.
- Color Labels: Apply color labels for visual cues, perhaps to mark images for specific purposes or clients.
- Collections: Collections are virtual groupings of images. You can add photos to multiple collections without duplicating the actual files on your hard drive, saving valuable disk space. "Smart Collections" are particularly powerful, automatically updating based on criteria you define (e.g., all 5-star photos from a specific date).
The Library Filter Bar, located above the grid view, is an indispensable tool for quickly finding images based on metadata, keywords, ratings, and other criteria. Mastering its use can significantly speed up your workflow.
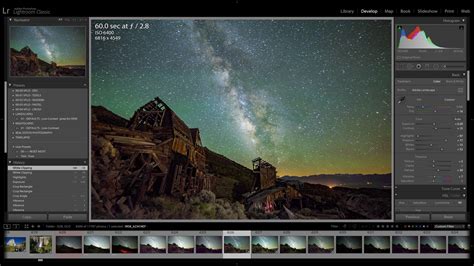
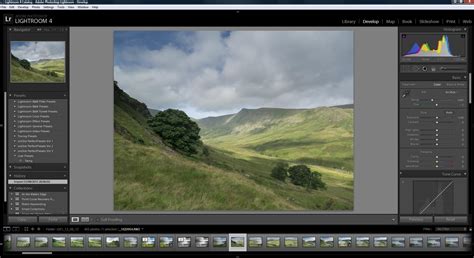
The Develop Module: Unleashing Creative Potential
The Develop module is where the transformative aspect of photography truly comes to life. Here, you can refine your images to match your artistic vision.
Non-Destructive Editing at its Core
As mentioned, all edits in the Develop module are non-destructive. This means your original RAW files remain unaltered. Lightroom records each adjustment in the catalog, allowing you to revert to the original image or modify any edit at any point.
Key Panels and Tools in the Develop Module
The Develop module is organized into various panels, typically on the right-hand side of the screen.
- Basic Panel: This is your starting point for most edits. Here, you can adjust fundamental properties like:
- White Balance: Corrects color casts to ensure accurate colors.
- Exposure: Controls the overall brightness of the image.
- Highlights & Shadows: Recovers detail in the brightest and darkest areas.
- Whites & Blacks: Sets the absolute white and black points for optimal contrast.
- Texture, Clarity, and Dehaze: These sliders help to enhance or reduce detail and contrast in specific tonal ranges. Clarity adds mid-tone contrast, while Dehaze can reduce atmospheric haze or add a dramatic effect.
Tone Curve: Offers more precise control over the tonal range of your image, allowing for nuanced adjustments to contrast and brightness.
HSL / Color: This panel allows for fine-tuning of Hue, Saturation, and Luminance for individual color ranges.
Detail Panel: This section is crucial for sharpening your image and reducing noise.
- Sharpening: Enhances edge detail. It's important to apply sharpening judiciously to avoid introducing artifacts.
- Noise Reduction: Minimizes digital noise, especially in images shot at high ISOs.
Transform Panel: Essential for correcting geometric distortions. You can straighten horizons, correct lens distortions (like barrel or pincushion distortion), and adjust perspective. Professional photographers often place a high emphasis on ensuring their photos are straight and well-composed, and this panel is key to achieving that.
Effects Panel:
- Vignetting: Darkens or lightens the edges of an image, helping to draw the viewer's eye towards the subject.
- Grain: Adds a film-like grain to the image, which can be used for stylistic effect.
Calibration Panel: This panel allows you to adjust the camera's color profiles. It can be used to add a specific "look" or enhance skin tones, for example, by subtly shifting colors.
Local Adjustments: The Power of Masks
Beyond global adjustments that affect the entire image, Lightroom Classic offers powerful masking tools for making localized edits.
- Adjustment Brush: This tool allows you to "paint" adjustments onto specific areas of your image. You can control the brush size, feathering (how soft the edges are), and flow to precisely target areas for adjustments like exposure, white balance, or clarity.
- Gradient and Radial Filters: These tools apply gradual or elliptical adjustments to selected areas.
- AI-Powered Masks: Newer versions of Lightroom Classic include AI-driven masks that can automatically select the sky, subjects, or backgrounds, making complex local edits much more accessible.
The Healing Tool, especially with its content-aware feature, is incredibly useful for removing blemishes, dust spots, or distracting elements from an image. It uses AI to intelligently fill in the selected area, often saving significant time compared to traditional cloning methods.
Exporting Your Images: Sharing Your Work
The final step in the Lightroom workflow is exporting your edited images. This process creates a new file with your chosen settings.
Export Dialogue Box
To export, select your image(s) in the Library module, then go to File > Export. The Export dialogue box offers a wide range of options:
- Export To: Choose whether to export to your hard drive, email, or CD/DVD.
- Export Location: Specify the destination folder for your exported files.
- File Settings:
- File Format: JPEG is the most common format for sharing and printing. TIFF is a higher-quality option for further editing.
- Color Space: sRGB is standard for web use, while Adobe RGB or ProPhoto RGB offer a wider gamut for professional printing.
- Quality: For JPEGs, a quality setting of 80-100 is generally recommended.
- Image Sizing: You can resize your images to specific dimensions or resolutions. For printing, a resolution of 300 pixels per inch is standard.
- Watermarking: You can add a text or graphical watermark to protect your images.
Adobe Lightroom Classic - Disable auto-opening the Import dialog box
By carefully configuring these settings, you can ensure your exported images are optimized for their intended purpose, whether it's for online sharing, professional printing, or submission to clients.
Continued Learning and Practice
This guide provides a foundational understanding of Lightroom Classic. The true mastery of the software comes with consistent practice and further education. Exploring online resources, such as tutorials from Digital Photography School, YouTube channels by professional photographers like Peter McKinnon, and dedicated online courses, will significantly accelerate your learning curve.
Consider enrolling in a comprehensive online course that covers Lightroom Classic in detail. Many courses offer structured learning paths, from basic organization to advanced editing techniques. Furthermore, practicing what you learn by actively importing, editing, and exporting your own photographs is paramount. Don't hesitate to experiment with different tools and settings; this hands-on approach is invaluable for developing your unique style and workflow.
The journey with Lightroom Classic is ongoing. By embracing its organizational capabilities and creative tools, and by committing to continuous learning, you will undoubtedly elevate your photography and unlock new levels of artistic expression.