For years, filmmakers have eagerly awaited a more integrated approach to working with Apple's ProRes RAW codec within the industry-standard DaVinci Resolve. That anticipation has finally been met with Blackmagic Design's official embrace of ProRes RAW across its DaVinci Resolve software and its popular Pocket Cinema Camera 4K. This significant development, long a subject of discussion on Blackmagic's own forums, finally bridges a critical gap for creators, simplifying post-production workflows and expanding creative possibilities.

The Long Road to Native Support
Apple introduced ProRes RAW in 2018, envisioning it as a compressed yet highly flexible codec designed to streamline RAW workflows. Its adoption by major editing platforms like Final Cut Pro, Adobe Premiere Pro, and Assimilate Scratch was swift. However, DaVinci Resolve, a powerhouse for color grading and finishing, remained notably absent from this list. This omission forced many professionals into complex workarounds or software switching when dealing with ProRes RAW footage, a situation that caused considerable frustration.
The delay in integrating ProRes RAW into DaVinci Resolve can be attributed to a delicate strategic balance. Blackmagic Design has its own flagship compressed RAW solution, Blackmagic RAW (BRAW), which is engineered for small file sizes and extensive grading flexibility. Naturally, Blackmagic had less incentive to fully embrace a direct competitor's codec, particularly one owned and controlled by Apple.
However, the growing momentum of ProRes RAW across the broader industry could not be ignored. Camera manufacturers such as DJI, Nikon, and Panasonic began supporting it through external recorders, and editors and colorists outside the Blackmagic ecosystem were increasingly incorporating it into their daily work. This lack of cross-platform compatibility created silos, often compelling productions to avoid mixed systems to maintain a cohesive workflow. By finally adopting ProRes RAW, Blackmagic Design has signaled a commitment to more open workflows that ultimately benefit a wider range of users.
Several factors likely accelerated this shift. Apple's persistent promotion of ProRes RAW, especially its integration into iPhones, elevated the stakes as mobile filmmaking became a more significant part of professional workflows. Industry pressure, evidenced by the numerous user requests on Blackmagic's forums, undoubtedly played a role. Furthermore, major industry events like IBC provide a global platform for such significant announcements. Grant Petty, CEO of Blackmagic Design, framed this update as part of the company's ongoing commitment to delivering valuable, free software upgrades to its customers. He stated, "With the addition of ProRes RAW formats across our capture, playback and professional editing software products we are continuing our commitment to software updates for existing products."
Expanding Capture and Playback Capabilities
The implications of this integration extend beyond just editing within Resolve. Blackmagic Pocket Cinema Camera 4K owners now have the direct ability to record in ProRes RAW, offering a more dynamic choice beyond the established ProRes 422 family. This enhancement is set to be further unified across Blackmagic's ecosystem, with upcoming updates to the Blackmagic Camera app and Blackmagic Video Assist 12G promising ProRes RAW recording capabilities.
This move is more than just adding a technical feature; it signifies a strategic alignment with industry demands. The inclusion of ProRes RAW formats across capture, playback, and editing software underscores Blackmagic's dedication to providing comprehensive solutions. As Petty noted, "Blackmagic Pocket Cinema Camera 4K customers have always been able to record in compressed ProRes 422 formats, but now they will be able record ProRes RAW and natively playback the files in DaVinci Resolve."
The arrival of ProRes RAW support follows a year of significant milestones for DaVinci Resolve. Earlier in the year, Blackmagic released DaVinci Resolve 20, which introduced advanced tools for motion graphics artists, offering greater flexibility for text, animation, and graphics. This was followed by the polished final release of DaVinci Resolve 20, which solidified stability and refined numerous features. More recently, Blackmagic expanded its educational resources with guides for immersive filmmaking using URSA Cine and DaVinci Resolve, bridging the gap between production and post-production.
Navigating the ProRes RAW Landscape in Resolve
With native support now a reality, filmmakers can import, playback, and grade ProRes RAW files directly within DaVinci Resolve. This applies not only to footage captured on dedicated cinema cameras but also to content recorded on devices like Apple's iPhone 17 Pro.
For users working with ProRes RAW footage, understanding how to manage its unique characteristics within Resolve is key. The codec is managed within the "Camera RAW" tab in the Color page. Unlike Blackmagic RAW, which offers distinct color space and gamma controls, ProRes RAW presents a "RAW to Log" dropdown menu with various log profiles. For maximum creative control and to preserve the raw sensor data, selecting "None" in the "RAW to Log" option is recommended, allowing users to work in a linear gamma.
When dealing with unsupported log profiles, such as Sony's S-Log3 often found on cameras like the Sony FX6, the solution lies in setting up a Color Space Transform (CST) within a CST timeline. The process involves using the camera's native color space (e.g., Sony S-Gamut3 for the FX6 or Apple ProRes RAW for the iPhone 17 Pro) as the input color space with a linear gamma. This is then transformed into DaVinci Wide Gamut as the working color space, providing ample flexibility for grading. For final delivery, the output color space should be set to Rec. 709 Gamma 2.4, suitable for platforms like YouTube.
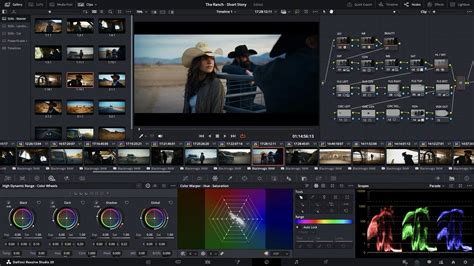
While color temperature adjustments are directly accessible, tint corrections typically require utilizing the offset wheel within a single node. The exposure control is presented as an "exposure bias" slider, ranging from -1 to +1, rather than traditional stops. It's worth noting that on the Edit page, ProRes RAW clips might occasionally display with black bars or minor artifacts. This is often due to the codec's 1:1 sensor ratio and slight crop factors inherent in some camera implementations. For optimal results, DaVinci YRGB color management with DaVinci Wide Gamut processing is the ideal working space, effectively harnessing the dynamic range offered by ProRes RAW.
ProRes RAW files import into Resolve with a "flat" profile, essentially a blank canvas that many colorists appreciate. A recommended approach for grading involves a parallel node structure, dedicating one node each for lift, gamma, and gain. By adjusting blacks with the lift and mid-tones with the gamma, contrast can be effectively built. For achieving cinematic saturation, a three-node density/saturation setup can unlock the full potential of ProRes RAW's 12-bit depth, leading to stunning visual results. When paired with effective shooting techniques, DaVinci Resolve 20.2 and its native ProRes RAW support transform the codec into a powerful asset for filmmakers.
Understanding the RAW Conversion Alternative
While native support is the ideal scenario, there may still be instances where converting ProRes RAW to a more universally compatible format is necessary, particularly for older workflows or specific collaborative environments. One prominent tool for this is "RAW Converter," a free application that requires purchasing individual modules for specific camera support.
The conversion process typically yields CinemaDNG files, which are image sequences where each frame of the video is represented by a separate DNG file. This format, while robust, can lead to a significant number of files, creating folders for each clip. Importing these into Resolve requires careful attention; dragging entire CinemaDNG folders can result in each clip being placed in its own bin, which can be cumbersome. A more efficient method is to select all the individual CinemaDNG folders and drag them into Resolve's media tab, ensuring each folder is treated as a separate video file without creating extra bins.
The CinemaDNG format preserves metadata, and the conversion process can even extract 32-bit float audio if recorded by the camera, such as the Lumix GH7. When these converted CinemaDNG files are brought into DaVinci Resolve, the RAW metadata can be accessed and manipulated within the "Camera RAW" tab on the Color page.
It's important to understand how Resolve handles RAW decoding. By default, adjustments are often dictated by Project Settings. However, users can switch to "Decode using Clip Settings" to access individual clip settings, offering more granular control. While a dedicated "ISO" slider might not be present for non-Blackmagic RAW files, the "exposure" slider effectively serves the same purpose, as ISO adjustments on most cameras are essentially gain adjustments. For Blackmagic cameras, the native BRAW codec allows for direct ISO control due to Blackmagic's full ecosystem integration.
Considerations for Cloud Workflows and Mezzanine Files
For those engaged in cloud-based collaborative workflows, the integration of ProRes RAW presents unique challenges. DaVinci Resolve's cloud workflow relies on syncing project files and media. While project files are managed by Blackmagic Cloud, media is handled separately, often through services like Dropbox, Google Drive, or Blackmagic's own cloud storage.
The issue arises with non-proxiable media. While Resolve can generate proxies for typical video formats (ProRes, HEVC, H.264), it does not automatically create proxies for image sequences like CinemaDNG. Consequently, when importing DNG image sequences into a cloud project, Resolve's cloud and proxy engine may attempt to upload all original DNG files, even when configured to sync only proxy media. This can lead to significant upload times and storage consumption.
Getting Started - Blackmagic Cloud, DaVinci Resolve - How to COLLABORATE with yourself (and others)
To circumvent this, a common solution is to create an "interim" or "mezzanine" file. This involves converting ProRes RAW to a high-quality compressed format (e.g., ProRes 422 HQ) before importing it into Resolve for the primary editing phase. This mezzanine file can then be used for the cloud editing workflow. Towards the end of the project, the original CinemaDNG sequences can be swapped in for final grading and finishing, ensuring the highest possible quality is maintained. This approach streamlines the collaborative process by reducing the amount of data that needs to be constantly synced and uploaded during the editing stages.
The decision to adopt ProRes RAW by Blackmagic Design is a testament to the evolving landscape of filmmaking technology. It reflects a growing understanding that open standards and interoperability are crucial for empowering creators and fostering innovation. The "codec wars" between BRAW and ProRes RAW may persist, but for filmmakers, this integration ultimately translates to greater freedom and flexibility in their creative endeavors. Whether working with footage from a Pocket 4K, an iPhone 17 Pro, or a combination of cameras from different manufacturers, professionals can now maintain a cohesive and efficient workflow entirely within DaVinci Resolve.
It is important to note that Apple charges for the implementation of ProRes RAW. This licensing agreement is handled directly by Blackmagic Design when utilizing their SDK. While some may argue that ProRes RAW has a lower market share compared to other codecs, its increasing adoption by camera manufacturers and its presence in consumer devices like the iPhone highlight its growing significance. The inclusion of ProRes RAW support in cameras like the Panasonic LUMIX S1R II, which records internally to CFexpress Type B cards, further solidifies its position as a key codec for modern filmmaking. The industry's move towards more flexible and accessible RAW formats continues, and DaVinci Resolve's embrace of ProRes RAW is a significant step in that direction, offering users more choices and a more streamlined path from capture to final delivery.