Adobe InDesign offers a robust set of tools for precise text formatting, and understanding how to manage indents and tab stops is crucial for creating professional-looking documents, especially when dealing with bulleted or numbered lists. While the concept of a bullet point might seem straightforward, achieving the desired alignment, particularly when text wraps to a new line, can present a unique challenge. This article delves into the intricacies of positioning text at specific horizontal locations within a frame, utilizing the power of tab stops and indents to ensure your bulleted lists are both aesthetically pleasing and highly readable.
The Foundation: Understanding Indents and Text Frames
Before diving into the specifics of bullet points, it's essential to grasp the fundamental concepts of text frames and indents in InDesign. A text frame is the container for your text. Its width can be set to conform to the width of the current column, or to the length of the current column, allowing for precise control over layout.
Indents, on the other hand, dictate how text is positioned within these frames. There are several types of indents:
- Left Indent: This moves the entire paragraph inward from the left edge of the text frame or inset by a specified value. You can set this value in the Paragraph panel by typing a value (such as 1p) in the Left Indent box.
- First Line Left Indent: This indent affects only the first line of a paragraph, moving it inward relative to the left-margin indent. Dragging the top marker on the ruler in the Paragraph panel allows you to indent the first line of text. You can also type a position in the X box and press Enter or Return to set a specific value for the first-line left indent.
- Hanging Indent: This is a common requirement for bulleted and numbered lists. In a hanging indent, the first line of the paragraph is flush left, while all subsequent lines are indented. This is achieved by setting a left indent and then a negative first-line left indent that cancels out the left indent, effectively creating a space for the bullet or number. For instance, if your left indent is 11 pt, then make the first-line indent -11 pt. The tab stop is then set at the left indent value.
It's important to note that these indents move with the text flow, ensuring that your formatting remains consistent even if the text reflows.

Leveraging Tab Stops for Precise Alignment
Tab stops are markers that you set on the tab ruler to position text at specific horizontal locations within a frame. You can set left, center, right, and decimal or special-character tabs. The Tabs dialog box, accessible from the Paragraph panel menu, provides a comprehensive interface for managing these.
The Tabs dialog box includes:
- Tab ruler: This visually displays the tab stops you set.
- Tab alignment buttons: These allow you to choose the type of alignment for your tab stop (left, center, right, decimal).
- Align On box: Here, you can type or paste any character you want to align to, such as a period or a dollar sign for decimal tabs.
- Leader box: This allows you to specify characters that fill the space between tabs, creating a "leader" for tabular text.
To add a tab stop, simply click on the tab ruler. You can then drag the tab to a new location or drag it off the tab ruler to remove it. Typing a position in the X box and pressing Enter or Return offers another precise method for setting tab positions.
Indents and tabs work in tandem to create sophisticated list structures. For bulleted lists, a common approach is to use a hanging indent, where the bullet is positioned to the left of the main text. A tab stop is then set at the point where the text should begin, aligning subsequent lines of text consistently.
The Challenge of Wrapped Lines in Bulleted Lists
A frequent issue encountered when formatting bulleted lists in InDesign arises when the text of a bullet point wraps to a second line. The default behavior often causes this second line to align with the bullet itself, rather than the content of the first line. This can lead to an unappealing and unprofessional appearance, disrupting the visual flow of the list.
How To Indent Second Line Adobe InDesign Tutorial
This problem can be particularly frustrating when working on long documents with multiple styled bullet points. While using first-line indent, left indent, or tab positions individually might seem like logical solutions, they often do not achieve the desired outcome of aligning the wrapped text with the content of the bullet point, not the bullet symbol itself.
The "Indent to Here" Shortcut: A Powerful Solution
One of the most effective and often overlooked solutions for this specific problem is the "Indent to Here" command. This special character tab is designed precisely to address this scenario.
Here’s how it works:
- Insert your cursor after the bullet symbol on the line that wraps.
- Press Cmd/Ctrl + \ (the backslash key). This is the default keyboard shortcut for "Indent to Here."
What "Indent to Here" does is insert a special tab character that forces all subsequent text to align at that specific horizontal position, regardless of other tab stops or indents. Crucially, it respects the indentation of the first line, ensuring that the wrapped text aligns with the beginning of the actual content, not the bullet. This method provides a clean and consistent alignment for multi-line bullet points.
Utilizing Paragraph Styles for Efficient List Management
For any document with multiple bullet points, efficiency and consistency are paramount. InDesign's Paragraph Styles feature is indispensable for managing these elements. Each level of a list can be defined as a separate Paragraph Style.
- Create a Base Style: Set up your first style (e.g., "BULLET-1") with all the desired formatting for your primary bullet points. This includes the bullet character, font, size, and importantly, the indents and tab stops that create the hanging indent.
- Create Child Styles: For subsequent levels of lists (e.g., "BULLET-2," "BULLET-3"), create them as "Based On" the previous style. This inheritance allows you to modify only the specific spacing or indent values for each level, ensuring stylistic consistency across your entire document. For instance, "BULLET-2" would inherit all properties of "BULLET-1" but would have an increased left indent to visually differentiate it.
This approach not only saves time but also ensures that your lists are uniformly formatted, making them easier to read and manage, especially in lengthy documents.
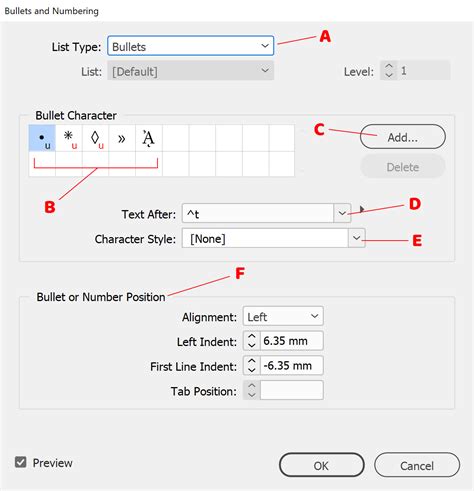
Advanced Customization: Bullets and Numbering Dialog Box
The Bullets and Numbering dialog box offers a more granular level of control over list formatting. You can access this by Option-clicking (or Alt-clicking) on the Bulleted List or Numbered List icon on the Paragraph Formats level of the Control panel.
Within this dialog box, you can:
- Choose List Type: Select between bulleted or numbered lists.
- Select Bullet or Numbering Style: InDesign provides a variety of pre-defined styles, but you can also create custom ones.
- Apply Character Styles: You can conveniently select a character style to be automatically applied to the bullet or number. This is extremely useful for applying specific formatting, such as a different font or color, to the bullet symbol itself. If you don’t have a suitable character style, you can create a new one on the fly.
- Add Custom Glyphs: Tired of the standard round bullet? Use the "Add" button to choose a glyph from a different font. This is particularly handy for dingbats or special symbols.
- Adjust Vertical Alignment: Sometimes, a chosen bullet character may not align perfectly vertically with the text. The solution is to apply a character style to the bullet character and then adjust its baseline shift and possibly font size within that character style. If your text begins with a capital letter, aligning the bullet vertically to the cap height can be effective. For lowercase text, adjusting the position and scale of bullets to the x-height is often appropriate.
Fine-Tuning Alignment: The Role of Negative Indents
As mentioned, bullets typically use hanging indents. This means the first line of the paragraph (containing the bullet) is positioned differently from the subsequent lines of text. To achieve this, the first-line indent needs to be negative, effectively pushing the first line to the left of the main paragraph indent. For example, if your left indent is 11 pt, you would set the first-line indent to -11 pt. This positions the bullet at the desired location, and the tab stop is set at the left indent value, ensuring the text begins correctly.
If you prefer your bullets to be flush with the left edge of the text frame rather than hanging, you'll likely want less space after the bullet. This involves adjusting the tab stop position and potentially the left indent.
Considerations for List Formatting
When designing bulleted lists, several stylistic and functional considerations come into play:
- Alignment: Bulleted lists, especially those with short lines, generally do not fare well with justified alignment. The large word spaces created can lead to an uneven and distracting appearance. Ragged-right alignment is often a better choice for readability. However, if you opt for ragged alignment, be vigilant about uneven rags and avoid using the "Balance Ragged Lines" feature, as it can often create more problems than it solves.
- Keeping Lines Together: For instructional texts where column "bottoming out" isn't critical, use Keep Options to ensure all lines of a paragraph stay together, preventing awkward breaks.
- Optical Margin Alignment: Bulleted lists tend to not work well with InDesign's Optical Margin Alignment feature, which can sometimes create visual oddities.
- List Styles for Multi-Frame Documents: The "[Default]" list style in InDesign does not support numbering across unthreaded text frames. For such scenarios, you must create a new list style and incorporate it into the paragraph styles for the relevant paragraphs to ensure sequential numbering.
Multi-Level Outlines and Numbering Challenges
While InDesign's list features are powerful, creating complex multi-level outlines can be more intuitive in applications like Microsoft Word. However, InDesign can certainly achieve this with careful setup. To create multi-level outlines in InDesign, you need to specify the level number for each style, insert a number placeholder to indicate the previous level, and check "Restart Numbers at This Level" where appropriate. Increasing the left indent with each subsequent level is sufficient to establish clear hierarchy.
A common challenge arises when lists contain both single- and double-digit numbers, making right-alignment difficult. To address this, you need to create enough space for the numbers on the left of the text. A suggested approach involves drawing a temporary frame to measure the rightmost edge of the two-digit numbers and then using that measurement for your left indent. Alternatively, using a two-digit numbering style (if your list doesn't exceed 99 items) can simplify the process.
Exporting Lists from InDesign
A final important consideration is exporting your InDesign document. If you plan to export a story to an RTF file, automatic numbers or bullets will be stripped out. To preserve them, you must convert the automatic numbering or bullets to text before exporting. This is done by selecting the list and choosing Type > Bulleted and Numbered Lists > Convert Numbering to Text. Once converted, the numbers or bullets can be selected and treated as regular text.
In conclusion, while creating well-formatted bulleted and numbered lists in InDesign involves more than meets the eye, mastering the interplay of indents, tab stops, and paragraph styles, along with understanding specific features like "Indent to Here," will ensure your lists are not only readable and quickly digestible but also contribute to the overall professional polish of your documents.