Designing your own custom t-shirts has become an accessible and rewarding endeavor, especially with the powerful tools offered by Adobe Photoshop. Whether you aim to express personal style, promote a brand, or create unique gifts, Photoshop provides a versatile platform to bring your visions to life. This tutorial will guide you through the essential steps and techniques for creating professional-looking t-shirt designs, from initial setup to applying finishing touches, drawing inspiration from various approaches including vintage logo creation and bootleg retro styles.
Setting Up Your Canvas for Success
The foundation of any successful design project lies in proper document setup. For t-shirt designs intended for print, precision is key. Begin by creating a new document in Adobe Photoshop. A common and practical size for the printable front of a t-shirt is 12×14 inches. It is sensible to set the resolution at 300 pixels per inch (ppi) because your t-shirt artwork will likely be printed, and a higher resolution ensures sharper, more detailed output. Furthermore, because you are working for print, it's a good idea to set the color mode to CMYK. While some designs might only utilize a limited color palette, working in CMYK from the start ensures that your colors will print as accurately as possible, reflecting the specific ink values of the printing process. For instance, when selecting a specific red, using CMYK values like 20c, 100m, 100y, 0k allows for precise color reproduction. Alternatively, for digital mockups or designs where print accuracy is not the immediate concern, you might start with an RGB color mode.
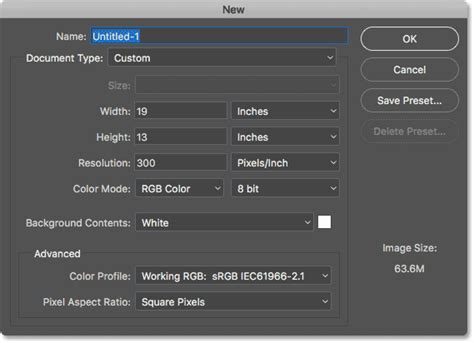
Some tutorials suggest starting with a specific background color to help visualize your design elements. For example, setting the background color to a deep red, such as #820000, can provide a strong starting point. Another approach involves setting up your canvas with a specific paper size, like A4, and a resolution of 300dpi with the color mode set to CMYK, especially when working with pre-packaged graphic bundles.
Incorporating Graphics and Illustrations
The heart of many t-shirt designs lies in compelling imagery. Whether you're using pre-made graphics or creating your own, Photoshop offers robust tools for manipulation and integration. When working with vector-based illustrations, such as those found in collections like "The World's Greatest Vintage Collection," it's advisable to open the EPS version. This allows the graphic to be rendered at your desired dimensions without losing quality, as vector files can be scaled infinitely. Once opened, you can double-click the layer to add effects like a Color Overlay, precisely controlling the hue and saturation to match your design's color scheme.

If you're working with rasterized images, such as watercolor elements, you can still achieve striking effects. For instance, using the "Adjustments > Threshold" feature can help convert complex images into simpler, more graphic forms. By setting the threshold level, you can isolate key details, making the image more suitable for t-shirt printing. Adjusting the layer preview to "multiply" and reducing the fill to 50% can create a subtle yet impactful graphic element.
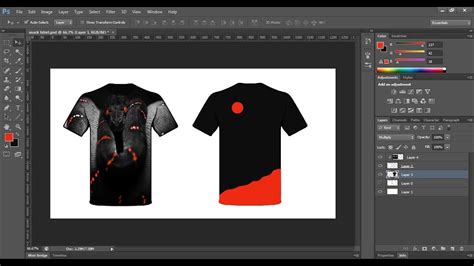
When creating more complex designs, such as bootleg retro t-shirts, the process often involves extracting and placing multiple subjects onto the shirt. Tools like "Select Subject" and Layer Masks are invaluable here. Start with the largest subject and then arrange smaller elements around it. Don't be overly concerned about perfect masks, as the "bootleg" aesthetic often embraces a slightly rough or imperfect feel. Grouping all your subjects together and clipping adjustment layers, like a Color Balance layer set to specific color shifts (e.g., Green -100 and Blue +100), can unify the elements and create a distinct retro mood.
Mastering Typography for Impactful Designs
Typography plays a crucial role in t-shirt design, conveying messages and enhancing visual appeal. Photoshop offers extensive control over text, allowing for creative customization. When adding words, you can choose from a vast array of fonts. For instance, "Pink Lady Font" by Ivan Rosenberg or fonts from curated bundles like "The Smashing September Bundle" by TheHungryJPEG can provide unique stylistic options.
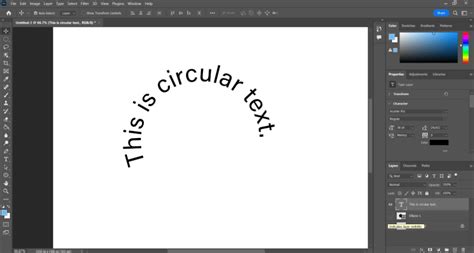
Beyond basic text entry, Photoshop's "Warp Text" feature is a powerful tool for adding dynamism. You can apply various styles like "Rise," "Horizontal," or "Bend" to create curved or distorted text effects. Adjusting the bend percentage allows for precise control over the intensity of the warp. This is particularly useful for creating vintage logo designs where text often follows organic shapes.
For vintage-style logos, the "Type on a Path" function is incredibly effective. First, create a shape, such as a rounded rectangle with a high corner radius, and set the tool to "Path." Then, switch to the Type tool, hover over the path until the cursor changes, and begin typing. This will make your text follow the contour of the shape. You can then use the Path Selection Tool to reposition the text along the path. To achieve a classic logo look, you might need to duplicate text layers and paths to create text on both the inside and outside of a shape, or to form circular arrangements.
When working with multiple text elements, consider varying font sizes, weights, and styles to create visual hierarchy. For example, using a bold variant of a font for a brand name and a lighter version for a tagline can improve readability and aesthetic balance. For script fonts, paying close attention to character settings, such as optical kerning and tracking, is essential to ensure letters flow smoothly. Manual adjustments using the Alt key and cursor keys can fine-tune spacing between specific letter pairs.
To add further decorative elements to your typography, you can use shape tools like the Line tool or the Rounded Rectangle tool to create outlines or borders around text. Holding the Alt key while transforming a shape can duplicate it, allowing for symmetrical embellishments. Duplicating entire text elements along with their associated paths (using Cmd+J) is an efficient way to replicate design components.
Applying Effects for a Polished and Thematic Finish
Once your graphics and text are in place, applying effects can elevate your design from basic to professional. For vintage designs, effects that mimic aging and wear are crucial. One effective technique is to round off the corners of fonts using the "Filter > Noise > Median" command. Repeating this process for each text layer can create a subtle "bleeding ink" effect, reminiscent of old print methods.
To impart the appearance of a well-worn garment, consider using texture packs. "Washed and Worn textures" can simulate the cracked and flaking ink of a t-shirt that has been washed and worn for years. To apply these, group all your design layers into a single folder. Then, create a layer mask for this group and copy one of the texture images. By holding the Alt key and clicking the layer mask, you can edit its contents, effectively "painting" the texture onto your design.
For a more contemporary or stylized look, such as the bootleg retro aesthetic, effects like gradients and color adjustments are key. Applying a gradient to text layers can add depth and visual interest. For unifying multiple graphic elements, clipping adjustment layers, like Color Balance, can shift the overall color tone of the group.
A powerful tool for fine-tuning the overall look and feel of your design is the "Camera Raw" filter. Within this filter, you can adjust brightness and contrast in the "Light" section, add texture in "Effects," and use "Calibration" to create sophisticated color effects, such as a two-toned blue and orange palette. This filter offers a comprehensive suite of controls for manipulating the mood and aesthetic of your entire design with a few adjustments.
Photoshop T-Shirt Mockup Tutorial – Start to Finish in 2 Minutes
Finalizing Your Design and Preparing for Production
Before finalizing your design, it's good practice to group all your layers into a single folder. This organization makes it easier to manage and apply global effects or transformations. Moving the entire design into the center of your canvas ensures proper placement for printing.
Should you need to edit text later, remember that double-clicking the text layer in Photoshop allows for immediate modification. If you encounter a situation where you've used a font that isn't installed on your system, Photoshop will typically notify you, providing the name of the missing font. You can then browse, download, and install it to use it in your design.
The beauty of using Photoshop for t-shirt design is its flexibility. You can create as many unique designs as your creativity allows, using the same techniques across different concepts. Whether you're aiming for a sophisticated vintage logo or a bold graphic statement, the tools and methods discussed here provide a solid foundation. Many resources, such as Vexels PSD templates, are made by professional designers and artists, offering pre-made elements and transparent PNGs that can be seamlessly integrated into your workflow, further streamlining the design process and allowing you to create tons of unique t-shirt designs fast, even without being a Photoshop expert.
The process of designing custom t-shirts in Photoshop is a journey of combining creative vision with technical skill. By mastering canvas setup, graphic integration, typography, and post-processing effects, you can produce professional-quality apparel designs that stand out. The ability to iterate and experiment with different styles, from the subtle elegance of vintage logos to the vibrant energy of bootleg graphics, ensures that your custom t-shirt creations will be as unique as your ideas.