InDesign offers a powerful and flexible environment for designers to create a multitude of professional-grade documents. Among these, the recipe book stands out as a popular and practical application of its capabilities. This tutorial will guide you through the process of building an InDesign recipe book template, leveraging the robust features of the software to ensure consistency, efficiency, and a polished final product. We will delve into the intricacies of managing multiple documents within a book file, synchronizing styles and design elements, and ensuring accurate page numbering, all while aiming for a template that is both functional and aesthetically pleasing.
The Foundation: Understanding InDesign Book Files
At the heart of managing a multi-chapter or multi-section document like a recipe book in InDesign lies the concept of a "book file." A book file is not a single InDesign document but rather a collection of individual InDesign documents that are linked together. This collection allows for seamless management of shared elements, ensuring consistency across your entire recipe collection.
You create a book file, and it opens in the Book panel. This panel acts as your central hub for managing all the documents within your book. Here, you can add, remove, reorder, and synchronize your individual recipe documents. The primary advantage of using a book file is its ability to share styles, swatches, parent pages, and other design assets. This means you can define a specific look and feel for your recipes - perhaps a particular font for ingredient lists, a unique color for headings, or a consistent layout for images - and have it applied automatically across all documents in the book.
One of the key documents within a book file is the "style source." By default, the first document added to the book is designated as the style source. However, you have the flexibility to select a new style source at any time. The style source acts as the master guide for shared styles. When you synchronize items within the book, InDesign refers to the style source to ensure all linked documents adhere to the defined standards.
Building Your Recipe Book Template: Step-by-Step
Let's begin by establishing the core structure of your recipe book template.
Creating and Managing Your Book File
Initiate the Book File: To start, you'll need to create a new book file. Go to
File > New > Book. This action will open the Book panel, ready for you to add your individual recipe documents.Adding Documents: You can add existing InDesign documents to your book file by dragging them from your file explorer into the Book panel. Alternatively, you can click the "Add Document" button at the bottom of the Book panel and navigate to your desired files. When you add a document to a book file, it adopts the format of the book.
The Book Panel in Detail: The Book panel is your command center. It displays a list of all the documents included in your book, along with their page ranges. You can reorder documents by simply dragging them up or down in the list. This is crucial for organizing your recipes logically, perhaps by course, cuisine, or any other system that makes sense for your cookbook.
Style Source Management: As mentioned, the first document in the book is typically the style source. To change this, select the desired document in the Book panel and choose "Set Style Source" from the Book panel menu. This is a critical step for maintaining design consistency.
Opening and Closing Documents: You can open individual documents within the book by double-clicking their names in the Book panel. To close all documents in the book, you can use the "Close Book" option from the Book panel menu or click the close button on the Book panel's title bar.
Managed Workflows: In situations where multiple people might be working on the same book file, InDesign has provisions for managed workflows. If someone else has the document open in a managed workflow, you'll be notified.
Synchronizing Styles for Ultimate Consistency
The true power of the InDesign book file feature for a recipe book template lies in its synchronization capabilities. This ensures that every recipe adheres to your predefined design standards, saving you immense time and effort.
The Synchronization Process: To synchronize items, select the documents you wish to update (or all of them) in the Book panel. Then, choose "Synchronize Documents" from the Book panel menu. This process checks the selected documents against the style source.
What Gets Synchronized?
- Styles: This includes paragraph styles, character styles, object styles, and table styles. If items in the style source are not found in the documents being synchronized, they are added. This means any new styles you create in your style source will be automatically applied to the other documents. It's important to note that if you have the "Synchronize All Styles" option selected, InDesign will synchronize all styles, including those that are not part of a style group. If you have the same character style outside the style group, it will be synchronized.
- Swatches: Colors, gradients, and tints will be harmonized across all documents.
- Parent Pages: Parent pages are synchronized in the same way as other items. Parent pages with the same name (such as A-Parent) as those in the style source are replaced. Synchronizing parents is useful for documents that use the same design elements, such as running headers and footers, which are common in recipe books to display chapter titles or page numbers.
- Text Variables: These can also be synchronized, ensuring consistent use of defined variables throughout your book.
Important Considerations for Synchronization:
- Parent Page Overrides: Be aware that any parent page items that are overridden on document pages after you synchronize parents for the first time are detached from the parent. Therefore, if you plan on synchronizing parent pages in your book, it’s a good idea to synchronize all the documents in your book at the start of the design process. It’s also a good idea to synchronize parent pages using only one style source. If you synchronize from a different style source, overridden parent page items may become detached from the parent page.
- Automatic Document Conversion: If you are working with documents created in older versions of InDesign, such as CS5, you may need to perform a conversion. To convert older InDesign documents to a newer format when adding them to a book, select "Automatic Document Conversion" in the Book panel menu. This process attempts to convert the documents to the current InDesign format. If documents are overwritten during conversion, select Automatic Document Conversion.
Advanced Features for Your Recipe Book Template
Beyond basic style synchronization, InDesign offers features that can further enhance your recipe book template.
Numbering and Section Management
Accurate page numbering is crucial for any book, especially a recipe collection where users might want to quickly jump to a specific dish. InDesign provides robust control over numbering.
Numbering Options: You can determine how pages, chapters, and paragraphs are numbered in a book. In a book file, the numbering styles and starting numbers for pages and chapters are determined by each document’s settings in the Numbering & Section Options dialog box or the Document Numbering Options dialog box.
Page Ranges: The page range appears beside each document name in the Book panel. By default, InDesign updates page and section numbering in the Book panel when you add or remove pages in booked documents, or when you make changes to the book file, such as reordering, adding, or removing documents.
Troubleshooting Numbering: If the book is updated and the numbering seems incorrect, the problem may be that absolute numbers are displayed instead of section numbers in General preferences. To fix this, navigate to
Edit > Preferences > General(Windows) orInDesign > Preferences > General(macOS) and ensure that "Section Numbers" is selected for display in the Book panel.Handling Missing Documents: If a document is missing or cannot be opened, the page range is shown as "?" from the place where the missing document should be to the end of the book, indicating that the true page range is unknown. In such cases, you must remove or replace the missing document before you can update the numbering accurately.
How to Make an InDesign Book Layout Template
Streamlining Your Workflow with Templates
Creating a template means setting up a structure that can be reused. For your recipe book, this involves defining consistent layouts, styles, and perhaps even placeholder text for common recipe elements.
Parent Pages for Layout Consistency: Parent pages are essential for maintaining a consistent layout across your recipes. You can create parent pages that include elements like page numbers, chapter titles, decorative borders, or even pre-defined text frames for ingredients and instructions. When you synchronize parent pages, any changes made to the parent page in the style source will be reflected in all linked documents.
Master Styles: Define all your paragraph, character, and object styles in the style source document. This includes styles for recipe titles, ingredient lists, instructions, sidebars, image captions, and any other text elements you anticipate using. This ensures that when you create a new recipe document and add it to the book, it will automatically inherit these styles.
Placeholder Content: Consider adding placeholder text within your template documents. For example, you could have a pre-formatted text frame labeled "Ingredients" with placeholder text like "1 cup flour" and another labeled "Instructions" with "1. Mix ingredients…" This provides a clear starting point for users of your template.
Saving as a Template: Once you have established your core structure, styles, and parent pages, save your InDesign documents as templates. You can do this by going to
File > Save Asand choosing "InDesign Template (.indt)" from the "Save as type" dropdown menu. This ensures that when you open the template, you are creating a new document based on it, leaving the original template intact.
Tips for a Professional Recipe Book Design
Creating a functional template is only half the battle; the aesthetic appeal of your recipe book is equally important.
Typography Matters: Choose fonts that are legible and complementary. A common approach is to use a more decorative font for recipe titles and a clean, highly readable serif or sans-serif font for the body text (ingredients and instructions). Ensure your leading (line spacing) and tracking (letter spacing) are set appropriately for comfortable reading.
Visual Hierarchy: Use font sizes, weights, and styles to create a clear visual hierarchy. Recipe titles should be the most prominent, followed by ingredient lists and then instructions. Use subtle variations to guide the reader's eye through the recipe.
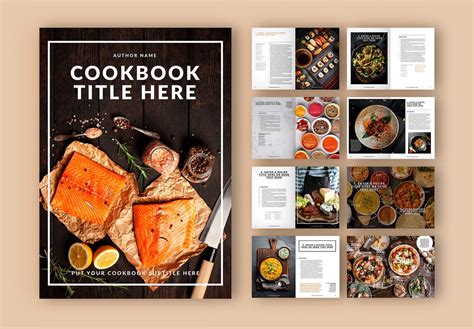
Image Integration: High-quality food photography can elevate any recipe book. Design your template to accommodate images effectively. Consider how images will be placed, cropped, and captioned. Ensure there's enough white space around images so they don't feel cramped.
Color Palette: Develop a consistent color palette for your recipe book. Use colors sparingly and purposefully, perhaps for headings, accents, or to differentiate sections. Avoid overly bright or distracting colors that might detract from the recipes themselves.
White Space: Don't underestimate the power of white space. Ample white space makes your design feel clean, organized, and professional. It improves readability and prevents the page from feeling cluttered.
Consider the Audience: Are you designing a cookbook for professional chefs or for home cooks? The complexity of the recipes, the level of detail in the instructions, and the overall design aesthetic might vary depending on your target audience.
By thoughtfully constructing your InDesign recipe book template using the book file feature, style synchronization, and careful design considerations, you can create a reusable framework that ensures consistency, efficiency, and a professional-looking final product for all your culinary creations.