In the intricate world of digital publishing, precision and control over text formatting are paramount. Adobe InDesign, a leading tool for creating professional layouts, offers a powerful, yet sometimes elusive, feature: the ability to reveal hidden characters. These invisible symbols, often referred to as control characters, play a crucial role in dictating how text behaves within a document, influencing everything from paragraph breaks to precise spacing. Understanding and utilizing the "Show Hidden Characters" function is not merely a matter of curiosity; it's an essential skill for any InDesign user seeking to achieve flawless typography and efficient workflow. This guide delves deep into the functionality, benefits, and practical applications of revealing these hidden elements, transforming a potentially frustrating aspect of InDesign into a powerful ally.
The Nature of Hidden Characters in InDesign
InDesign employs a sophisticated system of invisible text characters that are not displayed in the standard layout view or in the final printed output. These characters, known as control characters, are fundamental to the underlying structure and formatting of text. They act as instructions to the software, dictating specific behaviors that might not be immediately apparent.
For instance, the distinction between a hard return (pressing Enter or Return) and a soft return (pressing Shift+Return) is marked by different hidden characters. A hard return signifies the definitive end of a paragraph, initiating a new one and applying paragraph styles accordingly. A soft return, on the other hand, forces a line break within the same paragraph, allowing for controlled text flow without altering paragraph-level formatting. Similarly, tabs, spaces, and index markers are all represented by unique invisible symbols.
The presence of these characters is not arbitrary; they are the building blocks of precise text manipulation. When importing text from external sources, such as Quark files or web pages, these hidden characters can sometimes be carried over, leading to unexpected formatting issues. Recognizing and understanding these symbols is the first step towards mastering InDesign's text handling capabilities.
Why Activating Hidden Characters is Essential for Control
The primary reason for activating the "Show Hidden Characters" feature is to gain complete control over your text content. As mentioned, these invisible characters dictate formatting. If you desire immaculate typography, you must be able to see the underlying code that governs it.
Consider the application of paragraph styles. The way text wraps and reflows can be significantly affected by the type of return character used. A soft return will allow text to continue within the same paragraph style, whereas a hard return will initiate a new paragraph, potentially with a different style applied. Without the ability to see these distinctions, troubleshooting formatting inconsistencies becomes a daunting, if not impossible, task.
Furthermore, the "Show Hidden Characters" feature is an invaluable tool for spotting and rectifying errors. Mistakenly pasted characters from other applications, or accidental keystrokes that insert unwanted symbols, can lead to subtle but problematic layout deviations. By making these characters visible, you can easily identify and remove them, preventing them from affecting the overall design and readability of your document. This proactive approach to identifying potential mistakes, such as those found in a list of common InDesign errors, significantly enhances the quality and professionalism of your work.
How to Reveal Hidden Characters in InDesign
The process of revealing hidden characters in InDesign is straightforward and accessible through the application's menu system.
- Navigate to the Type Menu: In the main menu bar at the top of the InDesign window, click on "Type."
- Enable "Show Hidden Characters": From the dropdown menu, select "Show Hidden Characters." A checkmark will appear next to the option, indicating that it is now active.
Once this setting is enabled, InDesign will display a variety of special characters directly within your text frames. These symbols are designed to be distinct and informative, allowing you to easily differentiate between them.
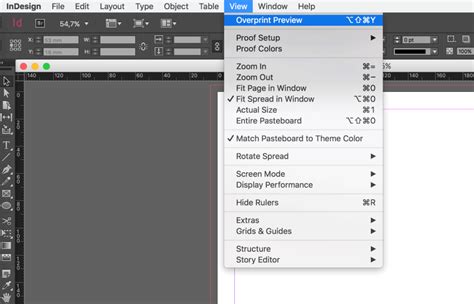
It is crucial to note that these hidden characters are only visible when the document's Screen Mode is set to "Normal." If your Screen Mode is set to "Preview" mode, which is designed to show the layout as it will appear when printed, these invisible characters will be hidden. To switch to Normal mode, you can typically find this option under the "View" menu, often labeled as "Screen Mode" or "Overprint Preview."
Troubleshooting: When Hidden Characters Still Aren't Visible
In rare instances, even after enabling "Show Hidden Characters," you might find that no special characters are appearing. If this occurs, the most common culprit is the "Overprint Preview" feature being active. Overprint Preview can sometimes mask the visibility of hidden characters.
To resolve this:
- Navigate to the View Menu: Click on "View" in the main menu bar.
- Disable "Overprint Preview": If "Overprint Preview" is checked, uncheck it.
By turning off Overprint Preview, you should now be able to see all the hidden text characters within your InDesign document.
Understanding the Visual Representation of Hidden Characters
Once hidden characters are visible, InDesign employs specific symbols to represent them. While the exact appearance can be customized, a common set of symbols is used:
- Paragraph Break Mark: A pilcrow symbol (¶) typically indicates the end of a paragraph, signifying a hard return.
- Line Break (Soft Return): Often represented by a bent arrow (↵), this symbol denotes a line break within the same paragraph.
- Tab Character: Usually shown as an arrow pointing to the right (→), this indicates a tab stop.
- Space Character: A small dot or diamond shape in the middle of the text line represents a standard space.
- End of Story Marker: A small square or diamond at the end of the text in a frame indicates the end of a story.
- Index Marker: These can vary but are often depicted as a colon-like symbol or a specific icon.
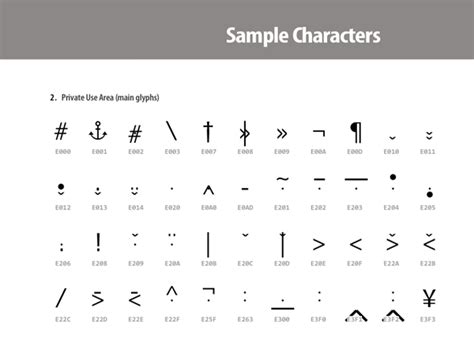
Being familiar with these symbols is key to interpreting the underlying structure of your text. A "decoder ring" or a readily available reference list of these characters, as some users have compiled, can be incredibly helpful, especially when encountering unfamiliar symbols or when importing text from older or different software.
Customizing the Appearance of Hidden Characters
InDesign offers a degree of customization for how hidden characters are displayed, allowing users to tailor their appearance to suit their preferences and working environment.
Changing the Color of Hidden Characters
The default color for hidden characters in InDesign is typically a shade of blue. However, this color can be changed to improve visibility against different backgrounds or to match personal preferences. This is achieved by modifying the layer color settings.
- Access Layers Panel: Go to "Window" > "Layers."
- Select the Layer: In the Layers panel, select the layer on which your text resides.
- Change Layer Color: Double-click on the layer color swatch or right-click and choose "Layer Options." In the dialog box, you can select a new color for the layer. This change will affect the color of all elements on that layer, including the hidden characters.
By adjusting the layer color, you can make the hidden characters stand out more prominently or blend in more subtly, depending on your needs.
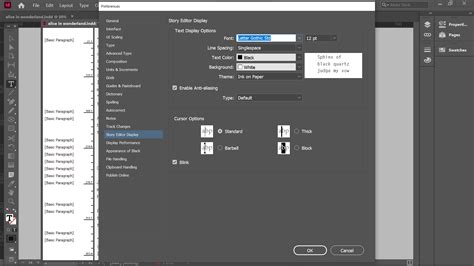
Modifying Story Editor Display Preferences
The Story Editor, a dedicated window for viewing and editing text, also provides options for customizing the display of hidden characters and other text elements.
- Open Story Editor: Select text and go to "Edit" > "Edit in Story Editor," or use the keyboard shortcut (often Ctrl+Y or Cmd+Y).
- Access Preferences: Within the Story Editor, go to "Edit" > "Preferences" (or "InDesign" > "Preferences" on macOS) and then select "Story Editor Display."
- Customize Appearance: Here, you can adjust various display settings, including:
- Text Color: Change the color of the actual text.
- Background Color: Modify the background color of the editor window.
- Hidden Text Color: Specifically alter the color of hidden characters.
- Text Cursor Appearance: Change how the text cursor is displayed.
- Font Smoothing: Enable or disable font smoothing for better readability.
These preferences allow you to create an optimal viewing environment within the Story Editor, making it easier to work with large amounts of text or to identify specific formatting elements.
Advanced Applications: Conditional Text and Hidden Characters
Beyond basic visibility, InDesign's concept of "hidden characters" extends to a more sophisticated feature: Conditional Text. This powerful tool allows you to create multiple versions of a document from a single source file, by hiding or showing specific blocks of text based on predefined "conditions."
Understanding Conditions
Conditions are essentially tags that you can apply to ranges of text. These tags allow you to designate certain text as belonging to a particular version or audience. For example, you might create conditions for "Windows" and "Mac" to produce different versions of software documentation, or use conditions like "Editorial Review" or "Internal Comments" for internal workflows.
- Applying Conditions: Conditions can be applied to text within table cells, but not to entire cells, columns, or rows directly. Anchored objects can also be made conditional by selecting their marker.
- Smallest Unit: The smallest unit of text that can be made conditional is typically a word or a punctuation mark. Making very small fragments conditional, such as part of a sentence, can complicate translation efforts and should be done judiciously. It's often recommended to make entire phrases or sentences conditional for better manageability.
- Visibility: When a condition is applied, you can control whether that text is visible or hidden in the layout. Hiding a condition means the text is not displayed in the layout window and is generally ignored for tasks like searching or spell-checking.
Managing Conditions
The Conditional Text panel (Window > Type & Tables > Conditional Text) is the central hub for managing these conditions.
- Showing/Hiding Conditions: You can toggle the visibility of conditions directly from this panel. A click in the visibility box next to a condition name will show or hide text associated with that condition.
- Condition Sets: To streamline the process of managing multiple conditions, you can create "Condition Sets." These sets allow you to quickly activate specific combinations of conditions, enabling you to rapidly switch between different document renditions. For instance, a set could be configured to show only French text and editorial comments, while hiding all other conditions.
- Creating and Deleting Conditions: New conditions can be created, and existing ones can be deleted. When deleting a condition, InDesign prompts you to confirm whether you want to delete the associated hidden conditional text.
- Condition Indicators: InDesign can display visual indicators in the layout to highlight text that has a condition applied. These indicators can be toggled on or off for a cleaner view.
Adobe InDesign Course - Class 48 (Conditional Text)
The ability to hide a condition results in the hidden text being stored internally, often represented by a hidden conditional text symbol. This ensures that the content is not lost and can be revealed again when needed.
Conditional Text in Books and Documents
When working with InDesign Books, conditions can be applied consistently across multiple documents. This is particularly useful for large projects where different versions of chapters or sections are required. The management of conditions within a book ensures that the intended renditions are maintained across the entire publication.
The interplay between visible hidden characters and the more advanced concept of conditional text highlights InDesign's depth in text management. Whether you are troubleshooting a minor spacing issue or managing complex multilingual content, understanding these features is key to unlocking the full potential of the software.
The Role of Copy Editor (Beta)
For users who experience performance lag while editing large amounts of text in InDesign, especially when additional features are enabled, Adobe offers a beta feature called Copy Editor. This tool provides a text-only editing environment, designed to be faster and more responsive.
While Copy Editor does not support text formatting or styles, it allows for continuous typing and editing in a streamlined interface. It can be launched directly from the text box via the context menu or through the "Window" menu. This beta feature serves as an alternative for users who prioritize typing speed and responsiveness over immediate formatting control within the main InDesign layout window.
Conclusion
The ability to "Show Hidden Characters" in InDesign is a fundamental yet powerful feature that grants users granular control over their text. From understanding the subtle differences between paragraph and line breaks to troubleshooting unexpected formatting, these invisible symbols are the keys to precise typographic control. By mastering the display and interpretation of these characters, and by leveraging advanced features like Conditional Text, InDesign users can significantly enhance their efficiency, accuracy, and the overall quality of their published documents. The journey of unveiling the invisible is an essential step in becoming a proficient InDesign professional.
tags: #indesign #show #hidden #characters