In the realm of vector graphics, the ability to precisely control and manipulate every element is paramount. Inkscape, a powerful and free open-source design tool, offers a robust workflow for achieving this control, particularly when it comes to text. While Inkscape allows you to add editable pixel-based text to your project, which can be adjusted by changing the font, size, and color, there are distinct advantages to converting this live text into paths. This process unlocks a deeper level of creative freedom, enabling intricate modifications and ensuring design fidelity across different platforms and users.

The Fundamentals of Text Conversion in Vector Design
Before diving into the specifics of Inkscape, it's beneficial to understand the underlying principles. In vector design, a path is essentially an object defined by a series of coordinate points on an X and Y axis. These points, known as nodes, dictate the shape and form of the object. When you work with text in its "live" state within Inkscape, it is treated as a text object with associated font metrics and character data. This allows for easy editing of the text content, font selection, size, and weight.
However, for more advanced manipulation, such as distorting letterforms, creating unique effects, or ensuring that the text appears precisely as intended regardless of the viewer's installed fonts, converting text to a path is a crucial step. This process is not reversible; once text is converted to a path, Inkscape no longer recognizes it as editable text. Therefore, it is vital to ensure that all textual edits, including spelling and formatting, are finalized before initiating the conversion.
Why Convert Text to a Path? Unlocking Design Potential
There are several compelling reasons why a designer might choose to convert text to a path in Inkscape:
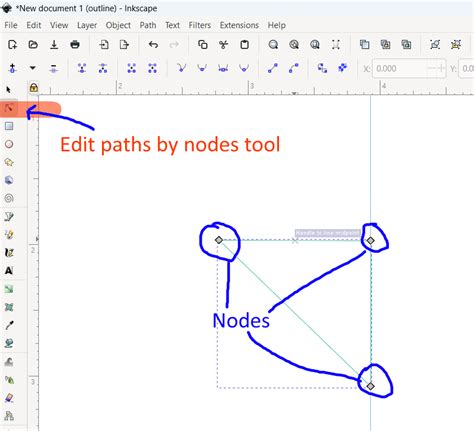
- Unrestricted Manipulation: Live text has limitations. You cannot, for instance, easily create a "dripping" effect by pulling down the nodes of individual letters. Converting to paths grants you direct access to the nodes of each letter, allowing for intricate distortions, custom shapes, and unique artistic treatments that go far beyond standard text formatting. You can easily use the Node tool to make adjustments to the selected item by moving the nodes. Nodes are the small squares around the selected object or text. Simply select the node with the Node tool and then drag it to a new position.
- Design Fidelity and Font Independence: When you share a document containing live text, the recipient must have the exact same font installed on their system for the text to display correctly. If the font is missing, the viewing software will substitute it, potentially altering the entire aesthetic of your design. Converting text to a path embeds the letterforms as vector shapes, ensuring that the appearance remains consistent on any computer, regardless of installed fonts. This is particularly important for logos and branding where precise visual representation is critical.
- Integration with Vector Effects: Certain vector effects and operations in Inkscape work more effectively, or exclusively, with path objects. For example, applying operations like "Path Effects" or using tools that directly manipulate path geometry becomes possible only after the text has been converted. This opens up a wider array of creative possibilities for transforming and stylizing your text.
- Creating Complex Graphics: In some design scenarios, text needs to be treated as a graphic element that interacts with other shapes and paths in intricate ways. Converting text to paths allows it to be combined, subtracted, or intersected with other vector objects, forming a single, unified graphic entity.
The Step-by-Step Process: Converting Text to Path in Inkscape
Converting text to a path in Inkscape is a straightforward procedure, but understanding the nuances can prevent common pitfalls.
Step 1: Type Your Text and Format It
Begin by opening Inkscape and selecting the Text tool. This tool is typically found on the left-hand toolbar, or you can access it by pressing the "T" key on your keyboard. Click anywhere on your artboard or canvas and type out the desired text. Use the Font tab, usually located in the settings bar at the top of the screen, to choose a satisfying font for your project. You can either type the font's name directly or scroll through the available options until you find the perfect one. At this stage, it is crucial to finalize all aspects of the text, including the font, size, weight, and any spelling corrections. Once converted to a path, these attributes will no longer be editable as text properties.
Step 2: Select the Text Object
With your text typed and formatted, activate the Select and Transform Objects tool. This is usually the first tool on the left toolbar, or you can press the "S" key. Click on your text to select it. You will see bounding box handles appear around the text, indicating that it is selected. The status bar at the bottom of the Inkscape window will typically display information about the selected object, such as "TEXT" followed by font details.
Step 3: Convert Text to Path
Navigate to the menu bar at the top of the Inkscape window. Click on "Path," and then select "Object to Path." Alternatively, you can use the keyboard shortcut, which is typically Shift+Ctrl+C.
Upon successful conversion, the text will no longer be recognized as a text object. If you try to select it with the Text tool again, you won't be able to edit the characters. Instead, the status bar will now indicate that you have a "Group" of objects, or a single complex path, depending on the Inkscape version and specific settings.
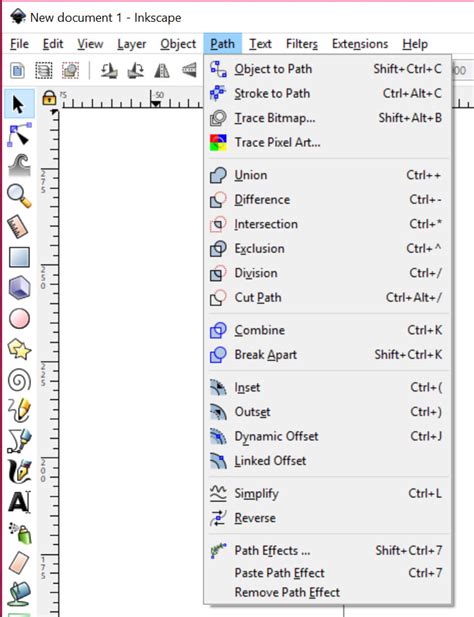 "Object to Path" option" style="max-width: 100%;">
Addressing Common Issues and Advanced Manipulations
While the core conversion process is simple, users sometimes encounter unexpected behavior.
Individual Letters as Separate Objects
A common observation after converting text to a path is that each letter may become an individual path object, and these are often grouped together. While this grouping allows for some manipulation as a single unit, it might not provide the desired level of integration for certain effects.
If you need to treat all letters as part of a single, continuous object for operations like applying a compound path effect or ensuring a seamless stroke, you will need to perform additional steps:
- Ungroup: With the group of letter paths selected, go to
Object>Ungroup(or use the shortcutShift+Ctrl+G). This will separate each letter into its own distinct path object. - Combine: To merge these individual paths into one, select all the letter paths (you can do this by dragging a selection box around them or by pressing
Ctrl+Awhile they are all visible). Then, go toPath>Combine(or use the shortcutCtrl+K). This operation merges the selected paths into a single compound path.
It's important to note that "Combine" is different from "Union." "Combine" essentially creates a single object from multiple paths, preserving their individual outlines but allowing them to be treated as one. "Union," on the other hand, merges overlapping areas, creating a single shape without internal divisions. For most text-to-path scenarios where you want to manipulate the letters as a single unit after conversion, "Combine" is the appropriate choice.
The "No Dynamic Offset" Phenomenon
Some users report that applying effects like "Dynamic Offset" to text after converting it to a path yields no visible result, with the expected small rectangular control handle not appearing. This can occur for several reasons:
- Text Not Converted Properly: Ensure the conversion to path was successful. The status bar should not indicate "TEXT" anymore.
- Path Structure: The "Dynamic Offset" and related "Path Effects" often rely on specific path structures. If the converted text paths have self-intersections or are not "clean" in their vector definition, these effects might fail.
- Linked Offset vs. Dynamic Offset: Inkscape has several offset commands. The "Linked offset" command is specifically designed to create an offset that remains linked to the original path, allowing for real-time updates. Other offset commands, like "Dynamic Offset," create a new, independent path. If you are expecting a linked behavior, you might be looking for the wrong tool. However, the "Dynamic Offset" should typically work on any valid path.
- Internal Paths and Holes: If the text contains characters with internal "holes" (like 'O', 'B', 'A'), the offset operation might be applied in a way that isn't immediately obvious or might behave differently due to the compound nature of the path.
If "Dynamic Offset" isn't working, try first converting the text to paths, then ungrouping and combining them if necessary. After that, use the Node tool to inspect the paths for any obvious irregularities. Sometimes, using Path > Simplify (with a low value) after converting to path can help clean up path data, although this can also slightly alter the curves.
Advanced Techniques: Distorting and Styling Converted Text
Once your text is successfully converted to paths and potentially combined into a single object, the real creative possibilities open up.
The Node Tool: Your Primary Instrument
The Node tool (N key) is indispensable for manipulating converted text. Each letterform is now composed of nodes and the curves (or straight lines) connecting them. You can:
- Move Nodes: Click and drag individual nodes to alter the shape of a letter. This is how you achieve effects like stretching, squashing, or creating unique serifs.
- Add/Delete Nodes: You can add new nodes to a path segment to create more points for manipulation, or delete existing nodes to simplify a shape.
- Adjust Handles: For curves (Bézier curves), nodes have control handles. Manipulating these handles allows you to change the curvature and smoothness of the path segments.
- Convert Between Curve Types: Nodes can be set as sharp corners, smooth curves, or symmetrical curves, offering fine control over the path's flow.
Creating Effects with Converted Text
- Dripping or Melting Effects: Select the nodes at the bottom of letters and drag them downwards, varying the distance to create a liquid or melting appearance.
- Distorting Perspective: By strategically moving nodes at the top and bottom of letters, you can create a sense of perspective or an anamorphosis effect.
- Custom Letterforms: Treat each letter as a malleable shape. You can add new elements, remove parts, or completely reshape them into entirely new glyphs.
- Layering and Stroke Variations: As mentioned in the initial user query, converting text to paths allows for intricate layering and stroke weight variations. Once letters are paths, you can apply multiple strokes, different fills, and use layering techniques to create complex visual depth and dimension. For instance, you could apply a thick, textured stroke to the outer edge of a letter while having a thinner, different colored stroke inside.
How To Warp And Distort Objects In Inkscape
Conclusion: Empowering Your Designs with Text to Path
Converting text to a path in Inkscape is a fundamental technique that transforms static type into dynamic, editable vector objects. It is a gateway to achieving design fidelity, enabling intricate manipulations, and integrating text seamlessly into complex vector artwork. By understanding the process, potential pitfalls, and the power of tools like the Node tool, designers can elevate their typographic creations from simple text to compelling visual statements. Remember to always finalize your text content and formatting before conversion, as this step is irreversible and unlocks a new dimension of creative control within Inkscape.