Photoshop, a powerhouse of digital artistry, offers a myriad of tools for designers and illustrators to bring their creative visions to life. Among the many techniques available, the creation of realistic torn paper effects stands out as a particularly engaging and versatile skill. This tutorial delves into the process of achieving a convincing torn paper look, a technique that can add a unique, tactile dimension to your digital creations. We will explore how to meticulously craft jagged edges, introduce depth and texture, and ultimately imbue your artwork with a sense of authentic imperfection, drawing inspiration from the artistic approach of Lidia Lukianova, an illustrator known for her layered and evocative compositions.
Laying the Foundation: Initializing the Torn Edge
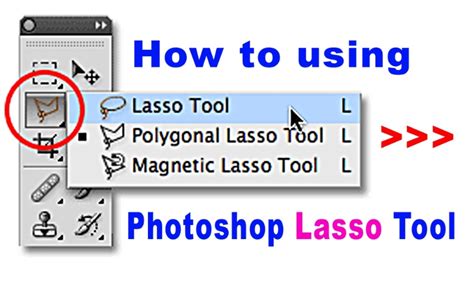
The journey to a realistic torn paper effect begins with defining the torn edge itself. This is where precision meets artistic intuition. For this, the Lasso tool (L) in Photoshop proves to be an invaluable asset, allowing for freehand creation of irregular, jagged lines that mimic the organic nature of ripped paper. Imagine Lidia Lukianova, an artist who clearly appreciates a layer of mystery in her work, employing this very tool to sculpt the visual narrative of her designs.
In a practical application, you would first establish a new layer dedicated to your torn paper element. Using the Lasso tool, carefully draw the desired jagged edge. This initial sketch doesn't need to be perfect; in fact, a degree of irregularity will contribute to the overall realism. Once the shape is defined, you can refine it further. A crucial step involves creating a selection from this drawn edge. This is achieved by Control-clicking (Windows) or Command-clicking (macOS) on the mask of your primary subject layer, such as a model or an object, to which you want to apply the torn paper effect. This action creates a precise selection boundary based on the mask.
Following the creation of this selection, it is vital to deselect the original torn edge layer by holding down Control+D (Windows) or Command+D (macOS). The next strategic move is to drag this torn edge layer below your main subject layer. This layering is fundamental to ensuring the torn paper appears to be obscuring or interacting with the content beneath it, rather than being a flat overlay.
Sculpting Realism: The Warp Tool and Natural Imperfection
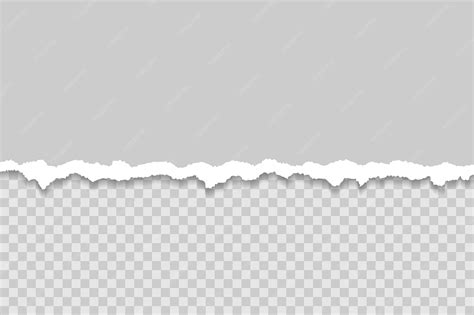
A perfectly straight or uniformly curved ripped edge would immediately betray its digital origin. To counteract this and imbue the torn paper with a natural, organic feel, the Warp tool becomes indispensable. Still working with your dedicated torn paper layer, access the Warp tool through the Edit > Transform > Warp menu. This powerful feature allows you to manipulate the shape of your torn edge by dragging its handles.
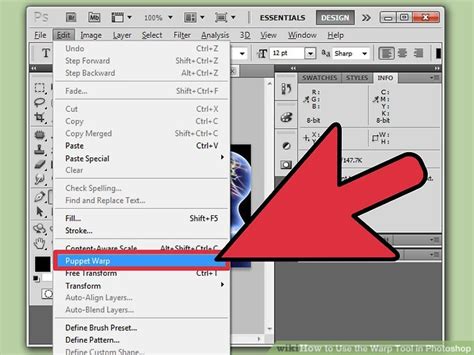
By carefully dragging the top handles of the Warp transformation, you can introduce subtle undulations, bends, and irregularities. The goal here is to break away from geometric perfection and embrace the chaotic beauty of a real tear. Think about how paper actually rips - it rarely follows a predictable path. Experiment with different degrees of warping, pushing and pulling the edges until the torn line looks less uniform and more akin to a genuine tear. This process of customization is key to achieving a believable effect, ensuring that the torn paper element feels like an integrated part of the composition, not an afterthought.
Adding Depth and Dimension: Layer Styles and Textures
To elevate the torn paper effect from a simple cut-out to a visually convincing element, introducing dimension and texture is paramount. This is where Layer Styles in Photoshop come into play. With your "Paper edge" layer still active, double-click on the layer itself to open the Layer Style dialog box. This dialog offers a wealth of options to manipulate how the layer interacts with light and its surroundings.
Within the Layer Style dialog, you'll want to focus on effects that simulate depth and surface detail. Options like "Drop Shadow," "Bevel and Emboss," and "Texture" can be particularly effective. A subtle "Drop Shadow" can create the illusion that the torn paper is slightly lifted from the background, casting a soft shadow that enhances its three-dimensionality. The "Bevel and Emboss" effect can be used to simulate the thickness of the paper, creating highlights and shadows along the torn edge that mimic the way light would catch a physical edge.
What are Layer Styles?
Furthermore, to impart a genuine paper texture, you can drag a paper texture image directly from your desktop onto your open Photoshop document. Once this texture image is placed as a new layer, position it directly above your "Paper edge" layer. By adjusting the blending mode of this texture layer (e.g., "Multiply," "Overlay," or "Soft Light") and its opacity, you can seamlessly integrate the paper's natural grain and imperfections onto your torn edge. This layered approach to texture and depth is what transforms a flat digital shape into a tactile, believable paper tear.
Integrating Sample Files and Advanced Refinements
For those looking to practice these techniques, Adobe Stock offers sample files that can be invaluable for hands-on learning. Lidia Lukianova, for instance, utilizes such resources, enabling her to experiment and refine her workflow. If you choose to use a sample file for practice within this tutorial, remember that any use beyond the scope of this learning exercise may require purchasing a license from Adobe Stock.
The initial steps of defining the torn edge, warping it for naturalism, and applying layer styles for depth are foundational. However, the pursuit of ultimate realism often involves further refinements. Consider the direction and quality of light in your overall image. Does the torn paper cast a shadow on the element behind it? Does it catch highlights in a way that is consistent with the scene's lighting? Adjusting the opacity, drop shadow, and bevel settings can help synchronize the torn paper element with the ambient lighting conditions.
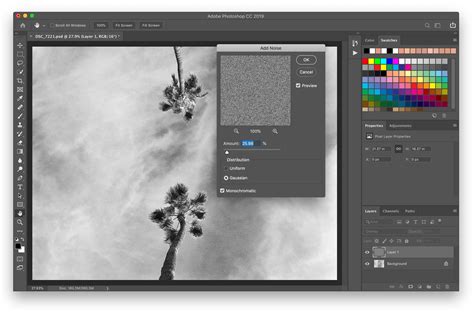
Moreover, the quality of the torn edge itself can be enhanced. If the initial Lasso tool work was too clean, you might consider applying a subtle "Noise" filter to the torn edge layer to break up any overly smooth transitions, further mimicking the granular nature of paper fibers. Conversely, if the tear is too rough, subtle use of the "Smudge" tool or further warping can smooth out specific areas.
The process of creating a realistic torn paper effect in Photoshop is an iterative one. It involves not just the application of tools but also an understanding of how real-world materials behave. By combining precise selection tools with the organic manipulation capabilities of the Warp tool, and by leveraging the depth-adding power of Layer Styles and textures, you can achieve a result that is both visually striking and remarkably authentic, a testament to the nuanced control Photoshop offers to digital artists. The ability to layer these effects and fine-tune them allows for a level of detail that can truly fool the eye, making digital artwork feel tangible and physically present.
The Art of Imperfection: Embracing the Edges
The appeal of the torn paper effect lies in its embrace of imperfection. In a digital realm often striving for flawless perfection, the jagged edge of a torn piece of paper introduces a welcome element of rawness and authenticity. This technique, as demonstrated through the steps and inspired by the approach of artists like Lidia Lukianova, allows for the creation of visual narratives that feel more grounded and tactile.
Consider the psychological impact of such an effect. A torn edge can suggest a history, a process, or even a sense of urgency. It breaks the clean lines of digital design and invites the viewer to engage with the artwork on a more visceral level. This is not merely about replicating a physical object; it's about harnessing the visual language of imperfection to enhance emotional resonance and storytelling within an image.
The careful application of the Lasso tool, the organic manipulation with the Warp tool, and the strategic use of Layer Styles and textures are all steps in a deliberate process. However, the true mastery comes from understanding why these steps work. The Lasso tool allows for manual control, mirroring the unpredictable nature of a physical tear. The Warp tool enables the artist to introduce the subtle curves and bends that are inherent to any material that has been stressed. Layer Styles and textures are not just decorative filters; they simulate the way light interacts with physical surfaces, creating the illusion of depth and material reality.
When integrating these effects, especially when using sample files from sources like Adobe Stock, it's important to consider the overall context of your artwork. The lighting, the color palette, and the subject matter should all inform how you apply the torn paper effect. A rough, frayed tear might suit a vintage or distressed aesthetic, while a cleaner, more defined tear could be used for a modern, graphic look. The versatility of this technique means it can be adapted to a wide range of artistic styles and purposes.
The journey from a simple digital shape to a convincing torn paper effect is a testament to the power of layering and thoughtful manipulation within Photoshop. It’s a process that requires patience, an eye for detail, and a willingness to experiment. By following these steps and understanding the underlying principles, you can confidently add this impactful technique to your digital design toolkit, creating artwork that not only looks good but also feels tangible and emotionally engaging. The key is to move beyond merely applying effects and to truly understand how to sculpt and refine digital elements to mimic the nuances of the physical world, thereby enhancing the storytelling potential of your creations.