Inkscape is a powerful, free, and open-source vector graphics editor that offers a robust set of tools for creating and manipulating scalable vector graphics (SVG). This tutorial aims to demystify the Inkscape user interface and guide beginners through various design processes, from crafting simple icons to more complex illustrations. We will explore fundamental techniques, filters, and practical applications, making Inkscape accessible for both novice users and those looking to enhance their cartoonish art creation skills.
Understanding the Inkscape Interface
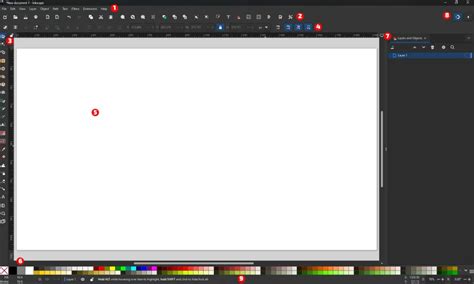
The Inkscape user interface is designed to be intuitive yet comprehensive. At its core, you'll find a central canvas representing your drawing area. Surrounding this are various toolbars and panels that provide access to Inkscape's extensive features.
The Toolbar typically resides on the left side of the window, housing essential tools such as the Select tool, Node tool, Bezier curves and Pen tool, Pencil tool, Text tool, Rectangle tool, Ellipse tool, Star and Polygon tool, 3D Box tool, Calligraphy tool, and the Spray can tool. Each tool has its own set of options that appear in the Tool Controls Bar, usually located just below the main menu bar.
The Command Bar at the top provides standard file operations like New, Open, Save, and Export, along with undo/redo functions. Below this, the Tool Controls Bar dynamically changes based on the selected tool, offering specific parameters and options. For instance, when the Text tool is active, this bar displays font choices, size, and alignment options.
On the right side of the screen, you'll typically find several important panels: the Fill and Stroke dialog, the Layers panel, and the Transform dialog. The Fill and Stroke dialog is crucial for controlling the color, pattern, and opacity of object fills, as well as the color, width, and style of object strokes. The Layers panel allows you to organize your artwork into different layers, which is invaluable for managing complex designs. The Transform dialog enables precise manipulation of objects through translation, scaling, rotation, and skewing.
For beginners, understanding how to navigate these elements is key. For example, when using the Bezier curves and Pen tool, a beginner should note that to get Bezier curves out of the line/bezier tool, you must click-drag. A click-only action will result in only connected straight line segments. This distinction is vital for creating smooth, curved paths.
Crafting SVG Icons: A Step-by-Step Approach
Creating a simple SVG icon in Inkscape involves a series of design steps, utilizing basic shape tools and path manipulation. Let's walk through a demonstration of the design process.
Begin by selecting a fundamental shape, perhaps a circle or a square, from the tool palette. For instance, to create a pseudo sine wave, a common element in logos, one might start by drawing a basic shape. If you are aiming for a logo with specific proportional elements, it's beneficial to set your units to millimeters (mm) and establish grid spacing. For example, setting the grid spacing to 1 mm can be a good starting point. While Inkscape offers a single grid, more experienced users might recall the desire for major and minor grids, similar to other design software.
The process of creating guides is another area where beginners might seek clarity. In some other vector editing software, like Adobe Illustrator 7, clicking on the ruler bar would create a guide. This guide could then be moved with grid snap like any object, making it easy to align elements precisely. In Inkscape, guides are created by dragging them off the ruler. While a guide is placed on the page, it cannot be directly selected or manipulated as a regular object in the same way as paths or shapes. This means you cannot duplicate guides to create additional, accurately spaced grids after the initial one. This limitation is something a beginner might discover when trying to replicate the functionality of a secondary grid.
Once basic shapes are in place, you can use the Node tool to edit paths, adjusting curves and corners to achieve the desired form. For example, if you are creating a logo main element that is a pseudo sine wave, you might have initially made it with grid snap and stretching and replicating. Now, remembering these techniques and how to achieve accurate spacing is important.
Text objects can be added using the Text tool. These can be grouped with other elements for easier management. Grouping allows you to move, scale, or rotate multiple objects as a single unit. For example, if you have a logo with a central graphic and accompanying text, grouping them ensures they stay together.
The final step involves exporting your creation in SVG format, ensuring it remains scalable without loss of quality. This process is fundamental to creating reusable and adaptable graphic assets.
Exploring Filters: Creating a Simple Bubble or Orb
Inkscape's filter effects offer a quick way to add visual flair to your designs. One common application is creating a simple bubble or orb effect, demonstrating the use of the blur filter and clipping.
To start, draw a perfect circle using the Ellipse tool. Hold down the Ctrl key while dragging to constrain it to a circle. Next, apply a radial gradient to the fill of this circle to give it a sense of depth and light. You can choose colors that suggest highlights and shadows, mimicking the way light interacts with a spherical object.
To create a realistic bubble or orb, the blur filter is essential. Apply a Gaussian blur to the circle. The amount of blur will determine how soft the edges appear. Experiment with different blur radii until you achieve a soft, diffused edge that suggests transparency.
Clipping is another powerful technique. You might want to add a highlight or a reflection to your orb. Draw a new shape, perhaps a smaller ellipse or a curved path, representing the highlight. Position this shape over your blurred circle. Then, select both the blurred circle and the highlight shape, and use the Object > Clip > Set command. This will use the outline of the blurred circle to mask the highlight, revealing only the portion of the highlight that falls within the circle's boundaries. This effectively creates a realistic-looking reflection or a glossy surface.
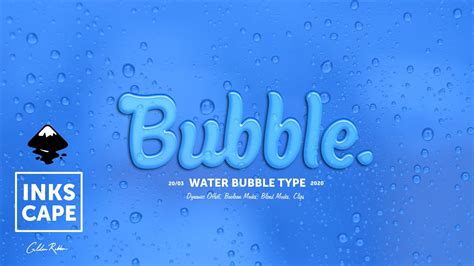
This combination of gradients, blur, and clipping can transform a simple circle into a convincing 3D-like object, demonstrating the power of Inkscape's effects for creating visually appealing graphics.
Coloring Black-and-White Images with Trace Bitmap
Inkscape provides a powerful tool for converting raster images (like JPEGs or PNGs) into editable vector graphics: Trace Bitmap. This is particularly useful for coloring black-and-white images.
To begin, import your black-and-white image into Inkscape. Select the image. Then, navigate to Path > Trace Bitmap. This will open a dialog box with various options.
The Trace Bitmap dialog offers several modes. For a simple black-and-white image, Brightness cutoff is often the most straightforward. This mode converts the image based on a single threshold value for brightness. Pixels brighter than the threshold become white, and those darker become black. You can adjust the threshold slider to fine-tune the detection of edges and details.
Other modes, such as Edge detection or Color quantization, can be used for more complex images or when you want to create a vectorized version with multiple colors. However, for coloring a black-and-white line drawing, Brightness cutoff is usually the preferred method.
After tracing, Inkscape creates a new vector path directly on top of your original raster image. You will need to move the original image aside to see the traced vector version. The traced image is composed of paths that can now be edited with the Node tool.
To color the traced image, you can now fill these paths with desired colors. Select a path segment with the Select tool or Node tool, and then use the Fill and Stroke dialog to choose a new fill color. If your original image was a line drawing, the traced bitmap might result in filled shapes. You can then adjust the stroke and fill properties to achieve the desired coloring. For example, you can remove the stroke and apply a solid color fill, or use gradients for more nuanced coloring.
This technique allows you to breathe new life into old artwork, logos, or scanned drawings, converting them into scalable and easily editable vector formats. It's a fundamental skill for anyone looking to work with existing imagery in Inkscape.
Inkscape Lesson 11 - Trace Bitmap Tool (Convert Raster to SVG)
Cartography Basics with Inkscape
Inkscape can also be a valuable tool for creating maps and cartographic elements. While not its primary purpose, its vector editing capabilities make it suitable for designing clear and scalable maps. The file "Tutorial-cartography_(basic).svg" is a resource designed to help users learn the basics of cartography using Inkscape. By downloading and opening this file in Inkscape, beginners can explore how different map elements are constructed.
This involves understanding how to represent geographical features like rivers, roads, and boundaries using paths and shapes. For instance, rivers can be drawn as flowing Bezier curves, with stroke properties adjusted to give them width and color. Roads can be represented with thicker, more defined strokes, potentially with parallel lines to indicate lanes or divided highways. Landmasses can be created using closed paths, filled with appropriate colors or patterns to denote different terrains or political regions.
Key cartographic principles that can be applied in Inkscape include:
- Scale Representation: While SVG itself is resolution-independent, you can visually represent scale by including a scale bar. This can be constructed using simple rectangles and text labels.
- Symbolism: Different icons can be used to represent points of interest such as cities, landmarks, or facilities. These symbols should be clear and easily recognizable.
- Labeling: Text objects are crucial for labeling map features. Inkscapeâs text tools allow for precise placement and styling of labels, ensuring readability. Font choice and size are critical for legibility, especially when dealing with complex maps.
- Color Palettes: Using a consistent and appropriate color palette is essential for effective cartography. Colors should be chosen to differentiate features without causing visual clutter or confusion. For instance, blues are typically used for water bodies, greens and browns for land, and reds or yellows for important routes or warnings.
By studying the structure of the "Tutorial-cartography_(basic).svg" file, users can gain practical insights into applying these principles within Inkscape, learning how to draw Mac-like clocks or create acrylic photo effects by understanding how shapes, paths, and filters are combined.
Creating Cartoonish Art and Illustrations
Inkscape's versatility extends to creating vibrant and engaging cartoonish art. The combination of its drawing tools, gradient fills, and filter effects allows for a wide range of artistic expressions.
One approach to creating cartoonish art involves using the Bezier curves and Pen tool to draw clean, bold outlines. These outlines are characteristic of many cartoon styles. Once the outlines are established, you can use the Fill and Stroke dialog to apply flat colors or smooth gradients to the interior of the shapes.
The Spray can tool can also be used creatively in cartooning, for example, to add texture or a stippled effect. However, itâs important to use such tools judiciously to maintain a clean, cartoon aesthetic.
For character design, the Ellipse tool, Rectangle tool, and Star and Polygon tool are invaluable for constructing basic body parts and features. These shapes can then be manipulated with the Node tool to create more organic or stylized forms. For instance, a simple circle can become a head, and ovals can form the body and limbs.
The ability to easily duplicate objects and group them simplifies the process of creating symmetrical elements or repeating patterns. For example, if you are drawing a character with two identical eyes, you can draw one, duplicate it, and then position the copy accurately.
Furthermore, Inkscape's support for layers is a significant advantage when working on detailed illustrations. By placing different elements on separate layers â such as background, characters, and foreground objects â you can manage your artwork more effectively, making it easier to edit individual components without affecting others.
Advanced Techniques: Masking and Spot Colors
As users become more comfortable with Inkscape, they can explore more advanced techniques like masking and the use of spot colors.
Masking in Inkscape allows you to use one object to control the visibility of another. It's similar in concept to clipping, but masks can be more complex, allowing for partial transparency and softer edges. To create a mask, you typically have a "mask object" and a "masked object." The mask object determines which parts of the masked object are visible. For instance, if you have a complex illustration and want to reveal only a portion of it through a specific shape, you can use that shape as a mask. The process involves aligning the mask object over the masked object and then applying the mask. This technique is fundamental for creating sophisticated visual effects and is often used in photo manipulation and complex graphic design.
Spot colors are specialized inks used in professional printing. While Inkscape is primarily a design tool, its ability to handle spot colors is crucial for designers who need to prepare artwork for professional printing processes. Spot colors are pre-mixed inks of a specific hue, distinct from the CMYK (Cyan, Magenta, Yellow, Black) process colors. When designing with spot colors in Inkscape, you assign specific spot colors to different objects or layers. This ensures that during the printing process, each spot color is printed with its own dedicated ink, resulting in precise color reproduction, especially for brand colors or specific Pantone shades. This is particularly important for logos and branding where exact color matching is critical. Uploading such designs to a Patch Tracker, for example, would require adherence to specific color output requirements.
Miscellaneous Tips and Tricks
For the less experienced Inkscape user, a few hints and tips can prove invaluable. These are often born from practical experience and can save significant time and frustration.
One such tip relates to managing complex designs. The original concept for a logo might have been a collection of paths filled with colors and text objects. Grouping these elements is key to making replicating some objects easy. When working on a logo, for instance, you might find yourself needing to create precise spacing. Setting your units to millimeters (mm) and adjusting the grid spacing can be very helpful. However, as noted earlier, the default grid in Inkscape is a single grid. If you require more complex grid systems, you might need to create guides manually and use them for alignment.
Remembering how to create guides by dragging them off the ruler is a fundamental skill. While you can't directly duplicate guides to form a secondary grid, you can use existing guides as reference points for placing new objects or creating new guides with precise measurements. For instance, if you need a guide exactly 10mm from an existing one, you can draw a rectangle of 10mm width, align its edge with the existing guide, and then draw a new guide from the opposite edge of that rectangle.
For those transitioning from other software, recalling how features worked elsewhere can sometimes lead to initial confusion. The method of creating guides by dragging from rulers is standard across many vector applications. The limitation regarding guide duplication is a specific characteristic of Inkscape that users learn to work around.
The Coofer Cat's Inkscape Page is a good example of where miscellaneous meanderings with Inkscape might lead to useful hints and tips for beginners. These often arise from the user encountering a problem and finding a creative solution through experimentation.
Working with Photos: Acrylic and Other Effects
Inkscape can be used in conjunction with other software, like GIMP, to achieve various photo effects. For example, creating an "Acrylic Photo" effect from a photo can be a multi-step process.
Typically, this involves using GIMP for initial image adjustments and then importing the image into Inkscape for vector-based enhancements. In Inkscape, you might trace parts of the image to create vector elements or use filters to mimic the texture and depth of acrylic paint. For instance, applying a subtle blur and then overlaying a textured pattern created with Inkscape's tools can give the impression of paint on a canvas.
The process of coloring a black-and-white image using Inkscape's Trace Bitmap is also relevant here, as it can be a precursor to applying other effects. Once a black-and-white photo is vectorized, it can be recolored and stylized using Inkscape's extensive fill and stroke options.
Language and Documentation Resources
While this tutorial is in English, it's worth noting that Inkscape has a global community. For instance, "FLOSS Manuals" offers an Inkscape user guide in Finnish ("FLOSS Manualsin suomenkielinen Inkscape-käyttöopas"). Similarly, there are resources in other languages, such as French ("Comment faire une illustration de A à Z avec inkscape"). This multilingual support underscores Inkscape's accessibility worldwide. Understanding how to mask in Inkscape ("Inkscape'te maskeleme nasıl yapılır?") is a common query across different language communities.
Conclusion
Inkscape is a versatile and powerful tool for graphic design, suitable for a wide range of projects from simple icon creation to complex illustrations and even basic cartography. By understanding its interface, mastering essential tools like Bezier curves and the Node tool, and exploring its filter and masking capabilities, beginners can quickly become proficient in creating professional-looking vector graphics. The ability to trace bitmaps opens up possibilities for working with existing raster images, while the community-driven resources in various languages ensure that help and learning materials are widely available. Whether you're aiming to design a logo, create cartoon characters, or prepare artwork for print, Inkscape offers a robust and accessible platform.