Adding depth, dimension, and a modern aesthetic to typography is a key skill for any graphic designer. Among the myriad of techniques available in Adobe Photoshop, the "long shadow" effect stands out for its ability to imbue text with a striking visual impact, making it a popular choice for posters, social media graphics, and designs demanding a bold statement. This comprehensive tutorial delves into creating a long shadow text effect in Photoshop CC, utilizing efficient methods that ensure both artistic flair and practical application. We will explore how to leverage Smart Objects for editable text, construct the shadow through a series of transformations, and refine the final look using Photoshop's advanced blurring capabilities.
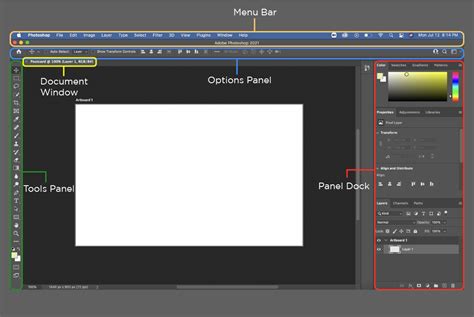
Setting Up Your Canvas and Text
The journey begins with a blank canvas. To start, open Adobe Photoshop and create a new document. The dimensions can be anything you desire, depending on your project's needs. Once your workspace is ready, select the Horizontal Type Tool, conveniently accessed by pressing 'T' on your keyboard. Choose any font that suits your aesthetic and type out your desired text. This initial text will serve as the foundation for our long shadow effect.
To ensure maximum flexibility and non-destructive editing, it's highly recommended to convert your text layer into a Smart Object. This is achieved by right-clicking on the text layer in the Layers panel and selecting "Convert to Smart Object." This crucial step allows you to modify the text at any point without degrading the quality of the applied effects.
Building the Foundation of the Shadow
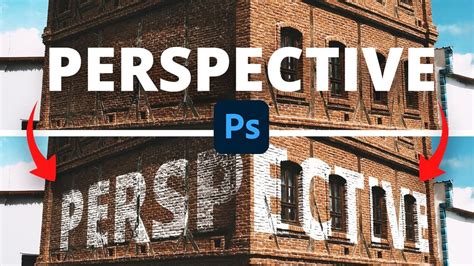
With your text established as a Smart Object, the next phase involves manipulating it to create the elongated shadow form. Navigate to the 'Edit' menu, then select 'Transform' and choose 'Perspective.' This tool allows you to skew the text in a way that mimics the appearance of a shadow cast from a specific angle. By dragging the corner handles of the transformation bounding box, you can stretch the text outwards, establishing the basic length and direction of your shadow.
Following the perspective transformation, a common approach involves utilizing the Gradient Tool ('G'). Ensure that the gradient preset is set to "Black to White." The precise settings in the top toolbar will depend on the desired intensity and blend of your shadow. This black-to-white gradient will form the tonal range of the shadow, transitioning from solid black at the base of the text to a lighter shade as it extends outwards.
Refining the Long Shadow Effect with Layer Styles
While the perspective transformation lays the groundwork, Photoshop's Layer Styles offer a more sophisticated and controlled method for creating compelling long shadows, especially in newer versions of Photoshop CC. This approach allows for greater customization and non-destructive editing.
The Power of Multiple Drop Shadows
With the release of Photoshop CC 2015 and subsequent versions, the ability to apply multiple instances of the same layer style to a single layer revolutionized text effects. This feature is particularly beneficial for crafting intricate effects like long shadows, which historically required numerous manual steps.
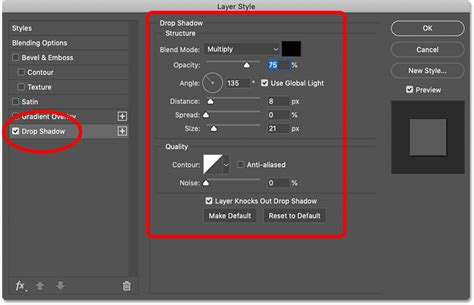
Let's begin by adding a standard 'Drop Shadow' layer style to your text layer. Access Layer Styles by clicking the 'fx' icon at the bottom of the Layers panel and selecting 'Drop Shadow.' Initially, you'll want to configure this first drop shadow to be quite small, creating a subtle base. Adjust the 'Distance,' 'Spread,' and 'Size' sliders to achieve a crisp, close shadow. The 'Angle' control is vital here; it dictates the direction from which the light source appears to be shining, and thus, the direction of the shadow. The 'Use Global Light' option, when checked, ensures that all drop shadows applied with the same angle will maintain consistency, mimicking a single light source.
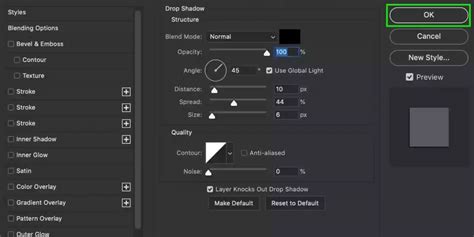
The true magic of the long shadow effect is unlocked by adding subsequent 'Drop Shadow' instances. Click the '+' icon next to the existing 'Drop Shadow' style within the Layer Styles dialog box. Each time you add a new instance, you can independently adjust its properties. For a long shadow, the key is to progressively increase the 'Distance' for each new drop shadow layer. By carefully controlling the spacing between these shadows, you can create a smooth, elongated trail of darkness.
It's important to pay close attention to the 'Spacing' when adding multiple drop shadows. If the spacing is too loose, you risk creating jagged edges on your shadow, detracting from its realism. Experiment with values until you achieve a clean, continuous line.
Enhancing with Strokes and Layer Groups
To further enhance the long shadow effect, consider adding a 'Stroke' layer style. This stroke should ideally match the color of your drop shadow, creating a unified appearance.
When you reach Photoshop's limit of ten instances of a single layer style on one layer, you can employ Layer Groups to extend the effect. Place your text layer into a new Layer Group. You can then apply additional 'Drop Shadow' layer styles to this group itself. This allows you to continue extending the length of your long shadow by adding more instances of the effect to the group. Carefully adjust the settings for the drop shadow applied to the group, ensuring it aligns seamlessly with the shadows from the text layer, effectively doubling or further extending the shadow's length.
Photoshop QUICK Tip: Easiest Way to Create Long, Solid, Drop Shadows!
Alternative Approaches: Smart Objects and Transformations
Beyond the advanced Layer Styles method, a more direct, albeit less flexible, approach involves using Smart Objects and transformations.
Start by creating your text layer and converting it to a Smart Object, as described earlier. Then, duplicate this Smart Object layer. On the bottom layer, apply a solid color fill, such as black. This will serve as the base of your shadow.
Next, use the 'Edit > Transform > Perspective' tool on this colored layer. Stretch and skew it to create the elongated shadow shape, similar to the initial steps. You can then adjust the opacity of this layer to control the shadow's intensity.
For a more nuanced shadow, you might consider using the 'Gradient Tool' on this transformed layer. Apply a black-to-white gradient, adjusting its angle and opacity to create a softer, more natural-looking shadow.
Another method involves duplicating the text layer, filling the duplicate with black, and then applying a significant 'Gaussian Blur' filter. After blurring, use the 'Transform' tools (Scale, Skew, Perspective) to stretch this blurred layer into a long shadow. This technique provides a softer, more diffused shadow effect.
Understanding Shadow Properties and Realism
Learning how to add shadows in Photoshop is a fundamental skill that unlocks countless creative opportunities. Whether it's a simple drop shadow or an elaborate long shadow, understanding the principles of light and shadow is key.
Drop Shadows: These give the impression that a layer is hovering above the background, casting a shadow beneath it. The 'Distance' slider controls how far the shadow is from the object, influencing the perceived height. The 'Size' slider softens the edges of the shadow, mimicking the diffusion of light. The 'Spread' slider affects the intensity and thickness of the shadow's edges.
Real-World Shadows: It's crucial to remember that real-world shadows are typically soft and subtle. While dramatic shadows can be artistically effective, an excessive or unnatural shadow can lead to an unprofessional look. Consider the direction of your imaginary light source and how it would realistically cast a shadow. The 'Angle' control in Photoshop's Layer Styles is your primary tool for this.
Inner Shadows: Unlike drop shadows that fall behind an object, inner shadows create depth by simulating shadows within the object itself. This can make elements appear recessed or carved.
Advanced Techniques and Considerations
Creating Shadows with Depth
When text overlays an image with multiple colors, a drop shadow can significantly improve readability. If black text, for instance, blends into dark areas of the background, a drop shadow can provide the necessary contrast to make it stand out. However, be mindful that overly dramatic drop shadows can sometimes hinder legibility.
Detaching Shadows for Greater Control
For advanced manipulation, you can detach a drop shadow from its layer, allowing it to exist as its own independent layer. Right-click on the layer with the applied Layer Style and select 'Create Layer' under the 'Layer Style' submenu. This separates the shadow, giving you complete control over its position, transformation, and blending modes. This is particularly useful when you need to precisely position a shadow or apply further effects to it independently.
Using the Blur Gallery for Sophisticated Shadows
For exceptionally realistic and artistic long shadows, Photoshop's Blur Gallery offers powerful tools. After creating the basic shape of your long shadow using transformations or multiple drop shadows, you can apply filters from the Blur Gallery, such as 'Field Blur' or 'Iris Blur.' These allow for localized blurring and precise control over the shadow's softness and falloff, creating a truly refined effect.
Conclusion
Mastering the long shadow text effect in Photoshop CC is a valuable skill that can elevate your designs. Whether you opt for the advanced Layer Styles method with multiple drop shadows and layer groups, or the more direct approach using Smart Objects and transformations, the key lies in understanding how light and shadow interact. By practicing these techniques and paying attention to the subtleties of real-world shadows, you can consistently create visually compelling and professional typography that commands attention. This effect is easily reusable; simply update the text within your Smart Object, and the entire shadow effect will automatically adapt, saving you time and ensuring consistency across your projects.