Infusing your photographs with a touch of vintage allure or a cinematic mood is an art form, and Photoshop offers a robust toolkit to achieve these sought-after effects. This tutorial delves into the multifaceted process of utilizing Photoshop's powerful tools to add realistic and appealing grain textures to your images. Whether you're aiming for the timeless nostalgia of film photography, the gritty realism of cinematic edits, or simply want to add depth and tactile feel to digital designs, understanding how to effectively incorporate grain is a valuable skill.
The Foundation: Preparing Your Image for Grain
The first crucial step in adding any texture, including grain, in Photoshop is to ensure that your original image remains unaltered. This principle of non-destructive editing is paramount for flexibility and maintaining the highest image quality.
To begin, open your selected photo in Adobe Photoshop. The most effective way to preserve the original state of the photo is to create a new layer specifically for the grain effect. This is achieved by navigating to "Layer" > "New" > "Layer." This action opens the "New Layer" dialog box. While you could click "OK" immediately, there are further preparatory steps required to optimize this layer for its intended purpose.
Once the new layer is created, it's time to set it up for the grain application. A common and highly effective method involves setting the layer's blend mode. For achieving a natural-looking grain that integrates well with the underlying image, setting the layer's blend mode to "Overlay" is often recommended. This mode allows the underlying image's colors and tones to show through while still allowing the texture of the grain to be visible. Alongside this, ensure the layer's opacity is set to 100% initially, as this can be adjusted later to fine-tune the intensity of the grain effect.
A further preparatory step involves filling this new layer with a neutral gray color. Within the "New Layer" dialog box, or by selecting the layer and going to "Edit" > "Fill," choose "50% Gray" or a neutral gray color. This gray fill, when combined with the "Overlay" blend mode, becomes effectively transparent, creating a clean slate upon which the grain can be applied without introducing unwanted color casts.
The Core Technique: Adding Grain with "Add Noise"
The "Add Noise" filter is a fundamental tool within Photoshop for introducing grain. However, to ensure this effect is fully editable and non-destructive, it's essential to convert the newly created layer into a Smart Object.
To convert your layer into a Smart Object, right-click on the layer in the Layers panel and select "Convert to Smart Object." You'll observe a tiny symbol appearing at the lower right edge of the layer thumbnail, signifying its transformation. This conversion is vital because it allows filters applied to this layer to become "Smart Filters," meaning they can be re-edited or adjusted at any time without degrading the image quality.
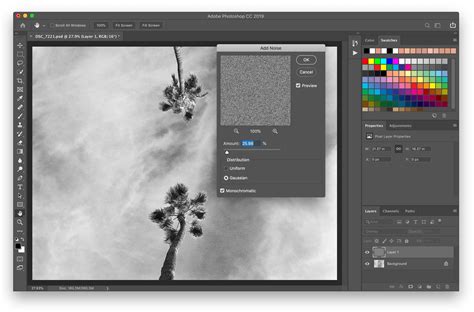
With the layer as a Smart Object, you can now apply the "Add Noise" filter. Navigate to "Filter" > "Noise" > "Add Noise." This opens a dialog box where you can control the characteristics of the grain. To make the grain effect more prominent and achieve a classic film look, adjust the "Amount" value. A starting point of around 20% is often effective, but this is highly dependent on the image resolution and desired outcome.
Crucially, select "Gaussian" for the distribution type. This method distributes the noise in a more natural, bell-curve pattern, closely mimicking the look of film grain. Furthermore, ensure the "Monochromatic" option is checked. This prevents the noise from introducing color variations and ensures the grain appears in shades of gray, just like real film grain. By clicking "OK," the noise is applied as a Smart Filter to your Smart Object layer.
Refining the Grain: Gaussian Blur and Beyond
While the "Add Noise" filter provides the foundational grain, sometimes a slight refinement can lead to a more aesthetically pleasing and natural-looking result. Applying a subtle Gaussian Blur to the "Add Grain" layer can help soften the grain, making it appear less digital and more organic, similar to how real film grain behaves.
To do this, ensure the "Add Grain" layer (which is now a Smart Object) is selected. Go to the top menu bar and click on "Filter" > "Blur" > "Gaussian Blur." In the dialog box that appears, adjust the "Radius" value. A very small radius, often around 0.2 to 0.5 pixels, is usually sufficient. The goal is to slightly soften the edges of the individual noise specks without making the grain appear blurry or indistinct. Click "OK" to apply this as another Smart Filter.
The beauty of using Smart Objects and Smart Filters lies in their editability. If, after applying the Gaussian Blur, you feel the grain is still too harsh or too soft, you can easily readjust. In the Layers panel, under the "Add Grain" Smart Object layer, you will see the applied filters listed. Double-click on "Add Noise" to reopen its settings and tweak the "Amount" or distribution. Similarly, double-click on "Gaussian Blur" to adjust its radius. This non-destructive workflow allows for extensive experimentation and iteration until the perfect effect is achieved.
How to Add Grain in Photoshop | Photoshop Tutorial
Exploring Alternative Approaches and Filters
While the "Add Noise" filter is a primary method, Photoshop offers other avenues for creating grain textures, each with its own nuances.
Camera Raw Filter for Grain
For a more integrated and often quicker approach, the Camera Raw filter's "Effects" tab provides a dedicated "Grain" slider. This filter is particularly effective for applying subtle, uniform grain that blends seamlessly with the image. To use it, ensure your image layer is selected (or convert it to a Smart Object for editability). Navigate to "Filter" > "Camera Raw Filter." Within the Camera Raw interface, locate the "Effects" tab and find the "Grain" section. Adjusting the "Amount," "Size," and "Roughness" sliders allows for fine-tuning the grain's appearance. This method is often favored for its speed and the natural feel it imparts.
Textured Overlays
Another powerful technique involves using pre-made grain texture images as overlays. These can be high-resolution photographs of actual film grain, or digitally created textures. Download or create a suitable grain texture image. Open it in Photoshop, and then drag and drop this texture image onto your main photo's document. Position and scale it as needed. Then, set the blend mode of this grain texture layer to "Overlay," "Soft Light," or "Hard Light" for different results. You can further adjust the opacity of the grain layer to control its intensity. This method offers immense control over the specific look and feel of the grain, as you can choose from a vast array of texture types.
Understanding Grain in Design and Photography: Key Use Cases
Grainy effects are not merely an aesthetic choice; they serve functional and artistic purposes across various creative fields.
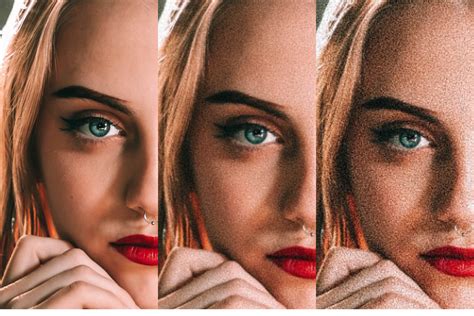
- Vintage & Film-Style Photography: Adding grain texture in Photoshop is fundamental to recreating the look of classic film photography. This helps imbue images with a sense of timelessness and nostalgia, evoking the imperfections and character inherent in analog processes.
- Cinematic & Retro Edits: Designers and filmmakers frequently employ Photoshop grain filters to achieve a cinematic aesthetic. This can enhance mood, add a layer of realism, and contribute to a retro or stylized visual language in creative projects, from film posters to motion graphics.
- Textured Graphic Design: In graphic design, applying grainy effects to posters, album covers, social media graphics, and digital artwork can introduce a tactile feel. This adds depth to otherwise flat designs, making them more engaging and visually interesting.
- Photo Enhancements & Noise Reduction (Paradoxical Use): Counterintuitively, the Photoshop grain filter can be useful for reducing overly smooth or artificial-looking surfaces in digital images. By adding a subtle texture, it can make digital photos appear more natural and less "plastic."
- Blending & Softening Edits: Grain texture in Photoshop can also be employed to help blend different elements within a composite image. The added texture can create a more cohesive and organic look, making disparate elements appear as if they belong together.
Common Pitfalls to Avoid When Adding Grain
While the process of adding grain in Photoshop is generally straightforward, certain mistakes can detract from the final image quality. Being aware of these common pitfalls can help you achieve professional results.
- Overusing Grain: The most frequent mistake is applying too much grain. Excessive grain can overpower the image's details, making it look noisy, distracting, and unprofessional. A subtle approach is almost always best, enhancing the image without overwhelming it. The goal is texture, not a pixelated mess.
- Applying Uneven Texture: An inconsistent grain pattern can make an image appear unnatural. Some areas might be heavily textured while others remain too smooth. Consistency is key. Ensure the grain distribution is balanced across the entire image for a seamless integration.
- Ignoring Blending Modes: Failing to experiment with different blending modes (like Overlay, Soft Light, or even Multiply for darker grains) can lead to a flat or unappealing grain effect. These modes are crucial for controlling how the grain interacts with the underlying image.
- Skipping Color Adjustments: Sometimes, adding grain can subtly alter the colors in an image, making them appear muted or slightly off. It's often beneficial to make minor color balance or saturation adjustments after applying grain to ensure the overall photo remains vibrant and true to its original tone.
- Using Low-Resolution Grain: If you're using grain texture overlays, ensure they are of high resolution. Low-resolution textures can result in pixelated or coarse-looking noise that degrades the overall quality of your image.
Beyond Photoshop: Exploring Other Tools
While Photoshop remains the industry standard, other software solutions offer streamlined ways to achieve grain effects. The CapCut desktop video editor, for instance, is a user-friendly tool designed for quick and easy application of cinematic grain to both images and videos. Its interface allows for effortless enhancement of texture and mood, providing a professional cinematic look with just a few clicks. Features like built-in film grain effects, seamless overlay blending, and customizable sharpness control make it an accessible option for those seeking a fast and effective way to add grain.
Conclusion: Mastering Your Grain Workflow
Learning to effectively add grain in Photoshop significantly enhances your ability to control the texture, mood, and artistic style of your images. By understanding the nuances of filters like "Add Noise" and "Camera Raw," utilizing Smart Objects for non-destructive editing, and experimenting with blend modes and subtle blurs, you can achieve a wide spectrum of grainy effects, from subtle filmic textures to bold, artistic statements. Remember that practice and experimentation are key to mastering any photographic editing technique. By carefully considering the use cases and avoiding common mistakes, you can elevate your images with artistic texture and professional-quality finishes.