Transforming ordinary outdoor shots into breathtaking, cinematic masterpieces is an attainable goal for any photographer. This tutorial delves into the art of using Lightroom presets to enhance nature photography, with a particular focus on achieving vibrant, controlled green tones and a polished, professional aesthetic. We will explore the common challenges encountered in raw outdoor images and demonstrate how strategic adjustments can elevate your photographs for platforms like Instagram and Google.
Decoding the Raw Outdoor Image: Common Challenges
Raw outdoor images, while offering a wealth of detail, often present several common issues that detract from their visual appeal. Understanding these limitations is the first step toward effective editing.
Flat or Overexposed Skies
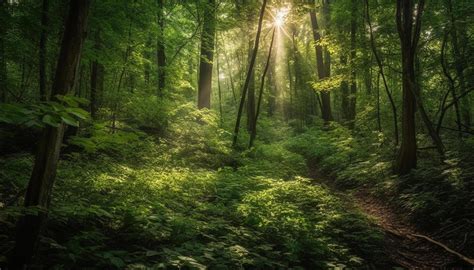
One of the most frequent problems is a sky that appears either overexposed, rendering it a washed-out white, or simply flat and lacking any discernible texture or depth. This can significantly diminish the overall impact of a landscape photograph, making it feel less dynamic and engaging. The subtle gradations of blue or the dramatic formations of clouds are often lost in the raw capture, leading to a less compelling visual narrative.
Uneven and Dull Greens
Nature's most dominant color, green, can be surprisingly difficult to render accurately. In raw images, greens often appear uneven, with patches of dullness or an unnatural cast. This can range from muddy tones to an over-reliance on a single shade, failing to capture the subtle variations that make natural foliage so rich and complex. The vibrancy and life inherent in healthy plant life are often suppressed, leaving the image feeling lifeless.
Subject Blending with the Background
Achieving a clear separation between the main subject and its background is crucial for a strong composition. In raw outdoor shots, subjects can easily become lost, blending into the surrounding environment. This lack of distinction makes it difficult for the viewer's eye to focus on the intended point of interest, weakening the photograph's storytelling potential and overall impact.
Lack of Depth and Contrast
A photograph that lacks depth and contrast can appear flat and uninspired. Without sufficient tonal range, the image fails to convey a sense of three-dimensionality, and the interplay of light and shadow is diminished. This can result in a photograph that feels as though it is "pasted" rather than "seen," missing the subtle cues that draw the viewer into the scene.
Achieving a Cinematic Green Result: The Power of Lightroom Presets
Lightroom presets offer a powerful and efficient way to address these common issues and transform your nature photographs. By applying carefully crafted adjustments, you can bring out the best in your images, creating a cohesive and visually striking aesthetic.
3 Simple Steps for Toning Green in Lightroom | How to Tone Greens in Your Photographs
Vibrant and Controlled Greens
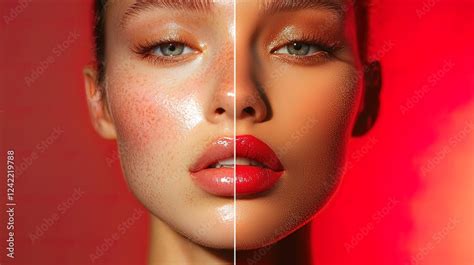
The goal is to make the greens in your image vibrant and controlled. This means enhancing their richness without letting them become oversaturated or unnatural. The aim is to bring out the subtle variations in hue and luminosity that define different types of foliage, from the deep emerald of a forest canopy to the bright, fresh green of new growth. This controlled vibrancy adds a professional polish and a sense of life to the scene.
Soft and Smooth Skies
A well-edited sky can add immense beauty to a photograph. The aim is to achieve a soft and smooth appearance, reducing any harshness or overexposure. This involves carefully managing highlights and ensuring that the sky complements, rather than competes with, the rest of the image. A smooth sky can enhance the mood of the photograph, whether it's a serene blue expanse or a dramatic, cloud-filled vista.
Clear Subject Highlight
Ensuring your subject stands out is paramount. Through targeted adjustments, you can highlight the subject clearly, making it the undeniable focal point of the image. This often involves subtle increases in exposure or clarity for the subject, creating a gentle separation from the background and guiding the viewer's eye precisely where you want it to go.
A Fresh and Premium Feel
The ultimate outcome of these adjustments is an image that feels fresh and premium. The combination of vibrant, controlled colors, a well-balanced sky, and a clearly defined subject contributes to a polished and professional look. This elevated aesthetic is what transforms a good photograph into an exceptional one, ready to capture attention on any platform.
Lightroom Editing Settings: A Step-by-Step Breakdown
To achieve this cinematic green look, a specific set of Lightroom adjustments can be employed. While presets offer a starting point, understanding the underlying settings provides greater control and customization.
Basic Panel Adjustments
The Basic panel is where you establish the foundational exposure and tonal balance of your image.
- Exposure: A slight increase of +0.30 can help brighten the overall image, bringing out details in darker areas without blowing out highlights.
- Contrast: Increasing contrast by +25 adds punch and separation between light and dark tones, giving the image more impact.
- Highlights: Bringing highlights down to -45 is crucial for taming overexposed skies and bright areas, preserving detail and preventing a washed-out look.
- Shadows: Lifting shadows to +40 reveals detail in the darker parts of the image, adding depth and preventing the image from looking too dark or muddy.
- Whites: A slight increase to +15 can help define the brightest points in the image, adding a subtle sparkle without creating harshness.
- Blacks: Setting blacks to -20 deepens the darkest tones, adding contrast and a sense of richness to the image.
Color Adjustment
Fine-tuning the color balance is essential for achieving the desired mood and vibrancy.
- Temperature: A slight warm adjustment can add a pleasant, inviting tone to the image, especially for outdoor scenes.
- Vibrance: Increasing vibrance to +20 selectively boosts muted colors, enhancing their richness without over-saturating.
- Saturation: A slight decrease in saturation to -5 can prevent colors from becoming too intense, ensuring a more natural and balanced look.
HSL Panel: The Key to Green Control
The Hue, Saturation, and Luminance (HSL) panel is where you gain precise control over specific color ranges, making it indispensable for nature photography.
- Green Hue: Shifting the green hue slightly towards yellow can often create a more natural and vibrant green, mimicking the way our eyes perceive sunlight on foliage.
- Green Saturation: Increasing green saturation to +15 makes the greens pop, bringing out their inherent richness and vitality.
- Green Luminance: Boosting green luminance by +10 brightens the green areas, making them appear healthier and more vibrant.
- Blue Saturation: Decreasing blue saturation to -20 can help to prevent the sky or other blue elements from overpowering the greens, creating a more harmonious color palette.
Masking for Targeted Enhancements
Masking allows for selective adjustments, ensuring that changes are applied only where they are needed, preserving the natural look of the image.
- Subject Mask: Increasing the exposure on the subject mask subtly brightens the main point of interest, making it stand out more prominently.
- Sky Mask: Reducing highlights in the sky mask helps to bring back detail and prevent it from being overexposed, creating a smoother and more natural appearance.
- Background Mask: Applying a slight clarity reduction to the background mask can soften its appearance, further helping the subject to pop and creating a pleasing depth of field.
Why This Nature Edit Goes Viral
The popularity of this particular editing style stems from its alignment with current visual trends and its ability to create highly engaging content.
The Trending Fresh Green Aesthetic
There is a strong and ongoing trend towards fresh, vibrant green aesthetics in visual media. This look evokes feelings of nature, health, and well-being, making it highly appealing to a broad audience. Images that embody this aesthetic often stand out and resonate deeply with viewers.
High Engagement in Travel and Nature Reels
In the realm of social media, particularly on platforms like Instagram Reels, travel and nature content consistently garners high engagement. This type of editing style perfectly complements these themes, providing the polished, eye-catching visuals that perform exceptionally well in short-form video formats.
Clean Cinematic Tone
The clean, cinematic tone achieved through these Lightroom adjustments offers a sophisticated and professional look. It elevates the perceived quality of the photograph, making it more impactful and memorable. This elevated aesthetic appeals to both casual viewers and photography enthusiasts alike.
Professional Look from Mobile
The accessibility of powerful editing tools on mobile devices means that this professional look is no longer exclusive to desktop users. With the right presets and techniques, stunning results can be achieved directly from a smartphone, democratizing high-quality nature photography.
Best Use Cases for Cinematic Green Presets
The applications for this editing style are diverse, making it a valuable tool for a wide range of photographic endeavors.
Tea Garden Photography
Tea gardens, with their lush, manicured greenery, are perfectly suited for this editing style. The enhanced greens will bring out the vibrancy and health of the tea plants, while the cinematic tone adds a touch of elegance to the scene.
Forest Portrait Shots
Capturing portraits within a forest setting benefits greatly from this approach. The controlled greens will create a beautiful, natural backdrop that complements the subject, while the enhanced contrast and depth will make the portrait truly pop.
Travel Instagram Posts
For travel photographers, this preset offers a way to make their destination photos stand out. The fresh, vibrant aesthetic is ideal for showcasing the beauty of natural landscapes and creating visually appealing content for social media feeds.
Outdoor DP Photos
Whether for personal use or professional portfolios, outdoor "DP" (display picture) photos will achieve a remarkable level of polish. The cinematic quality and vibrant colors will ensure these images are eye-catching and memorable.
The Importance of Licensing and Usage Rights
When utilizing presets, understanding the terms of use is crucial. It's important to remember that:
"You may only use these products for personal or professional use. This license extends to the single, individual purchaser. This license does not extend to companies or partnerships and may not be resold, loaned, and/or gifted to another individual and/or party. You may not share, loan or redistribute/sell or copy any of these files in any way. All Presets, Actions, Overlays, and Digital Backdrops by Pretty Presets & Actions are copyright protected. Due to the downloadable nature of these products, all digital sales are final sales."
This clarifies that presets are for individual use and cannot be shared or resold. Adhering to these guidelines ensures you are using the purchased assets ethically and legally.
Exploring Free and Premium Preset Options
For photographers looking to enhance their nature imagery, various options exist.
Free Lightroom Presets for Nature Photography
Resources like "Awesome Nature" offer free Lightroom presets specifically designed for nature photography. To access these, users often need to follow specific instructions, such as watching a tutorial video and remembering a password for downloading in DNG format. This provides an excellent entry point for those experimenting with preset editing.
The Value of Paid Preset Sets
While free presets are valuable, investing in premium preset sets can offer more advanced features, a wider range of styles, and dedicated support. These sets are often curated by professional photographers and can provide a more comprehensive toolkit for achieving specific looks, including those similar to the cinematic green style discussed.
Continuous Improvement and New Presets
The world of photography is constantly evolving, and so is the availability of editing tools. Following creators and platforms that regularly release new presets ensures you can stay current with emerging trends and continually improve your photo editing skills. The pursuit of the perfect edit is an ongoing journey, with new presets and techniques emerging daily.