Adding an outline to text, often referred to as a "stroke," is a fundamental design technique that significantly enhances visual impact. This tutorial delves into the process of creating and customizing text outlines in Adobe Photoshop, exploring its applications, benefits, and considerations for professional printing. From making headlines pop on a poster to mimicking the vibrant glow of neon signs, understanding how to effectively outline text opens up a world of creative possibilities.
The Power of Text Outlines in Design
Text stroke, also known as an outline, plays a significant role in design by enhancing the visual impact of text. For example, in a poster design, adding a stroke to the headline text can make it bolder and more prominent, ensuring it catches the viewer's attention. For instance, a neon sign-inspired design can utilize a vibrant colored stroke to mimic the glow of real neon lights. Outlining text can also serve to separate text from busy backgrounds, ensuring legibility and clarity. It can provide a subtle emphasis or a bold statement, depending on the chosen color, thickness, and style of the outline. The versatility of text outlines makes them an indispensable tool in a designer's arsenal, applicable across a wide spectrum of projects, from digital graphics to print media.
Step-by-Step: Creating a Text Outline in Photoshop
To begin, you'll need to open the Photoshop software and create a new canvas. For a standard tutorial size, dimensions of 1280x720 pixels are a good starting point.
Create Your Text: Locate the Text Tool in the left toolbar of Photoshop. This tool is represented by an icon resembling the letter "T." Click and drag on your canvas to create a text box. By default, Photoshop's Text Tool is set to the Horizontal Type Tool, allowing you to input text horizontally. Type your desired text into the box.
Access Layer Styles: Once your text is in place, you'll need to access the Layer Style options. Locate the text layer in the Layers panel, which is typically found at the bottom right of your Photoshop workspace. Right-click on this text layer using your mouse. A context menu will appear.
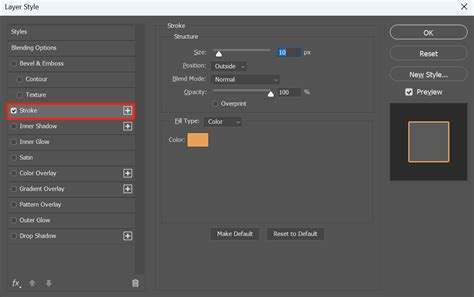
Apply the Stroke: From the context menu, select "Blending Options." This will open the Layer Style window. On the left side of the Layer Style window, you will see a list of various effects. Locate and check the "Stroke" option.
Customize the Stroke: With the "Stroke" option checked, a new set of controls will appear below it, allowing you to customize the outline.
- Size: This slider or numerical input determines the thickness of your outline. You can adjust this to make the stroke wider or narrower.
- Position: This dropdown menu offers three options: "Inside," "Center," and "Outside."
- Inside: The outline will be drawn inwards from the edge of the text.
- Center: The outline will be centered on the edge of the text, extending both inwards and outwards.
- Outside: The outline will be drawn outwards from the edge of the text.
- Color: Click on the color swatch to open the Color Picker and select your desired outline color. This is where you can create vibrant effects like the neon glow mentioned earlier, or a simple black or white border.
- Blending Mode: This dropdown allows you to control how the stroke interacts with the underlying pixels. "Normal" is the most common choice for a standard outline.
- Opacity: Adjust the transparency of the stroke.
Enhancing Text Outlines with Texture and Effects
For an extra touch of creativity and depth, you can enhance the text stroke by adding texture or further stylistic effects.
Adding Texture: To apply a texture to your outline, create a new layer above your text layer. Select a textured brush preset from the brush options in Photoshop. You can then paint onto this new layer, using the textured brush, to create a textured effect that can be clipped to your text layer or blended in various ways. Alternatively, for a more integrated approach, you can utilize Photoshop's pattern overlay features within the Layer Styles for the stroke itself, if the texture is intended to be part of the outline's color.
Multiple Strokes: Photoshop allows you to add multiple strokes to a single text layer, offering even more complex outline designs. In the Layer Style window, next to the "Stroke" effect, you'll see a plus sign (+). Clicking this will add a second stroke layer above the first. You can then customize each stroke with different colors, sizes, and positions, creating layered effects like a thick colored outline with a thinner black border.
Modifying Fill Opacity: If you wish to remove the original text fill and retain only the outline, you can do so by adjusting the "Fill Opacity" slider within the Layer Style window. Drag the Fill Opacity bar down to 0%. This makes the text itself transparent while keeping the stroke visible.
Advanced Techniques and Creative Applications
Beyond the basic stroke, Photoshop offers advanced methods to achieve unique text effects.
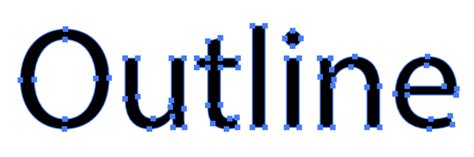
Converting Text to Vector Shapes: While the "Stroke" layer style is the most common method, you can also outline text by converting it into a vector shape. This process offers more granular control but can make the text less editable later. To do this, right-click on your text layer and select "Convert to Shape." Once converted, you can then apply layer styles or use the Pen Tool to further manipulate the outline. This method is particularly useful for logos or designs that require scalability without quality loss.
Utilizing Smart Objects: Some pre-made text effect styles, often found on marketplaces like Envato Elements, utilize Smart Objects. When you apply such a style, double-clicking the text layer will open a separate file where you can edit the text directly. Saving this separate file will automatically update the main design with the applied effect, including the outline. This is a powerful way to achieve complex, pre-designed looks with minimal effort.
3D Text Effects: For a truly impactful design, consider using Photoshop's 3D capabilities or pre-made 3D text effect styles. These can create impressive depth and dimension, often incorporating outlines as part of the overall 3D rendering. These effects can make text look like it's made of various materials or has intricate lighting, with outlines playing a crucial role in defining its form.
Create a Glowing Neon Text Effect in Photoshop
The Importance of Outlining Fonts for Printing
When preparing designs for professional printing, outlining fonts becomes a critical step, though it comes with its own set of considerations.
Why Outline Fonts Before Printing?
Simply put, just because you have a specific font installed on your computer doesn’t mean that anyone else you’ll send the file to has the same font installed on theirs. If they don’t, their computer will substitute the font with a different one, wasting the hard work you put into choosing the perfect font and ensuring the text in your document is laid out properly. Outlining fonts is a step that designers can take to ensure the fonts used in their document print correctly before sending their working design files to a professional printer. This process converts the editable text into vectorized shapes, essentially turning letters into graphic objects. This ensures your font will print as you designed it regardless of whether or not your printer has the same font installed.
Pros and Cons of Outlining Your Fonts
Pros:
- Font Integrity: Guarantees that the font appears exactly as intended on the final printed piece, regardless of whether the printer has the font installed.
- Vector Scalability: Outlined text becomes vector artwork, meaning it can be scaled to any size without losing quality.
Cons:
- Loss of Editability: Once outlined, the text is no longer editable as text. You cannot easily change the wording, spelling, or font type without reverting to an earlier version of your file.
- Formatting Issues: Not all formatting comes through when you outline fonts. Oftentimes, strikethroughs, underlines, bullets, and numbering included in your file can disappear or be altered when text is outlined. This is particularly problematic for documents with extensive formatting.
- Printer Workflow: While it ensures font integrity, some printers prefer embedded fonts for greater flexibility in making minor corrections during the preflight process.
Outlining Fonts vs. Embedding Fonts: Which is Better?
The choice between outlining and embedding fonts depends on your specific needs and the printer's requirements.
- Outlining: Best for final artwork where no further text edits are anticipated. It provides the highest level of certainty that the font will render correctly. However, it sacrifices editability.
- Embedding: This method embeds the font data within the document file. It allows the printer to potentially edit the text if necessary, which can be advantageous for minor corrections during print production. However, there's a slight risk, albeit small with modern printing workflows, that the font might not render perfectly if the embedding is incomplete or if the printer's system has issues with the embedded font.
At Thomas Group Printing, for instance, they accept files with outlined fonts but prefer that customers embed fonts in their design files instead. This preference allows them to make edits to the file if needed to ensure it prints correctly. During print production, their preflight team can easily make adjustments to the artwork even without owning the font when they are embedded, which is great if you need an extra hand to make a small correction in your file before it goes to print.
How to Outline Text in Other Design Programs
Adobe InDesign: In InDesign, outlining fonts is straightforward. Highlight all the text with the Type tool, then go to
Type > Create Outlines. Afterward, save a new version of your file for print readiness. It's recommended to only outline fonts in InDesign when the document does not include extensive formatting like strikethroughs, underlines, or bullet points, as these styles may be lost.Adobe Acrobat Pro: For PDF files, you can outline fonts within Acrobat Pro. Open the PDF, navigate to the Print Production Panel, and utilize the outlining options there. This is often a last-resort step to ensure font fidelity in a PDF.
Streamlining Your Photoshop Workflow
While mastering Photoshop's tools is essential, the efficiency of your workflow can be significantly enhanced. Traditional keyboard and mouse operations can sometimes feel limiting. Innovative tools like TourBox are designed specifically for creative professionals. Devices like TourBox allow for intuitive control over brush sizes, zooming, layer navigation, and other critical functions, enabling greater precision and speed, which can be invaluable when working with detailed text effects and outlines.
Considerations for Typographic Design
It's important to remember that typography designers invest significant effort into refining the appearance and characteristics of every font. Applying an outline to text can sometimes disrupt the designer’s intended aesthetic. Before applying an outline, consider if it genuinely enhances the design or if it detracts from the font's inherent beauty. Sometimes, a well-chosen font and thoughtful layout are sufficient without the need for an added outline.
Conclusion
Outlining text in Photoshop is a versatile technique that offers numerous creative and practical benefits. Whether you're aiming to make your text stand out, create a specific visual effect, or prepare your files for professional printing, understanding the nuances of the Stroke layer style, vector conversion, and the implications for print production will empower you to achieve professional-quality results. Remember to always save a copy of your original, editable text file before outlining, ensuring you have a fallback for any future edits.