InDesign's Links panel is an indispensable tool for managing the images and other external assets that bring your documents to life. Understanding its capabilities is crucial for maintaining an efficient workflow, ensuring the integrity of your layouts, and producing professional-quality final output. This tutorial will delve into the intricacies of the Links panel, guiding you through its features and empowering you to effectively control your placed graphics.
Understanding Linked vs. Embedded Assets
A fundamental concept in InDesign is the distinction between linked and embedded assets. When you "Place" an image into your InDesign document, InDesign primarily creates a link to that image's original location on your computer or a network drive. This linkage is the core function managed by the Links panel.
The Advantages of Linking
Linking offers several significant advantages:
- Smaller Document Size: By referencing external files rather than embedding their entire content, your InDesign document remains smaller and more manageable. This is particularly beneficial when working with high-resolution images.
- Efficient Workflow: Working with linked files allows you to maintain a quicker workflow, as you're not constantly dealing with large, heavy image files directly within InDesign.
- Easier Updates: If you need to make edits to an image, you can do so in its original application (like Photoshop). InDesign will then prompt you to update the link, reflecting those changes in your layout without needing to re-import the entire file. This is especially powerful when the same graphic is used in multiple places.
- Version Control: The Links panel helps you keep track of different versions of your linked assets.
When to Consider Embedding
While linking is generally preferred, embedding can be useful in specific scenarios:
- Self-Sufficiency: Embedding the contents of a linked file suspends management operations for that link, making your document "self-sufficient." This means the document contains all the necessary asset data within itself, reducing the risk of missing links if the original files are moved or deleted.
- Simplified Distribution: For final output or when sharing a document with individuals who may not have access to the original linked files, embedding ensures that all necessary components are present. However, be aware that embedding significantly increases document size.
The decision between linking and embedding hinges on your project's needs and how you intend to manage and distribute your InDesign files.
Navigating the Links Panel
The Links panel is your central hub for managing all placed assets within an InDesign document. To access it, choose Window > Links.
The Links panel displays a list of all graphics, text files, and other assets that have been placed into your document. Each entry represents a link to an external file.
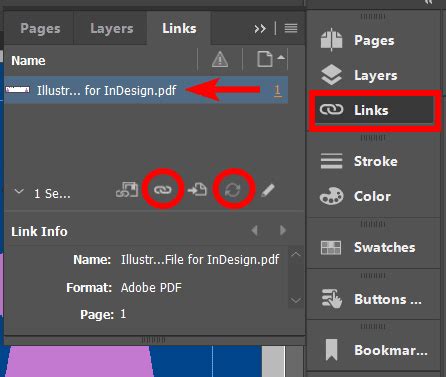
Key Components of the Links Panel
- Category Columns (A): These columns provide various pieces of information about each link. You can sort by clicking the column headers at the top of the panel. Clicking a category header again reverses the sort order.
- Link Information (B): This section details specific attributes of the selected link, such as its name, file type, dimensions, and color space.
- Icons (C, D, E): Various icons within the panel provide crucial status updates:
- Modified Icon (C, D): Indicates that the original file has been modified since it was placed in the InDesign document. A yellow warning triangle often signifies a modified link.
- Missing File Icon: A red question mark icon signifies that the original file cannot be found at its linked location.
- Link Icon: A "chain link" icon to the left of the link name indicates that the image is successfully linked.
- Embedded Icon: An embedded file is identified by a specific icon in the panel.
- Panel Menu: The small triangle icon at the top right of the panel opens a menu with various commands for managing links.
Understanding Link Status
The icons in the Links panel are vital for understanding the status of your placed assets:
- Up-to-date: No special icon, or a green circle, indicating the linked file matches the original.
- Modified: A yellow warning triangle (or a specific modified icon) signifies that the original file has been changed.
- Missing: A red question mark icon means InDesign cannot find the original file. This can happen if the file has been moved, renamed, or deleted.
- Out of Date: Similar to modified, but specifically indicating that a newer version of the original file is available.
When a file is missing, InDesign will not attempt to resolve the missing links automatically unless specific "Opening Document" options are selected in your preferences. You must actively relink or update these files.
Managing Linked Files
The real power of the Links panel lies in its ability to manage and update your linked assets efficiently.
Updating Modified Links
When the modified icon appears next to a link, it means the original graphic has been edited and saved. To update your InDesign layout with these changes:
- Select the modified link in the Links panel.
- Choose Update Link from the Links panel menu, or click the Update Link button (which may appear as a circular arrow icon).
- Alternatively, you can Option-click (Mac OS) or Alt-click (Windows) the Update Link button.
InDesign will then fetch the latest version of the original file and apply it to your layout. If multiple instances of the same linked file are present, and one or more are updated while others are not, the modified icon will accurately reflect this.
Relinking Missing Files
If a file is missing (indicated by the red question mark), you need to relink it to guide InDesign to its new location.
- Select the missing link in the Links panel.
- Choose Relink from the Links panel menu.
- Navigate to the new location of the original file in the dialog box that appears and click Open.
InDesign will then re-establish the link. You can also choose Relink Preserved Dimensions in the File Handling preferences if you want to maintain the original scaling and positioning of the graphic.
Fix missing or broken image links in Adobe InDesign - Graphic design tutorial
Embedding and Unembedding Links
You can choose to embed a linked file directly into your InDesign document. This makes the document self-sufficient but increases its size.
- To Embed a Single Link: Select the link in the Links panel and choose Embed Link from the Links panel menu.
- To Embed All Links: You can embed all linked files at once by selecting Embed All Links from the Links panel menu.
- To Unembed (Convert to Linked): If you have embedded a file and wish to convert it back to a linked file, select the embedded link and choose Unembed Link from the Links panel menu. This will create a separate file in the same folder as your InDesign document.
Editing Original Files
The Links panel allows you to quickly jump to the original file for editing.
- Select the link in the Links panel.
- Click the Edit Original button at the bottom of the panel, or choose Edit > Edit Original from the application menu.
- InDesign will launch the application used to create the original graphic (e.g., Photoshop for a PSD file). Make your edits and save the file.
- Return to InDesign, and you will be prompted to update the link to reflect your changes.
This "edit in place" functionality streamlines the revision process significantly.
Advanced Link Management Techniques
Beyond basic updates and relinking, the Links panel offers more sophisticated control.
Sorting and Filtering
The Links panel allows you to sort your links by various categories by clicking the column headers. You can also use the panel menu to choose specific display options, such as showing only modified or missing links.
Displaying Link Information
The "Show in Link Info" option in the Links panel menu allows you to customize the additional information displayed for each link, such as its dimensions, color profile, and more.
Managing OPI Links
For professional print workflows, InDesign supports OPI (Open Prepress Interface) links. These appear in the Links panel and allow for the use of low-resolution proxy images in your layout while ensuring that high-resolution images are used in the final print output.
Updating Multiple Links
If you have multiple modified links marked with the modified-link icon, you can select them all in the Links panel and choose Update Link from the panel menu to update them simultaneously.
Replacing Images Based on File Extensions
In the File Handling preferences, you can configure InDesign to replace images based on file extensions. This is particularly useful when working with different versions of the same file or when migrating assets.
Understanding File Paths
The Links panel displays the file path for each linked asset. This is useful for notifying team members where art is located and for troubleshooting when links become broken. InDesign can display either the relative file path or the platform-style path.
The Importance of Link Management for Workflow and Output
Effective management of links in InDesign is not merely a matter of convenience; it is fundamental to a smooth and error-free production process.
Preventing "Missing Link" Nightmares
The dreaded "missing link" scenario can bring a project to a standstill. By regularly checking the Links panel and proactively relinking any broken connections, you prevent last-minute rushes and potential design compromises. This is especially critical when collaborating with other designers or sending files to a printer.
Ensuring Print-Ready Files
For professional printing, it's imperative that all placed images are at the correct resolution and color mode. The Links panel provides the visibility needed to confirm that your linked files are indeed the high-resolution, correctly formatted assets required for high-quality output. If you are using OPI links, the Links panel is essential for verifying that the correct high-resolution images are being referenced for the final print job.
Streamlining Revisions
When clients request revisions to images, the "Edit Original" command in conjunction with the Links panel allows for a seamless update process. Instead of manually re-importing and repositioning modified graphics, InDesign handles the update automatically, saving significant time and reducing the chance of errors.
Maintaining Document Integrity
A well-managed set of links ensures that your InDesign document remains a cohesive and accurate representation of your design intent. Broken or outdated links can lead to unexpected visual discrepancies in the final output, undermining the professionalism of your work.
By consistently utilizing and understanding the features of the InDesign Links panel, you empower yourself to create more robust, efficient, and professional documents, from initial concept to final delivery.