Clip Studio Paint, a powerful software for digital artists, has significantly enhanced its toolkit with the addition of the Liquify tool. This feature, a highly requested addition, allows for dynamic and intuitive manipulation of pixels, offering artists a new level of control over their creations. Whether you're aiming for subtle retouching or dramatic distortions, understanding the Liquify tool's capabilities can revolutionize your workflow. This guide delves into its functionalities, modes, and diverse applications, from character design to special effects.
Understanding the Liquify Tool's Core Functionality
The Liquify tool is a specialized instrument designed for modifying existing artwork by pushing, pulling, expanding, pinching, and twirling pixels. It acts as a digital sculpting tool, enabling artists to reshape elements directly on the canvas without the need for complex selections or transformations. This immediacy makes it an invaluable asset for both minor adjustments and significant alterations.
A key characteristic of the Liquify tool is its layer-specific operation. It can only be applied to one layer at a time. If you wish to use Liquify on elements from multiple layers simultaneously, you will need to merge those layers first. The "Merge visible layer" option is available for this purpose, though it's important to note that merging can limit future editing flexibility.
Accessing and Navigating the Liquify Tool
The Liquify tool is integrated within Clip Studio Paint's toolset. It can be found under the "Blend" tool category. For users who prefer keyboard shortcuts, the default keybind for Liquify is 'J', though this can be customized in the software's shortcut settings.
The Liquify tool itself offers several adjustable parameters to fine-tune its effects:
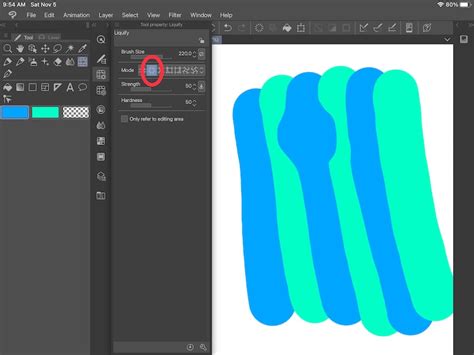
- Brush Size: This determines the diameter of the area affected by the Liquify tool. A larger brush size will impact a wider area, while a smaller brush allows for more precise manipulation.
- Strength: This slider controls the intensity of the Liquify effect. A lower strength value results in more subtle, gradual changes, making it easier to control and refine the deformation. Conversely, a higher strength value leads to more dramatic and immediate transformations.
- Hardness: This setting dictates the focus and spread of the Liquify effect. A low hardness value concentrates the effect more intensely in the center of the brush, creating a softer, more diffused deformation. A high hardness value makes the effect sharper and more defined, closely following the shape of the brush stroke.
The "Only Refer to Editing Area" Option
A crucial checkbox within the Liquify tool's settings is "Only refer to editing area." When this option is turned off, the Liquify tool considers pixels beyond the immediate brush area when calculating transformations. This can lead to a more fluid and interconnected deformation, as surrounding pixels influence the effect. However, when the checkbox is turned on, the tool strictly operates only on the pixels directly under the brush. This isolation is particularly useful when you want to modify a specific section without unintended influences from adjacent areas, especially when an area has been pre-selected.
Exploring the Liquify Tool Modes
The Liquify tool boasts seven distinct modes, each offering a unique way to manipulate pixels:
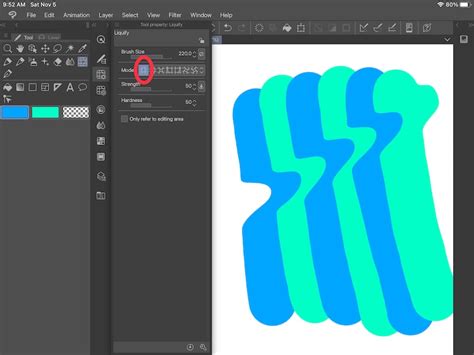
1. Push Mode
The Push mode is arguably the most frequently used and intuitive mode. It allows you to smoothly move areas of pixels in the direction of your brush stroke. This mode is excellent for subtle adjustments, reshaping elements, and creating organic flow. It's important to remember that Push mode, like other "push" variants, requires movement to function. When you drag your brush, the pixels beneath it are displaced accordingly.
2. Expand Mode
The Expand mode functions similarly to a magnifying glass effect. As you apply the brush, pixels are pushed outwards from the center of the brush stroke, causing the affected area to grow larger. This mode is ideal for inflating elements, increasing their size, or creating a bulging effect. The intensity of the expansion is directly influenced by the duration and pressure of your brush stroke.
3. Pinch Mode
Pinch mode is the direct opposite of Expand mode. It pulls pixels inwards towards the center of the brush stroke, causing the affected area to shrink or constrict. This is useful for making elements smaller, creating concave shapes, or tightening forms. Like Expand mode, Pinch mode can be activated by holding down the brush or by applying strokes.
4. Push Left Mode
This mode displaces pixels horizontally to the left of the brush stroke's path. If you move your brush from top to bottom, pixels will slide to the left. However, if you move your brush from bottom to top, the pixels will slide in the opposite direction (to the right). This mode can be tricky to master due to its directional sensitivity.
5. Push Right Mode
The counterpart to Push Left, this mode displaces pixels horizontally to the right of the brush stroke's path. Similar to Push Left, its directional sensitivity means that a top-to-bottom brush movement pushes pixels to the right, while a bottom-to-top movement pushes them to the left.
6. Twirl Clockwise Mode
This mode creates a rotational distortion, twisting the pixels in a clockwise direction around the center of the brush stroke. It's effective for creating swirling patterns, dynamic curves, or correcting the angle of slightly skewed elements.
7. Twirl Anti-Clockwise Mode
As the name suggests, this mode twists pixels in an anti-clockwise direction, creating a mirrored rotational effect compared to Twirl Clockwise.
Inverting Liquify Effects with the Alt Key
A powerful shortcut within the Liquify tool is the ability to invert the effect of any mode by holding down the Alt key. For instance, while using Expand mode, pressing Alt will temporarily switch it to Pinch mode, allowing you to quickly shrink an area you were just expanding. This bidirectional control significantly speeds up the editing process. However, there's an exception for Push Left and Push Right modes, which remain directionally sensitive even when Alt is pressed.
Practical Applications of the Liquify Tool
The Liquify tool's versatility extends to a wide array of artistic applications, from character design and retouching to creating special effects and even simple animations.
Character Design and Refinement
- Facial Expressions: Easily alter character expressions by adjusting mouths, eyes, and brows. The Push mode is particularly useful for subtle changes, while Expand and Pinch can exaggerate features for more dramatic expressions.
- Body Proportions: Correct or adjust body proportions at any stage of the drawing process. Use Pinch to reduce the size of hands or feet that appear too large, or Expand to subtly increase the volume of muscles or limbs.
- Hair Volume: Quickly increase or decrease the volume of a character's hair by using the Expand or Pinch modes.
- Symmetry Ruler Integration: For symmetrical elements like eyes, utilizing a symmetry ruler with the Liquify tool allows for simultaneous adjustments, ensuring consistency and saving time.
Retouching and Image Manipulation
- Minor Readjustments: The Liquify tool excels at minor retouching, smoothing out imperfections, or subtly refining shapes. It can be used at the beginning or end of the creative process.
- Object Manipulation: For tasks like editing an ice cream on a cone, you can select the ice cream area and carefully apply Liquify to reshape it without affecting the cone.
Special Effects and Creative Distortions
- Melt Effect: Achieve a quick melt effect by applying Liquify to areas that should appear to be dripping or deforming, such as on an ice cream cone.
- Water Effect: A simple left and right motion with the Liquify tool can create a convincing water ripple or wave effect.
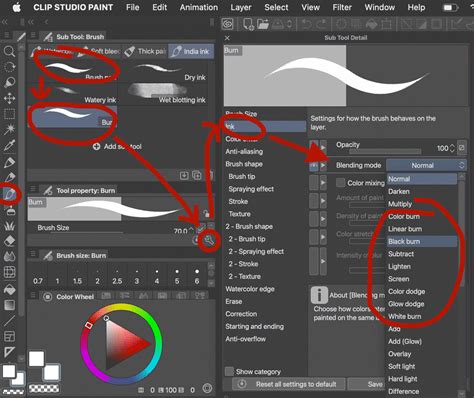
- Fire and Explosions: By drawing base colors (red, orange, yellow) and then using Liquify with specific blend modes like "Add (glow)" and "Clip Layer," you can create dynamic fire or fireball effects. Applying a blur to the fire layer further enhances its ethereal quality.
- Tree Creation: The Liquify tool can be used in conjunction with other brushes to add texture, light, and shadow to create stylized trees.
How to Use the NEW Liquify Tool! || Clip Studio Paint Tutorial #9
Lettering and Text Design
The Liquify tool offers innovative ways to stylize text and lettering:
- Stretching and Warping Text: Write your message with a long font on a dark background, then rasterize the layer. Use Liquify to stretch the letters further. Afterward, employ the "Finger tip" sub-tool from the Blend tool to refine the edges and avoid a stiff appearance, switching back and forth between Liquify and Finger tip until satisfied.
- Chromatic Aberration Effect: Duplicate your text layer three times. Assign each duplicate to a different color channel (red, green, blue). Then, use Liquify on each layer independently to create cyan, magenta, and yellow layers. This results in a unique chromatic aberration effect. Further enhancements can be made with tone curve adjustments and texture overlays.
- Melting Text Effect: With a duplicated text layer, use Liquify at a high strength with "Only refer to editing area" enabled. Stretch the bottom of the letters to form a uniform line. Select and cut each letter onto its own layer, lock transparency, and fill with gradients. Merge these layers and use Liquify again to create flowing shapes. Coloring can be achieved with gradient maps and vivid light blend modes. Adding extra flames with an airbrush and then modifying them with Liquify can create dynamic visual elements.
Animation and Motion Graphics
While not its primary purpose, the Liquify tool can be used to create simple animations:
- Prepare Your Artwork: Open your timeline window and ensure your artwork is ready.
- Animate Elements: Slightly move parts of the face or other elements you wish to animate using the Liquify tool. For more advanced animations, separating elements onto different layers is recommended.
- Playback: Once satisfied with the movement, play back the animation to see the results.
Artistic Experimentation and Abstract Art
The Liquify tool is a playground for artistic exploration. It can be used to generate abstract patterns, trippy visuals, or even intentionally "cursed" art by pushing proportions and forms to absurd extremes. This makes it a valuable tool for generating unique textures, backgrounds, or simply for creative experimentation.
Conclusion
The Liquify tool in Clip Studio Paint is a powerful and versatile addition that empowers artists with unprecedented control over pixel manipulation. Its intuitive interface, diverse modes, and wide range of applications make it an essential feature for digital illustrators, character designers, comic artists, and anyone looking to add dynamic flair to their work. By understanding its nuances and experimenting with its capabilities, artists can unlock new creative possibilities and elevate their digital art to new heights.