Creating outlines in Photoshop is a versatile technique that can be applied to both text and images, serving various design and print-related purposes. Whether you're preparing a file for a professional printer, enhancing your graphics for social media, or simply aiming for a specific aesthetic, understanding how to generate and manage outlines is a valuable skill. This guide will delve into the process of creating outlines for both text and images within Adobe Photoshop, exploring the nuances and best practices associated with each.

The Purpose and Nuances of Outlining Text
Outlining fonts, also known as converting text to outlines or vectorizing text, is a critical step for designers when preparing files for professional printing. The primary reason for this is to ensure font fidelity. Simply put, if you use a specific font in your design, and the printer does not have that same font installed on their system, their software will substitute it with a different, often less desirable, font. This substitution can drastically alter the appearance of your text, undermining the design choices you made. By outlining fonts, you convert the editable text into vectorized shapes. This guarantees that the font will render precisely as you designed it, irrespective of the font's availability on the printing machine.
However, this conversion comes with a trade-off. Outlining fonts transforms them into shapes, making them uneditable as text. This means that elements like strikethroughs, underlines, bullets, and numbering can sometimes be lost in the process. This is particularly true for longer documents with extensive formatting. Therefore, it is crucial to be aware that not all formatting might be preserved when outlining text.
Best Practices for Outlining Text for Print
When preparing files for a professional printer, it's essential to communicate effectively about their preferred methods. Some printing services, like Thomas Group Printing, have specific preferences. While they accept files with outlined fonts, they prefer that customers embed fonts in their design files instead. Embedding fonts allows the printer to make edits to the file if needed to ensure it prints correctly. They state, "if we need to open and work with the original file format to make any corrections, we won’t be able to edit text unless it is embedded in the design file. This is why we prefer to receive design files with embedded fonts rather than outlined fonts."
During print production, a preflight team can more easily make adjustments to the artwork even without owning the font if the fonts are embedded. This is beneficial if small corrections are needed before the job goes to print.
Despite this preference, if you intend to handle any edits to your file yourself, outlining can still be a suitable choice. The key takeaway is to always make a copy of your original file before outlining the fonts. This ensures you retain an editable version of your document should any modifications be required later by you or the printer. It is also recommended to only outline fonts when the document does not include complex formatting like strikethroughs, underlines, bullets, and numbering, as these styles are often removed during the outlining process.
How To Add New Fonts To Photoshop - Step By Step
Creating Outlines for Images in Photoshop
Beyond text, Photoshop offers robust tools for creating outlines around images, a technique widely used to isolate subjects, create visually striking graphics for social media, or prepare elements for further manipulation. This process typically involves selecting the desired part of an image and then applying a stroke or outline effect.
Step-by-Step Guide to Outlining an Image
Open the Image: Begin by opening the photograph you intend to work with in Photoshop. Navigate to
File > Openand select your image.Select the Foreground Subject: The crucial step is to accurately select the portion of the image you want to outline.
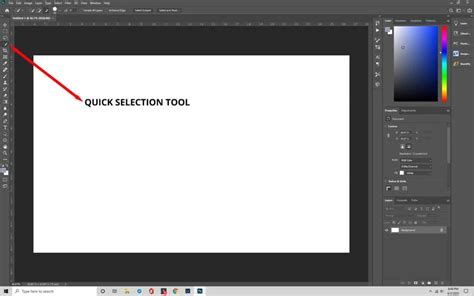
- Utilize Selection Tools: Tools like the
Quick Selection Toolor theMagic Wand Toolare excellent starting points, especially if there's a clear contrast between the foreground and background. - Refine Your Selection: For complex edges or subtle details, zoom in closely (
Ctrl + +orCmd + +) and use theAdd to Selection(+) andSubtract from Selection(-) features within the tool options to meticulously refine your selection. TheRefine EdgeorSelect and Maskoptions (depending on your Photoshop version) offer advanced controls for edge detection and smoothing. - Contrast is Key: Having strong contrast between the foreground and background significantly simplifies this process. Using a green screen or ensuring the background doesn't share similar colors with the subject can be highly beneficial.
- Utilize Selection Tools: Tools like the
Isolate the Selection: Once your selection is precise, you need to separate it.
- Copy and Paste: Copy the selected area (
Ctrl + CorCmd + C) and paste it into a new layer (Ctrl + VorCmd + V). This effectively places your subject on its own transparent background. - Delete Original Layers: If you opened the image directly, you should now have your subject on a new layer. You can delete the original background layer to leave only your isolated foreground. If you initially dragged the image into a new project, you might need to delete both the original image layer and any blank background layer.
- Copy and Paste: Copy the selected area (
Apply the Outline (Stroke): With your isolated subject on its own layer, you can now add the outline.
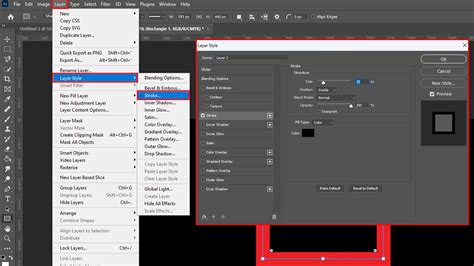
- Layer Styles: Right-click on the layer containing your subject and select
Blending Options. - Add Stroke: In the Layer Style dialog box, select
Stroke. Here, you can customize the outline:- Size: Adjust the pixel width of the outline.
- Color: Choose the desired color for your outline.
- Position: Typically,
Outsideis used to create an outline that extends beyond the subject's edges.CenterandInsidecan also be used for different effects. - Opacity: Control the transparency of the stroke.
- Multiple Strokes: For more complex outlines, you can add multiple strokes. Click the plus (+) icon next to the
Strokeeffect in the Layer Style panel to add another stroke, allowing for layered colors or varied widths.
- Layer Styles: Right-click on the layer containing your subject and select
- Save Your Work: Once satisfied with the outline, save your image. For graphics intended for web use or to preserve transparency, export as a
.pngfile (File > Export > Export AsorFile > Save Asand choose PNG). This format supports transparency, crucial for images with no background.
Advanced Techniques and Considerations
Outlining Text as Vector Shapes
Another method to outline text in Photoshop, offering more control and often a cleaner result, is by converting the text into vector shapes. This process also renders the text uneditable as text but provides the benefits of vector graphics, such as scalability without loss of quality.
- Create Text: Type your desired text in Photoshop.
- Convert to Shape: With the text layer selected, go to
Type > Convert to Shape. - Add Stroke: Now, the text exists as a vector shape. You can apply a
Strokelayer style as described in the image outlining section above. This method allows for precise control over the outline's appearance.
It's important to note that this method, like creating outlines from text directly, makes the text uneditable. If you intend to maintain editability for a significant portion of your project, consider using features like Stroke layer styles before converting to shapes or outlining.
Considerations for Different Audiences
The method chosen for outlining can also depend on the intended audience and the final use of the graphic.
- For Professional Printing: As discussed, embedding fonts is often preferred by printers to retain editability. If outlining is necessary, careful consideration of lost formatting and making a copy of the original file are paramount.
- For Social Media and Web Graphics: Outlining images to create a distinct subject with a colored border is a popular technique for thumbnails and general visual appeal. This is where the image outlining process described above is most commonly applied. Tools like Canva or RelayThat can be used in conjunction with Photoshop to further enhance these graphics.
- For Design Flexibility: Converting text to shapes in Photoshop offers a high degree of control. If you need to adjust the outline's appearance significantly or combine it with other vector elements, this method is advantageous. However, it sacrifices text editability.
While Photoshop on the iPad offers some text customization, it currently does not support outlining text directly. For such advanced operations, the desktop version of Photoshop remains the go-to solution.

Avoiding Clichés and Misconceptions
A common misconception is that outlining text is always the best way to ensure font appearance. While it serves this purpose, it’s not a universally superior method to embedding, especially when editability is required by the printer. Furthermore, the assumption that outlining always removes all formatting is not entirely accurate; the extent of lost formatting can vary depending on the complexity of the text and the specific features used. Designers should always perform a test print or carefully review the outlined file to confirm that all necessary elements are present.
The perceived ease of creating outlines can also be misleading. While the basic steps are straightforward, achieving a polished, professional-looking outline, particularly around complex image edges, requires patience, precision, and an understanding of Photoshop's selection and refinement tools. The goal is to create a clean separation that enhances, rather than detracts from, the overall design.
Ultimately, mastering outlines in Photoshop involves understanding the purpose behind the technique, choosing the appropriate method for your specific needs, and being aware of the implications for editability and formatting. Whether for print-ready files or eye-catching digital graphics, the ability to effectively create and manage outlines significantly expands a designer's toolkit.