Adobe Photoshop, renowned for its powerful raster image editing capabilities, also offers a robust set of vector-based tools that are indispensable for creating precise selections, shapes, and intricate designs. Among these, paths stand out as a fundamental element, providing smooth outlines that can be converted into accurate selection borders, manipulated with remarkable flexibility, and integrated across multiple documents. Understanding how to create, edit, and utilize paths is a skill that elevates a user's proficiency, transforming complex selection tasks into manageable workflows.
The Anatomy of a Path: Segments, Points, and Direction
At its core, a path in Photoshop is a series of one or more straight or curved segments. These segments are defined by points, which mark their endpoints.
A path segment forms the line between two points. These segments can be either straight or curved. Points, specifically anchor points, are the crucial nodes that define the beginning and end of each segment.
When a path segment is curved, it is influenced by direction lines that extend from the anchor points. These direction lines end in direction points, and their angle and length dictate the curvature of the segment. Smooth points, connected by curved segments, allow for flowing transitions. Conversely, corner points connect segments that meet at an angle, creating sharper turns.
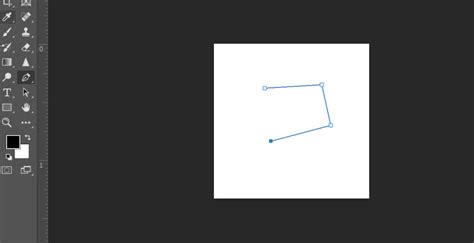
A path doesn't have to be a single, continuous line. It can comprise multiple distinct and separate path components. For instance, a path defining a star shape would consist of several interconnected segments forming the points and inner angles. When you select a path component or a specific segment, Photoshop displays all the associated anchor points, along with any direction lines and direction points if the segment is curved.
Navigating and Selecting Paths
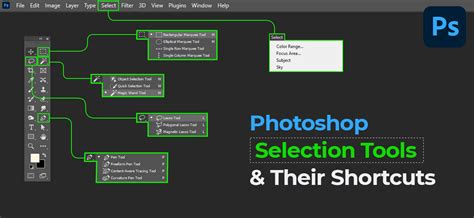
Working with paths involves a set of specialized tools and techniques for selection and manipulation. The Path Selection tool (often represented by an arrow) is used to select an entire path component. Simply clicking anywhere inside a path component with this tool will select it. For more granular control, the Direct Selection tool (often represented by a white arrow) is essential. This tool allows you to select individual anchor points, segments, direction lines, and direction points.
To isolate a path component, especially if it resides on a shape layer, you can enter isolation mode. With the path active, double-clicking on it using a selection tool will often bring up options for isolation.
The Paths panel is your central hub for managing all paths within a document. Here, you can view, select, duplicate, and organize your paths. To duplicate a path, you can drag it to the duplicate icon in the Paths panel, or use modifier keys like Option (Mac) or Alt (Windows) while dragging the path in the image area.
Crafting Paths with Precision: The Pen Tool and Beyond
The Pen tool is the primary instrument for creating paths with precision. While the act of drawing paths is similar to creating selections or shapes, mastering the Pen tool requires practice and an understanding of its nuances.
When using the Pen tool, each click creates an anchor point. For straight segments, you simply click to set subsequent anchor points. For curved segments, you click and drag from an anchor point to establish the direction and extent of the curve using the direction lines.
Advanced Pen Tool Techniques
- Repositioning Anchor Points While Drawing: If you click to set an anchor point and realize it's not in the ideal position, you can hold down the spacebar immediately after clicking, before releasing the mouse button. This allows you to reposition the anchor point. If you have already released the mouse, holding
Command(Mac) orCtrl(Windows) will temporarily toggle the Pen tool to the Direct Selection tool, enabling you to move the anchor point or its direction lines. - Adjusting Curved Segments: With the Direct Selection tool, you can select a curved segment or an anchor point connected to it. Dragging the segment itself will adjust its position. To refine the shape of the segment on either side of a selected anchor point, you can drag the anchor point or its associated direction point. It's important to note that adjusting one path segment often influences related segments, allowing for intuitive transformations of path shapes.
- Extending Paths: To extend an open path, select the Pen tool, position it where you want to end the new segment, and click. If you want the extension to be curved, position the Pen tool where you want the new curved segment to end and drag. To connect one path to another, click an endpoint on the path you want to extend. When the small "connect" symbol appears next to the pointer, click to attach the new segment.
- Adding and Deleting Anchor Points: Adding anchor points provides greater control over a path or allows for the extension of open paths. However, it's advisable not to add more points than necessary, as paths with fewer points are generally easier to edit, display, and print. By default, as you position the Pen tool over a selected path, it changes to the Add Anchor Point tool. Positioning it over an existing anchor point transforms it into the Delete Anchor Point tool.
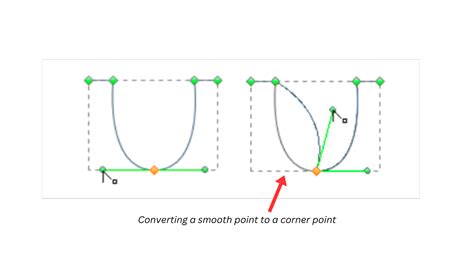
- Converting Anchor Points: The Convert Anchor Point tool (accessible by holding
Optionon Mac orAlton Windows with the Pen tool selected) is crucial for refining path shapes. Clicking an anchor point with this tool can convert a smooth point into a corner point, or vice versa. Dragging from a corner point with this tool will create direction lines, transforming it into a smooth point with independent direction lines.
The Curvature Pen Tool
Photoshop also offers the Curvature Pen Tool, designed for more intuitive path drawing. While adding anchor points, a single click creates a curved segment, and a double-click results in a straight segment. The initial segment created by the first two anchor points always appears as a straight line.
The Magnetic Pen Tool
For automated path creation, the Freeform Pen tool with the Magnetic option enabled can be a valuable asset. This tool analyzes image areas and attempts to snap the path to edge areas, simplifying the process of tracing complex shapes. Double-clicking with the Magnetic Pen tool closes the path.
Modifying and Refining Paths
Once a path is created, it can be extensively modified.
Transforming Paths
The Free Transform Path command (Edit > Free Transform Path) provides controls for scaling, rotating, skewing, and distorting paths. Within Free Transform mode, the Link icon in the Options bar toggles the constraint of the aspect ratio, ensuring proportions are maintained when scaling. The cursor changes to a double-headed arrow when positioned outside the transformation handles, indicating that you can rotate the path. The Reference Point can also be adjusted to define the center of transformation.
Editing Path Segments
With the Direct Selection tool, you can select a curved segment or an anchor point. Dragging the segment allows you to adjust its overall position. To modify the shape of a segment on either side of a selected anchor point, drag the anchor point or its direction point. This action adjusts related segments, allowing for intuitive reshaping.
Deleting Segments and Anchor Points
Selected segments can be deleted by pressing the Delete key. As mentioned, the Delete Anchor Point tool (or the Pen tool positioned over an anchor point) can also remove points.
Working with Multiple Paths and Path Components
Photoshop allows for the selection and editing of multiple paths simultaneously. Using the Path Selection tool, you can Shift-click or click-drag to select several paths.
Aligning and Distributing Paths
To align components, use the Path Selection tool to select the desired components and then utilize the alignment options available in the Options bar. Similarly, for distributing components evenly, select at least three components and apply the distribution commands.
Combining and Separating Paths
Paths can be combined to form a single, more complex path. This can be achieved by copying and pasting paths between documents or within the same document. To combine paths into a single component, you can select multiple path components and choose an option from the Paths panel menu to merge them. Conversely, a single path can be divided into multiple components.
Converting Paths to Selections
One of the most powerful applications of paths is their conversion into precise selection borders.

Loading a Path as a Selection
To load a path as a selection, you can either click the Load Path As A Selection button at the bottom of the Paths panel, or select the desired path and choose Make Selection from the Paths panel menu.
When making a selection from a path, you have options:
- Feather Radius: This setting creates a softer transition between the selected pixels and the surrounding ones. A value of 0 pixels means a hard-edged selection.
- Add to Selection: This option adds the area defined by the path to an existing selection.
- Subtract from Selection: This removes the area defined by the path from an existing selection.
- Intersect with Selection: This creates a new selection that is the intersection of the existing selection and the path.
Making a Work Path from a Selection
Conversely, you can create a path from an existing selection. Within the Paths panel, click the Make Work Path button or select Make Work Path from the panel menu. The Tolerance value determines how sensitive the command is to slight changes in the selection's shape. A higher tolerance results in fewer anchor points and a smoother path, which can be beneficial for printing complex clipping paths.
Customizing Path Appearance
To enhance visibility, especially on high-resolution monitors, you can customize the color and thickness of path lines. While using tools like the Pen tool, click the gear icon in the Options bar to access these settings. These customizations also affect paths for shape layers and vector masks.
Advanced Path Operations
Stroking Paths
For creating fluid and smooth painting strokes, stroking a path is an effective technique. After creating a path with the Pen tool, set up your desired painting tool with specific options (brush size, opacity, etc.). Then, from the Paths panel fly-out menu, choose Stroke Path and select the tool. To simulate pressure sensitivity, check the Simulate Pressure option.
Using Paths for Clipping
Paths can also be used as clipping paths to isolate specific areas of an image or to create complex masks. When troubleshooting printing issues with clipping paths, increasing the tolerance value in the "Make Work Path" dialog can sometimes resolve problems.
Integrating Paths Across Documents
Paths are not confined to a single document. You can easily move, reshape, copy, or delete paths between different Photoshop images.
- Copying and Pasting Paths: You can copy a path from one document and paste it into another using
Edit > CopyandEdit > Paste. This is a straightforward method for combining paths from different sources. - Dragging Paths: With both the source and destination images open, you can drag the active path from the Paths panel of the source image to the destination image.
- Saving Paths: Paths can be saved with the Photoshop document or exported individually.
Understanding Path Behavior and Preferences
Photoshop's behavior with paths has evolved over time. Since Photoshop CS6, the reshaping of vector curves when dragging line segments has become more graceful. You can also adjust path-related preferences, such as anti-aliasing for guides and paths, by navigating to Preferences > Guides, Grid, & Slices and Preferences > Performance.
The mastery of paths in Photoshop is a journey that combines technical understanding with practical application. From intricate selections to the creation of vector-based artwork, paths offer a powerful and flexible foundation for a wide range of creative and professional tasks. While the initial learning curve may seem steep, the precision and control afforded by paths make them an indispensable tool in any Photoshop user's arsenal.