Inkscape, a powerful and free vector graphics editor, offers robust features for creating and manipulating designs. A common requirement for many projects, especially those intended for web use or integration into other media, is to have a transparent background. While Inkscape's default behavior is to provide a transparent canvas, understanding how to manage and export this transparency is crucial for a seamless workflow. This guide delves into the intricacies of ensuring your Inkscape designs have a transparent background, from initial document setup to final export.
Understanding Inkscape's Default Background Behavior
By default, every new Inkscape document is established with a transparent background. This means that the canvas itself has no inherent color or opacity. When you begin adding elements such as text and shapes, these are placed onto this transparent canvas in the colors you select. It's important to distinguish this from how Inkscape visually represents the canvas. Unlike some other software that uses a checkerboard pattern to explicitly denote transparency, Inkscape does not employ this visual cue by default. This can sometimes lead to confusion, as the background might appear white, even when it is, in fact, transparent.
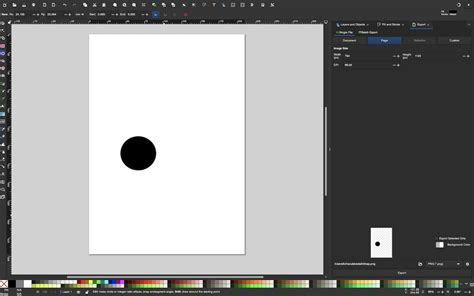
To visually confirm or enable the checkerboard pattern that explicitly indicates transparent areas, you can navigate to "File" > "Document Properties." Within this dialog, towards the bottom right, you will find a "Background" section. Here, you can click the checkbox next to "Checkerboard" to enable this visual aid. This allows you to design with a clear understanding of which parts of your canvas are transparent and which are occupied by your design elements.
Managing Background Color Settings: An Intuitive Hurdle
While the default background is transparent, Inkscape offers settings that can sometimes be misinterpreted or lead to unintended opaque backgrounds. If you wish to change the background color for display purposes within Inkscape, or if you suspect an unintended background color is present, you can access these settings via "File" > "Document Properties." In the "Background" section, there is a color picker for "Background color." However, it's crucial to understand that this setting primarily affects the display of the background within the Inkscape interface and does not necessarily dictate the background's opacity when exporting.
A more complex, and sometimes less intuitive, aspect relates to how transparency can be affected by filters. If you select an element and navigate to "Filters" > "Fill and transparency," you might encounter options like "fill background." It's important to note that these filter-related settings are distinct from the overall document background transparency and can sometimes lead to unexpected results if not fully understood. The primary goal for achieving a transparent background in your final output remains consistent: ensuring that no opaque layer is intentionally or unintentionally added to the background of your design canvas.
The Art of Clipping and Masking for Precise Transparency
For intricate designs where specific areas need to be removed or isolated, Inkscape's clipping and masking tools are indispensable. This process involves defining shapes that act as masks to reveal or hide parts of an underlying object.
Creating Clipping Paths
A common scenario involves removing a central portion of an object while also clipping it from the background. This can be achieved through the creation of two clipping paths or masks.
Defining Masks: Begin by drawing shapes that will serve as your masks. For instance, to isolate a specific object, you might draw one mask around the interior of an area you wish to keep and another around the exterior of an area you wish to remove. These masks can be filled with a color (e.g., pink and green) to make them easily distinguishable during the process. The order in which these masks are layered doesn't typically matter for the initial creation of the mask itself.
Combining Masks: Once your masks are drawn, you can combine them using the "PATH" menu. Selecting both mask shapes and choosing "DIFFERENCE" will subtract the area of the top mask from the bottom mask, creating a single, combined mask. This resulting mask will have a hole in it where the smaller mask was previously located.
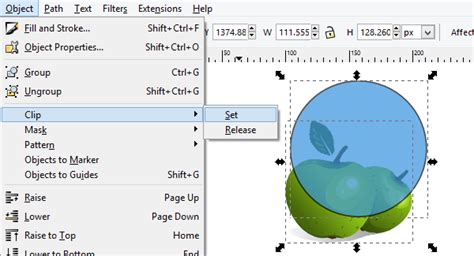
Applying the Clip: For the actual clipping operation, the order of objects becomes critical. The clipping mask (the combined shape you created) must be positioned above the object you intend to clip. With both the object and its clipping mask selected, navigate to "Object" > "Clip" > "Set Clip." This action will apply the mask, effectively cutting out the desired portion of your object and ensuring that any areas outside the defined mask are transparent.
Advanced Masking Techniques
The Pen tool (Bezier curves) is invaluable for creating precise paths for masking, especially for complex or irregular shapes. You can draw a path by placing dots that form segments, connecting them to create an unbroken line, and then filling this path for visibility. For intricate work, the BSpline path tool offers greater control.
When dealing with an image that has multiple elements to isolate, a recommended workflow is to create separate copies of the original file for each element. Alternatively, you can duplicate the image within a single file using CTRL+D and then position each duplicate away from the main canvas area. This allows you to work on each element's clipping path independently.
Exporting Your Design with a Transparent Background
The final and most crucial step in ensuring transparency is the export process. Inkscape uses an "Export Bitmap" function rather than a traditional "Save As" for PNGs, which is essential for preserving transparency.
Accessing the Export Menu: To initiate the export, go to "File" > "Export Bitmap" or use the shortcut
Control + Shift + E. This will open the Export panel, typically on the right side of your Inkscape workspace.Selecting the Area to Export: Before exporting, you must specify exactly what part of your design should be included in the PNG. You can select the specific object(s) you want to export. Within the Export panel, ensure that the "Export selected only" option is checked. This prevents any extraneous elements on your canvas from being included in the final image.
Configuring PNG Export Settings: In the Export panel, you will find options to set the image size and location for your exported file. Crucially, ensure that the "File type" is set to "Portable Network Graphic (*.png)". When exporting a PNG, pay close attention to the "Background color" settings. You need to ensure that the Alpha channel (often indicated by an "A" value) is set to zero for transparency. The thumbnail preview within the Export menu should update to reflect this transparency if the correct settings are applied.
How to Save / Export a PNG File in Inkscape
- Exporting the File: Once you have configured all the settings, choose the desired save location and click the "Export" button. You can then open the exported PNG file on your device to verify that the background is indeed transparent and that the white background you might have seen within Inkscape is not present in the final output.
Troubleshooting Common Transparency Issues
Despite Inkscape's default transparent background, several factors can lead to an opaque background in your exported PNG.
The Illusion of a White Background
As mentioned earlier, Inkscape's canvas does not inherently display a checkerboard pattern for transparency. This can create the visual impression of a white background, even when it is not. If your exported PNG shows a white background, it's essential to verify that you haven't inadvertently added a white object or shape that is covering the entire canvas. Selecting all elements and checking their properties can help identify any such hidden objects.
Border and Shadow Settings
Inkscape has default settings for borders and shadows that are enabled when you open a new document. While these settings are present by default, they are entirely separate from the background transparency. These border and shadow effects are applied to the document page itself and do not affect the transparency of the canvas. You can disable these by default by creating a custom default document. However, even if disabled in an existing document, they should remain disabled upon reopening that specific file.
The "Background Colour" Setting in Document Properties
While the "Background colour" picker in "Document Properties" can change the display of the background within Inkscape, it does not typically affect the transparency of the exported PNG unless specific, less common filter interactions are at play. The primary mechanism for transparency in exported PNGs is the absence of an opaque layer behind your design elements and the correct configuration of the export settings.
Dealing with Opaque Backgrounds in Existing Files
If you have an existing Inkscape document where the background appears opaque and you cannot easily remove it, consider the following:
- Inspect Document Properties: Revisit "File" > "Document Properties" and check the "Background" section. Ensure no color is set if you want full transparency.
- Layer Management: Examine your layers. There might be an opaque layer or object unintentionally placed behind your design.
- Filter Effects: Investigate if any filter effects have been applied to the canvas or background elements that might be introducing opacity.
- Sharing the SVG: If you are still encountering issues, sharing the SVG file allows others to inspect it directly and identify the cause of the opaque background. This is often the most effective way to resolve persistent problems.
Mac-Specific Bug (Less Likely on Windows)
It is worth noting that in the past, there have been reports of bugs in Inkscape on macOS that could cause transparency issues. However, if you are using Windows, this is unlikely to be the cause of your problem.
Creating Scalable Vector Graphics (SVG) from PNGs
While the primary focus is on transparent PNGs, Inkscape also allows you to convert bitmap images (like your exported PNGs) back into vector graphics. This is useful if you want to maintain infinite scalability without pixelation.
- Import the PNG: Import your exported, transparent PNG back into a new Inkscape document. It may appear at a very large size.
- Resize Appropriately: Use the selection tool to resize the imported image. It's helpful to have your original SVG or an idea of the desired dimensions to scale the PNG correctly. Locking the aspect ratio using the lock icon between the Width and Height parameters is crucial here.
- Trace Bitmap: With the imported PNG selected, open the "Trace Bitmap" panel via "Path" > "Trace Bitmap."
- For simple black and white line drawings, the "Single scan" option is often sufficient.
- For more detailed, multi-colored images, choose the "Multicolour" option and experiment with the "Detection mode" (e.g., "Colours"). The number of "scans" (layers) will affect the detail and file size; typically, 8 to 16 scans are a good starting point. Ensure "Remove background" is checked if applicable.
- Resulting SVG: The "Trace Bitmap" function will generate a vector path based on the pixel data of your PNG. This new vector object can be zoomed and scaled indefinitely without losing quality. You might notice that even after tracing, the object might appear to retain its original bounding box. This is normal, and the vector representation is what matters for scalability.
Best Practices for Transparency Workflow
To ensure a smooth workflow when aiming for transparent backgrounds in Inkscape:
- Start with a Clean Canvas: Always assume your new document is transparent. Avoid adding background layers unless specifically intended.
- Use the Checkerboard: Enable the checkerboard pattern in "Document Properties" for clear visual feedback on transparent areas.
- Select Before Exporting: Always select the elements you intend to export before opening the "Export Bitmap" dialog and check "Export selected only."
- Verify Export Settings: Double-check that the file type is PNG and that the alpha channel is set to zero for transparency.
- Save Your SVG: Regularly save your Inkscape project as an SVG file (
CTRL+S). This preserves your vector data and allows for future edits without quality loss. - Understand Clipping vs. Masking: Familiarize yourself with the differences and applications of clipping paths and masks for precise control over visible areas.
By understanding these principles and utilizing Inkscape's tools effectively, you can confidently create and export designs with transparent backgrounds, ensuring they integrate seamlessly into any project.
tags: #make #transparent #background #inkscape