Making the background transparent - sometimes referred to as "punching out the background" by graphic artists - is a straightforward task in Adobe Photoshop. But depending upon the subject you are trying to isolate, it can be laborious and time consuming. This guide will delve into the various methods and tools available within Adobe Photoshop to achieve this essential graphic design technique, catering to both novice users and seasoned professionals. We will explore why transparent backgrounds are invaluable and provide step-by-step instructions for creating them, ensuring your images seamlessly integrate into any design.
What is a Transparent Background?
A transparent background refers to an image feature where the area around the main subject is see-through rather than filled with a solid color or pattern. In digital imaging, this effect is achieved by removing the background pixels while preserving the integrity of the foreground subject. The result is a versatile image that can be seamlessly integrated into different backgrounds or compositions without any visible boundaries. Transparent backgrounds are commonly used in graphic design, photography, and digital art to enhance the appearance and versatility of images. They allow the subject to stand out prominently without distractions, making them ideal for logos, product images, and creative designs where a clean, professional presentation is essential. This feature is precious in applications like Photoshop, where precise control over image layers and transparency levels can be achieved with various selection and masking tools.
Most images cover a certain number of pixels and have color in all of those pixels, even if that color is white. A transparent background has nothing in the background pixels, allowing what’s behind it to show through. In a screenshot, you can see that a header with a logo has used an image with a transparent background because the color behind it is showing through. In contrast, a logo with a white background has a white box behind the logo itself, which is the background. Unless you want to change the colors on your site, you need to make a PNG with a transparent background that seamlessly integrates with your page and designs.
Why Is a Transparent Background Useful?
A transparent background is instrumental for several reasons, offering significant advantages in various digital applications:
- Versatility: It allows you to place an image seamlessly onto any background without visible edges or boundaries. This flexibility is crucial in graphic design, allowing easy integration into different layouts and compositions.
- Professionalism: Transparent backgrounds enhance the professional appearance of images, particularly for product photos and logos. They remove distractions, ensuring the focus remains on the subject matter.
- Creative Freedom: Designers and artists benefit from the creative freedom transparent backgrounds offer. They ensure consistency in appearance across different contexts.
- User Experience: For user-generated content or interactive applications, transparent backgrounds enhance user experience by seamlessly integrating images into different interfaces or environments.
- Repurposing Content: Product photography, for instance, can be a hefty investment. Creating transparent background images allows you to repurpose product photos for various uses across the web in a variety of contexts and channels.
In summary, transparent backgrounds provide versatility, professionalism, creative freedom, compatibility, and improved user experience, making them indispensable in digital imaging and design.

Understanding Image File Types: PNG vs. JPG vs. GIF
When working with transparent backgrounds, understanding different image file types is crucial. Each format has specific use cases and is essential for following good graphic design and web design best practices.
- JPG (or JPEG): These files are best for the majority of basic online images that don’t require high contrast. However, JPGs don’t support transparent backgrounds. If you were to delete the background of an image and then save it as a JPG, the transparent background will actually show up as solid white or solid black.
- PNG (Portable Network Graphics): PNGs are a better choice when you need a transparent image or want something with incredibly crisp, clear lines, like a line drawing or other iconic graphics. PNGs support alpha transparency, meaning they can have varying levels of transparency. One thing to note about PNGs is that there are a few different types of PNG files, including palette-based, grayscale, and RGB. You will generally want to use an RGB format with transparency. This ensures that your image will be in full color and gives the option of full transparency.
- GIF (Graphics Interchange Format): GIF files can have transparent backgrounds; however, there are some benefits to using a PNG over a GIF. PNGs have better compression, so the image size is smaller. In addition, GIFs only allow one color to be specified as transparent, while PNGs have better transparency options. GIFs are primarily used for animated images.
Therefore, JPGs should be used for general photography where transparency isn't needed. PNGs should be used for any images that require a transparent background or need high contrast. GIFs should be used for animated images. If you encounter an image in a WebP format that you need to be transparent, you’ll want to convert the image from WebP to PNG first.
Tools for Creating Transparent Backgrounds
While Adobe Photoshop is the industry standard for image editing and creating transparent backgrounds, other tools can also achieve this. Here, we'll focus on Photoshop, but briefly mention alternatives.
Adobe Photoshop: The Professional Standard
Adobe Photoshop is the gold standard in any type of image editing. Creating transparent backgrounds is just scratching the surface of its capabilities, and it may be overkill if that's all you need to do. Photoshop comes with a free trial and month-to-month plans.
Other Notable Tools
- Canva: A super easy-to-use online editing tool, helping you create beautiful designs without complexity. It's like a lightweight online version of Adobe Photoshop and an easy way to make your image background transparent right from the browser.
- Snappa: A quick online tool to help you create online graphics for social media, ads, blogs, and much more. It’s free, and like Canva, an easy way to make a transparent background for your images.
- Lumina: A desktop application (Mac and PC) that ties in traditional image editing with AI technologies.
- InPixio: A desktop application (Mac and PC) designed to help you remove unwanted objects in images.
- Background Eraser: Superimpose: A mobile app for iOS users that allows you to touch areas to make the background transparent and export as a PNG.
- Ultimate Background Eraser: A similar app to Background Remover, but for Google Play/Android users.
- Fiverr: A marketplace where you can find people to do small gigs, including making logo backgrounds transparent or removing background images from photos. This can be a cost-effective and time-saving option for professional results.
Making Your Background Transparent Using Adobe Photoshop
There are several methods within Photoshop to achieve a transparent background, ranging from quick automated actions to meticulous manual selection.
Quick Action: "Remove Background"
Photoshop 2024 and later versions offer a quick action feature that can remove backgrounds in just a few clicks, leveraging Adobe Sensei AI technology.
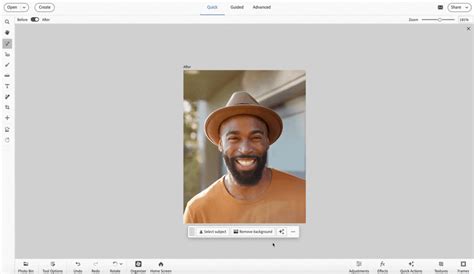
Step 1: Open Image and Access Contextual Task BarOpen your image in Photoshop. If you don’t see the Contextual Task Bar, go to Window > Contextual Task Bar from the menu at the top of the application window and ensure it's checked. The Task Bar will appear on or near your image.
Step 2: Utilize "Remove Background"Once the Contextual Task Bar is visible, click the "Remove Background" option. Photoshop will attempt to discern your subject and its background, displaying your subject without its background. In the Layers panel, you'll see that the background is now masked.
Manual Removal for Precision
For more complex images or when precise control is needed, manual removal is the way to go. This involves using selection tools to outline your subject.
Step 1: Duplicate the Image in a New LayerTo preserve your original image, duplicate it. Press Ctrl + A (Select All), followed by Ctrl + C (Copy), and then Ctrl + V (Paste). This creates a new layer with your image.
Step 2: Hide the Background LayerIn the Layers palette, find the original "Background" layer and click the eye icon to the left to hide it from view. You should now see your subject surrounded by a checkerboard pattern, which signifies transparency.
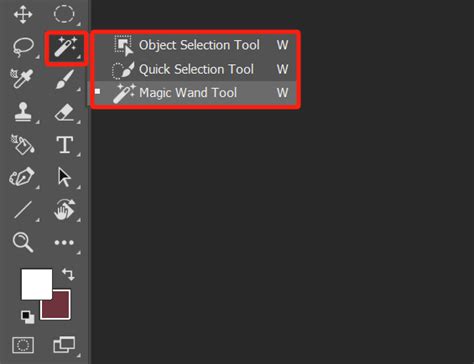
Step 3: Select the SubjectNow you need to use any of the preferred selection tools to select the subject and only the subject.
- Object Selection Tool: Click and hold the fourth tool from the top of the Tool palette until the tools pop out. Choose "Object Selection Tool." To use this tool, drag a box around the subject.
- Quick Selection Tool: This tool allows you to "paint" a selection by clicking and dragging over the area you want to select.
- Magic Wand Tool: Also found in the same cubby, click the Magic Wand inside the subject, and it will select a region that has a similar color. You can adjust the "Tolerance" setting to control how much of a similar color is selected.
- Lasso Tool (and its variants: Polygonal Lasso Tool, Magnetic Lasso Tool): These tools, found in the third position on the Tool palette, let you draw selections using freehand, straight lines, or by snapping to edges.
Step 4: Refine Your SelectionFor complex subjects, you'll want to "build up" your selections in stages. Use the following modes in the options bar when using selection tools:
- New selection: Only use this mode when you're starting to select an object.
- Add to selection: Click and drag to add more areas to your current selection.
- Subtract from selection: Click and drag to remove areas from your current selection.
Step 5: Delete the BackgroundOnce your subject is accurately selected, press the Delete key. The selected area will be removed and replaced by the grey and white checkered background, indicating transparency. If you have disconnected shapes or holes within your subject that you want to be transparent, you may need to repeat the selection and deletion process on those areas.
Step 6: Refine Edges (Select and Mask)To achieve a polished look, especially with details like hair or fur, use the "Select and Mask" workspace. After making an initial selection, go to Select > Select and Mask. Here, you can use tools like the Refine Edge Brush Tool to improve the selection around complex edges. Adjust sliders for smoothness, feathering, and contrast to ensure a natural transition.
Refine Edges in Photoshop
Step 7: Save as a Transparent PNG ImageTo preserve transparency, you must save your image in a format that supports it, such as PNG.
- Go to
File > Save As...orFile > Export > Export As...(keyboard shortcutShift + Alt + Ctrl + Won Windows,Shift + Option + Command + Won Mac). - Select "PNG (*.PNG)" as the file format.
- Ensure the "Transparency" box is checked.
- Avoid options like "Smaller File (8-bit)" if you are saving a PNG-24, as this can convert the file to a PNG-8, which has limitations.
- Pay attention to the predicted file size. For web use, aim for images around 200 KB or smaller. You can adjust image dimensions to reduce file size if necessary.
- Click "Export" and choose a folder to save your file. It's a good idea to keep optimized image files separate from your originals.
Note that though a transparent background looks checkered in Photoshop, it will actually be transparent in the final PNG file. If you are using an older version of Photoshop and do not see "Export As…", use "Save for Web" and select PNG-24 from the Preset dropdown menu.
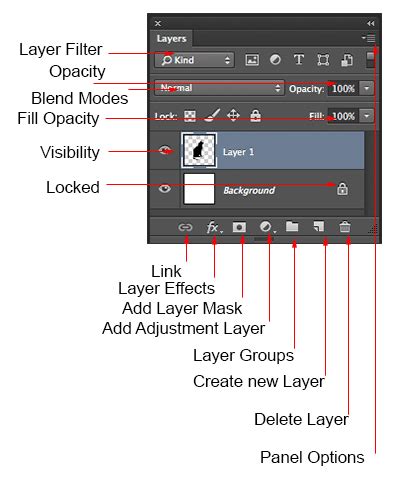
Working with Layers and Transparency
When opening a new document in Photoshop, you can set the "Background Contents" to "Transparency." This creates a blank canvas with a transparent background from the start. You can also add a new transparent layer by going to Layer > New > Layer and ensuring the "Mode" is set to "Normal" and "Opacity" is 100%. Drag this new layer below your image's layer if you need a base layer to work on.
More Applications for Creating a Transparent Background
Beyond general image editing, transparent backgrounds are particularly vital for specific applications:
Product Photography
For product photography, transparent backgrounds maximize the investment in your images. When products are on a transparent background, they can be used across the web in a variety of contexts and channels. This allows for seamless integration into e-commerce listings, social media posts, and marketing materials, regardless of the page's background color.
If your product image is saved as a JPG, you'll need to remove the background in Photoshop and resave the file as a PNG-24. If you're lucky enough to have a logo as a vector file (with extensions .AI, .EPS, or .PDF), you'll need to open the file in Photoshop or Illustrator and convert it to a PNG-24 so it will be in a web-ready format.
When opening a vector file in Photoshop, ensure your settings are correct:
- Crop To: set to Bounding Box
- Constrain Proportions: checked
- Mode: set to RGB Color (this might appear as sRGB with a specific profile)
Logos
Logos are frequently used across various platforms, making transparency essential for consistent branding. If your logo is a raster file (like a JPG), you will need to select and delete the background.
Step 1: Convert Background LayerDouble-click the "Background" layer in the Layers panel and click "OK" to convert it to a regular layer (Layer 0).
Step 2: Select the Background ColorChoose Select > Color Range.... Use the eyedropper tool to select the background color of your logo. Click "OK."
Step 3: Delete the BackgroundPress the Backspace or Delete key. The selected background will be removed, revealing the transparent checkerboard.
Step 4: Save as PNG-24Follow the steps outlined in the "Save as a Transparent PNG Image" section to export your logo as a PNG-24. Logos tend to have fewer colors than product images, so the file size will likely be smaller, and you may not need to reduce image proportions.
Tips for Perfecting Transparent Backgrounds
Creating transparent backgrounds in Photoshop is crucial for enhancing images, whether for professional presentations or creative projects. This process allows you to isolate subjects seamlessly, making them versatile for applications like web design, product photography, or digital art. Mastering transparent backgrounds involves precise selection, refining edges, and maintaining natural transitions between foreground and background elements.
Start with a High-Quality Image
Starting with a high-quality image is crucial when aiming for a transparent background. High resolution and sharp details make selecting and refining edges easier, resulting in cleaner and more accurate transparency. The clarity of the initial image also ensures that the subject stands out distinctly against any background it's placed on.
Use Selection Tools Wisely
Experiment with the Quick Selection Tool, Magic Wand, and Pen Tool to find the best fit for your specific image. The Quick Selection Tool is excellent for quickly grabbing large areas, while the Magic Wand can efficiently select areas of similar color. For intricate details and precise selections, rely on the Pen Tool, allowing you to create smooth, adjustable paths.
Refine Edges Carefully
After making an initial selection, refine edges using features like "Refine Edge" or the "Select and Mask" workspace. These tools allow you to adjust edge detection, smoothness, feathering, and contrast to ensure smooth transitions between the subject and background. Pay attention to details, zoom in for precision, and use techniques like painting with the Refine Edge Brush to refine complex areas like hair or intricate objects.
Adjust Feathering and Contrast
Feathering refers to softening the edges of a selection, which helps blend the subject seamlessly into a new background. In the "Select and Mask" workspace or through the Feather option in the Properties panel, adjust the feather radius to control the softness applied to the edges. Contrast adjustment is essential to ensure that the subject stands out distinctly against any background. Use adjustments like Levels or Curves to fine-tune the contrast between the subject and the background, enhancing clarity and definition.
Utilize Layer Masks
Layer masks in Photoshop are essential for creating precise, non-destructive, transparent backgrounds. After selecting the subject, apply a layer mask to hide unwanted areas of the image while preserving the original pixels. Use the Brush Tool with black to hide and white to reveal parts of the layer mask, allowing for seamless adjustments and corrections. Layer masks offer flexibility to refine edges, adjust transparency levels, and experiment with different background options without permanently altering the image.
Frequently Asked Questions About Transparent Backgrounds in Photoshop
How do I make the background transparent in Photoshop white?If you have a transparent background in Photoshop but want a white background instead, create a new layer in your Layers panel. Then, fill the new layer with white by typing Shift + F5 ( Fn + Shift + F5 on a Mac). In your Layers panel, move your new, white layer underneath your original image layer.
How do I save a PNG with a transparent background in Photoshop?To save a PNG with a transparent background in Photoshop, go to File > Export > Export As... or type Shift + Alt + Ctrl + W ( Shift + Option + Command + W on a Mac). In the dialog box that appears, set the Format to PNG and make sure the radio button next to Transparency is checked. Click Export.
How do I remove the white background from a picture?There are two very easy ways to remove a white background from a picture in Photoshop:
- Select "Remove Background" from the Contextual Task Bar.
- Choose
Select > Color Range...and select the white background using the Color Range eyedropper tool.
Can I use Photoshop to make backgrounds transparent in bulk?Yes, you can use a script in Photoshop to make backgrounds transparent in bulk. You can create a script that takes a set of images and applies specific actions, including making backgrounds transparent, to all of them. To run this script, use the File > Scripts > Browse... menu in Photoshop and select the script file.
Can I use Adobe Express for free to make backgrounds transparent?Yes, you can use the free Adobe Express plan to make the background of an image transparent. Adobe Express offers a free plan with dozens of quick action tools, templates, photo editing, and effects.
By mastering the techniques described in this guide, you can effectively create transparent backgrounds in Adobe Photoshop, enhancing the versatility and professional appeal of your images across a wide range of applications.
tags: #making #transparent #background #in #photoshop