Embarking on the journey of digital photography editing can feel overwhelming, especially when aiming for consistent, professional-looking results. Adobe Lightroom, a powerful tool for photographers, offers a streamlined way to enhance images. However, achieving a distinct aesthetic often requires more than just the basic adjustments. This is where Mastin Labs presets come into play, offering a curated collection designed to emulate the beloved characteristics of film photography. This tutorial will guide you through the process of installing and utilizing Mastin Labs presets, focusing on their unique 3-Step workflow to achieve efficiency, consistency, and true-to-color imagery in record time.
Understanding the Mastin Labs Philosophy
At the core of Mastin Labs' approach is a commitment to simplifying the editing process without compromising on quality. The company stands by its "Mastin 3-Step workflow," a methodology designed to ensure greater success and eliminate wasted time in your editing sessions. This workflow emphasizes efficiency, consistency, and achieving true-to-color imagery, a hallmark of professional film emulation.
Mastin Labs presets are not merely filters; they are meticulously crafted tools designed to replicate the nuanced characteristics of real film stocks. Each preset pack aligns with its namesake film, capturing its unique color tones, contrast, and grain. This approach allows digital photographers to harness the beauty and simplicity of film workflows, translating them into their digital captures.
Installing Your Mastin Labs Presets
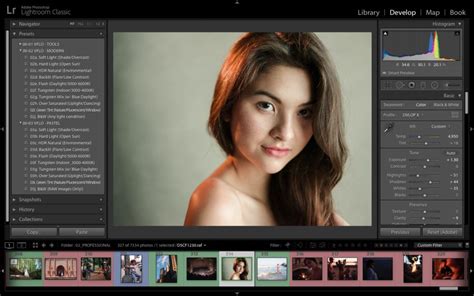
The first step in leveraging the power of Mastin Labs presets is to install them into your Adobe Lightroom software. The process is designed to be straightforward, though it's important to note that older versions of presets might have slightly different installation methods or tool names compared to current updates.
For Lightroom Classic
- Locate Your Presets: After purchasing and downloading your Mastin Labs presets, you will typically receive a zipped folder. Double-click this folder (on Mac) or right-click and select "Extract All" (on Windows) to decompress it. Inside, you should find a folder containing your individual preset files.
- Open Lightroom Classic: Launch Adobe Lightroom Classic on your desktop computer.
- Import Presets: Navigate to the "Develop" tab. On the left-hand side of the screen, you will find the Presets Panel. Click on the "+" sign within this panel and select "Import Presets."
- Select Preset Folder: Browse your computer to locate the unzipped folder containing your Mastin Labs presets and select it. Lightroom will then import these presets into your library.
It's worth noting that if you install presets into Lightroom Classic, they will often automatically install into Adobe Camera Raw (ACR) as well, providing a seamless experience across different Adobe applications.
Using the Installer (If Applicable)
Mastin Labs also offers an installer that can streamline the process. If your purchase includes an installer, follow the on-screen instructions provided with it. This method often removes the manual process of importing and offers more control over how your presets are organized within Lightroom.
Mobile vs. Desktop Installation
The process described above is primarily for desktop versions of Lightroom. If you are using Lightroom Mobile, the method for importing presets may differ slightly. It's advisable to consult the specific documentation or tutorials provided by Mastin Labs for mobile installation instructions.
Understanding the Mastin Labs 3-Step Workflow
The Mastin Labs 3-Step workflow is the cornerstone of their editing philosophy, designed to guide you through a logical and efficient editing process. This workflow aims to make editing all your photos a breeze, ensuring consistency and beautiful results.
Step 1: Apply the Preset
After installing your presets, the first step is to apply a Mastin Labs preset to your image. Open your desired photo in Lightroom Classic and navigate to the Presets Panel. You'll find your Mastin Labs presets organized by pack. Browse through the options and click on a preset to apply it to your image.
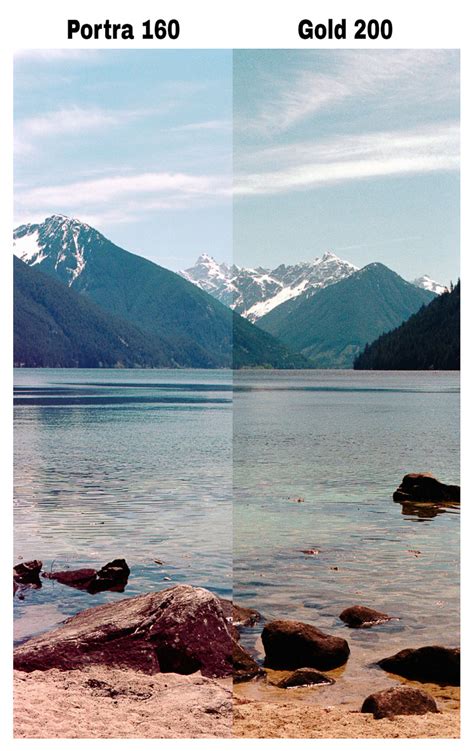
The presets are based on real film stocks, meaning they have characteristics that make them more or less suited for different scenarios and subject matter. For instance, the "Adventure Everyday Original" pack offers three film emulation presets: Ektar 100, Gold 200, and Tri-X 400.
- Ektar 100: This preset is known for its warm, bold colors and defined contrast, making it the most saturated option in the Mastin Labs lineup. It's ideal for vibrant images, vacation photos, summer vibes, and anything that screams "fun and colorful."
- Gold 200: Offering a similar color palette to Ektar 100 but with a more subdued saturation, Gold 200 imparts a fabulous "vintage" or nostalgic feeling. It's incredibly versatile and flatters a variety of skin tones, making it perfect for images of daily life.
- Tri-X 400: A classic black and white film emulation, Tri-X 400 is one of Mastin Labs' brighter black and white presets, excellent for high-key black and white photography. You can adjust the exposure to achieve a moodier look if desired.
Other popular packs include the Portra Original series, which emulates different versions of Kodak Portra film, each offering a warm and neutral look.
- Portra 160: The least saturated of the Portra presets, it's a great fit for a wide variety of skin tones, offering a subtle and neutral look with medium contrast.
- Portra 400: This preset provides a warm-toned film look with medium contrast and saturation.
When selecting a preset, consider the subject's skin tone. Darker skin tones often pair well with Fuji packs and the Adventure Everyday Original pack. Portra packs can add warmth to pale skin but might make darker skin tones appear too warm if not adjusted.
Step 2: Adjust Exposure
A crucial aspect of using film emulation presets, including those from Mastin Labs, is understanding how digital files behave differently from film. Digital shooters are often concerned with blown-out highlights, as this data is lost permanently. However, 35mm negative film works in reverse: highlight data is more easily retained, while shadows are where detail can be lost.
Because Mastin Labs presets emulate these film characteristics, they might alter the way your digital file behaves, sometimes making the image appear darker. Therefore, a common requirement after applying a preset is to adjust the exposure. Don't be shy with the exposure slider in Lightroom's Basic panel. Sometimes, the exposure increase needed might feel significant, but it's often necessary to achieve the intended look and restore proper brightness. This step is vital for ensuring your highlights are retained and your image is correctly exposed according to the film's characteristics.
Step 3: White Balance Adjustment
The final step in the Mastin Labs 3-Step workflow is fine-tuning the white balance. No camera can achieve perfect white balance 100% of the time, and film emulation presets can further shift the color balance. Learning to adjust white balance is a vital skill for creating beautiful photos faster and achieving accurate skin tones.
Understanding Skin Tones: Skin tones are built on two axes of color: warm & cool, and green & magenta. Your ability to perceive these subtle color shifts is key to dialing in natural-looking skin.
- Key Factors: When editing for skin tones, always keep an eye on them. Zooming in to isolate a subject's skin can help eliminate visual interplay with other colors in the scene. However, remember to zoom out periodically to check if the rest of the image has developed a color cast. Neutral areas in your image can serve as a guide for identifying subtle color casts.
- Color Casts: If you're encountering too much green in the skin tones, it can be particularly problematic. If shooting in challenging lighting conditions (like a dark, tungsten-lit reception), you might need to push the temperature slider significantly towards the cool end. The color of the hair can be a great indicator to identify excessive green or magenta.
- Portra and Skin Tones: While Portra 400 can be a great preset, it might sometimes produce too much orange for darker skin tones. Simply dragging the temperature down might help the skin but could discolor other parts of the image. In such cases, as a last resort, you can reduce the orange saturation in the HSL panel. However, Mastin Labs also offers the Fuji Original pack as a potentially better alternative for certain skin tones.
- Adjusting Sliders: You can start by choosing a white balance setting that best describes the scenario your photo was shot in (e.g., Daylight, Cloudy, Tungsten). From there, use the Temperature and Tint sliders to fine-tune the balance. Remember that it's perfectly acceptable to deviate from the exact look of the original film; the goal is to achieve a beautiful, natural-looking image.
Pro White Balance Tip to Fix Beginner's Greatest Challenge!
Beyond the Core Workflow: Tone Profiles and Lens Corrections
Mastin Labs preset packs often include additional tools to further refine your edits.
Tone Profiles
Alongside the film emulation presets, you'll find "Tone Profiles." These are designed to replicate specific settings on a Frontier film scanner, offering another layer of stylistic control. Applying a tone profile is typically a one-click action that can subtly alter the mood and color rendition of your image, complementing the base film preset. The suggestions for using tone profiles remain relevant even with newer AI tools in Lightroom.
Lens Correction
Each Mastin Labs preset pack also includes a one-click lens correction setting. Digital lenses can introduce various distortions and aberrations, such as chromatic aberration or barrel distortion. Applying this preset automatically corrects for these common lens issues, contributing to a cleaner and more polished final image.
Advanced Considerations and Tips
The Importance of Understanding White Balance
While Mastin Labs presets simplify many aspects of editing, a deep understanding of white balance remains paramount. This skill allows you to "dial in" skin tones with your eye, ensuring accuracy and naturalness. Understanding white balance takes practice and time, but mastering it is a vital skill for creating beautiful photos faster.
Avoiding Common Misconceptions
- Presets are not a "one-click fix": While presets significantly speed up editing, they are starting points. The 3-Step workflow (apply preset, adjust exposure, adjust white balance) is crucial for achieving optimal results.
- Film emulation is not about being "true to film": The goal is to capture the essence of film's aesthetic. Don't be afraid to adjust sliders and deviate from the preset's exact look to suit your specific image and artistic vision.
- Skin tone challenges: Different film stocks were tested on different skin tones. Be aware of how a preset might affect various skin tones and be prepared to make adjustments. For example, Portra presets might be ideal for adding warmth to pale skin but could over-saturate darker skin tones.
Staying Updated
Mastin Labs consistently updates its preset packs. They always keep the most current versions available in your Mastin Labs account. If you're following older tutorials, you might notice outdated names and tools. While the core editing principles remain accurate, Kirk (or other instructors) might describe edits differently to utilize new AI tools or updated features within Lightroom. The fundamental suggestions for using tone profiles, however, are still highly relevant.
Elevating Your Editing Workflow
By understanding and implementing the Mastin Labs 3-Step workflow, coupled with an awareness of white balance and potential exposure adjustments, you can elevate your editing process significantly. These presets are designed to bring the beauty of film and the simplicity of a film workflow to your digital photography, transforming your editing experience and breathing new life into your images.
Ready to put your newfound knowledge into practice? Explore the rich collection of true-to-analog film presets from Mastin Labs and discover how they can revolutionize your editing workflow, enabling you to achieve consistent, beautiful, and professional-grade edits with unparalleled efficiency.