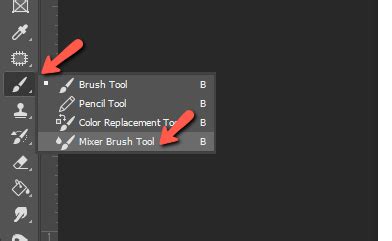
The Mixer Brush Tool in Adobe Photoshop stands as a powerful, yet often underutilized, instrument for digital artists and photographers aiming to imbue their work with a distinctly painterly aesthetic. This tool is not merely a brush; it's a digital simulation of traditional painting techniques, allowing for the realistic blending of colors and the nuanced control over paint wetness within a single stroke. Whether you are embarking on an entirely original digital painting or seeking to add a unique, artistic flair to an existing photograph, the Mixer Brush offers a gateway to achieving sophisticated, organic results. However, its true potential is unlocked through a deep understanding of its numerous options, which, at first glance, can appear overwhelming. This guide aims to demystify the Mixer Brush, providing a structured approach to mastering its capabilities, from fundamental concepts to advanced applications.
Understanding the Core Functionality of the Mixer Brush
At its heart, the Mixer Brush Tool simulates the physical act of mixing paint on a canvas. Unlike standard Photoshop brushes that simply apply color, the Mixer Brush actively interacts with existing colors on the canvas, blending them together in a manner akin to oil or acrylic paints. This dynamic interaction is governed by several key parameters: the brush's "wetness," how much "load" of paint it carries, the degree of "mix" with the canvas colors, and the "flow" rate.
The Mixer Brush Reservoir and Pickup
A critical concept to grasp when working with the Mixer Brush is its internal "reservoir" and "pickup" mechanisms. The reservoir holds the color that the brush is applying, while the pickup mechanism draws color from the canvas itself. These two elements are continuously mixed, creating the blended effect.
- Loading Paint into the Reservoir: To load paint into the reservoir, you can Alt-click (Windows) or Option-click (macOS) on the canvas. This samples the color from the clicked area and loads it into the brush.
- "Load Solid Colors Only": For a more consistent color application from the reservoir, you can select "Load Solid Colors Only" from the Current Brush Load pop-up menu in the Options bar. This ensures that the brush tip reflects a uniform color, preventing variations from the sampled area from affecting the loaded paint.
Simulating Traditional Painting Techniques
The Mixer Brush is designed to mimic real-world painting, offering controls that directly translate to traditional artistic practices:
- Wetness: This setting dictates how much paint the brush picks up from the canvas. A higher "wetness" value means the brush will pick up more color from the canvas, leading to more significant blending. Conversely, lower wetness means less color is picked up, and the brush's own loaded color will dominate.
- Load: This parameter controls the amount of paint loaded onto the brush's reservoir. A higher load means more paint is available for application, allowing for longer strokes before the paint is exhausted.
- Mix: This setting determines the extent to which the loaded paint blends with the colors already present on the canvas. A higher "mix" value results in a more thorough integration of colors, while a lower value means the loaded paint will overlay more distinctly.
- Flow: Similar to other brush tools, "flow" controls the rate at which paint is applied with each stroke. A higher flow means more paint is deposited, while a lower flow creates a more subtle, layered effect.
Navigating the Mixer Brush Options Bar
The Tool Options Bar for the Mixer Brush is where the magic happens. While it may seem complex initially, understanding each setting is key to unlocking its full potential.
Brush Size and Hardness
These are fundamental brush settings, affecting the diameter of the brush tip and the softness of its edges. You can select from a range of pre-defined brush tips or customize your own. For the Mixer Brush, experimenting with softer brushes often yields more natural blending results.
Current Brush Load Options
This section offers crucial controls over how the brush interacts with the canvas paint:
- Load Brush: This option reloads the brush with the color currently in its reservoir.
- Clean Brush: This is a vital function that effectively "rinses" the brush, removing any paint from its reservoir. This is akin to cleaning your physical brush between colors. When "Clean Brush" is enabled, the brush starts each new stroke with an empty reservoir.
- Load Solid Colors Only: As mentioned earlier, this ensures the brush loads a uniform color, preventing variations from the sampled area from influencing the brush's output.
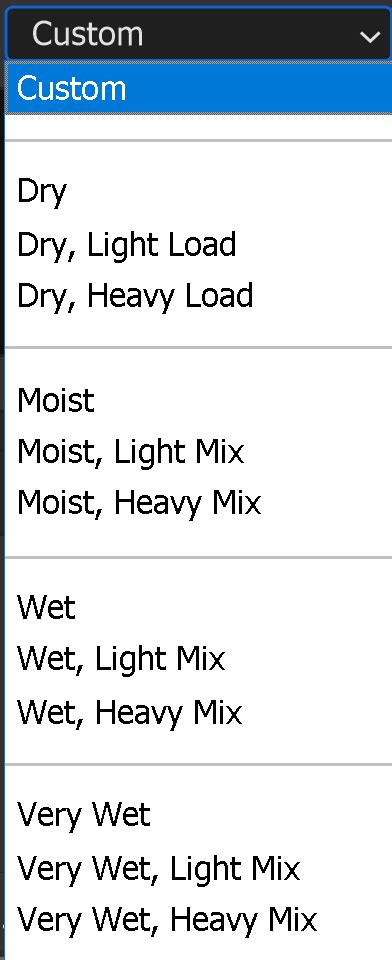
Presets and Customization
Photoshop provides a variety of presets for the Mixer Brush, offering pre-configured combinations of Wet, Load, Mix, and Flow settings. These presets are excellent starting points, allowing you to quickly experiment with different blending behaviors. However, for truly unique effects, creating custom presets is essential.
- Creating Tool Presets: You can save your chosen Mixer Brush settings as a "Tool Preset." This is particularly useful for remembering specific combinations that yield desired results.
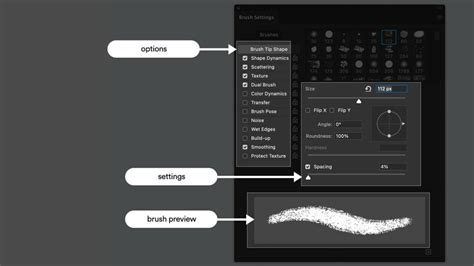
- Brush Settings Panel: The "Brushes / Brush Settings Panel" (accessed by clicking the brush icon in the Options Bar) offers a deeper level of customization. Here, you can fine-tune parameters like brush tip shape, spacing, scattering, texture, dual brush effects, color dynamics, and more. The live preview within this panel is invaluable for visualizing the impact of your adjustments.
Advanced Options: Pulled String Mode and Adjust for Zoom
- Pulled String Mode: This is a brush smoothing mode that helps create smooth lines with sharp corners. It's particularly useful for applications where precision and clean edges are desired alongside blending.
- Adjust for Zoom: This setting helps prevent jerky strokes by dynamically adjusting the smoothing behavior based on your zoom level in the document. When working at different zoom levels, this option can significantly improve stroke consistency and control.
Practical Techniques and Workflow for Mixer Brush Mastery
Effective use of the Mixer Brush often involves a strategic workflow and an understanding of how its settings interact with the image.
The Importance of a Pressure-Sensitive Tablet
While it's possible to use the Mixer Brush with a mouse or trackpad, a pressure-sensitive tablet and pen offer a significant advantage. They provide a more natural feel and allow for nuanced control over brush size, opacity, and flow based on how hard you press. This pressure sensitivity is crucial for achieving realistic painterly effects.
Working on Separate Layers
For maximum flexibility, it is highly recommended to paint on a new, empty layer. This approach isolates your brush strokes from the original image, allowing you to easily edit, refine, or even discard them without affecting the underlying artwork. If you need to erase parts of your brushwork, you can do so with the Eraser tool on this separate layer.
- Potential Lag: Be aware that working on a separate layer, especially with complex brushes or large documents, can sometimes introduce a slight lag in brush strokes. If this becomes an issue, consider optimizing your system or temporarily merging layers for more demanding painting sections.
Cleaning and Reloading the Brush
Regularly cleaning and reloading your brush is fundamental to realistic digital painting.
- Cleaning: Use the "Clean Brush" option in the Options Bar to ensure you're not carrying over unwanted colors from previous strokes.
- Reloading: After cleaning, you'll need to reload the brush with the desired color. This can be done by Alt/Option-clicking on the canvas or by selecting a color from your Swatches panel.
Practicing with Simple Brushes and Settings
To begin, it's wise to start with a simple, round brush and focus on mastering one or two core settings at a time. Gradually introduce more complexity as you become comfortable with the tool's behavior. Experimenting with different combinations of Wet, Load, Mix, and Flow will reveal how they influence the blending process.
Utilizing Keyboard Shortcuts and the History Panel
Efficiency in Photoshop is greatly enhanced by keyboard shortcuts. For the Mixer Brush, familiarizing yourself with shortcuts for brush size adjustment, color picking (Alt/Option-click), and switching tools will speed up your workflow. The History Panel is also an invaluable tool, allowing you to step back through multiple actions and revert to earlier states of your work.
Advanced Applications: Skin Retouching and Frequency Separation
The Mixer Brush Tool is exceptionally well-suited for advanced photo retouching techniques, particularly in portraiture.
Skin Tone Blending and Smoothing
The Mixer Brush excels at blending subtle color variations in skin tones, smoothing out imperfections, and creating a natural, luminous complexion. When working with skin, it's crucial to pay attention to the direction of the skin's natural texture and to use small, controlled strokes.
- Frequency Separation: This powerful skin editing technique works in conjunction with the Mixer Brush. Frequency Separation divides an image into two layers: a low-frequency layer containing color and tone information, and a high-frequency layer containing texture and detail. The Mixer Brush can then be used on the low-frequency layer to blend skin tones and smooth out blemishes without destroying the underlying texture.
Smooth Skin Retouching with Mixer Brush in Photoshop | Step-by-Step Tutorial
Handling Hair and Fine Details
The Mixer Brush can also be employed to refine fly-away hairs or to blend painted elements seamlessly into existing hair. By carefully mixing background colors into stray strands, you can achieve a more polished and realistic look. Remember to work with the direction of the hair and use shorter strokes for better control.
Creating Custom Mixer Brush Presets for Reusability
Once you've discovered a set of Mixer Brush settings that produce a desired effect, saving them as a preset is a wise practice.
- Adjust Settings: Configure the Mixer Brush with your preferred Wet, Load, Mix, and Flow values, and select a suitable brush tip.
- Open Brush Settings: Click the brush icon in the Options Bar to open the Brush Settings panel.
- Create New Brush Preset: Navigate to the "Brush Presets" section at the top and click "Create new brush preset."
- Configure Preset Options: In the dialog box that appears, you can name your preset. Crucially, ensure that "Capture Brush Size in Preset" and "Include Tool Settings" are ticked. This will save not only the brush tip but also the specific Mixer Brush options you've configured.
- Save: Click "OK" to save your custom preset. It will now appear in your Brush Presets panel, ready for immediate use.
Beyond Basic Blending: Exploring Creative Possibilities
The Mixer Brush is not limited to subtle blending. With creative application, it can be used to:
- Create Painterly Textures: By varying brush size, load, and wetness, you can build up rich, impasto-like textures that mimic traditional oil painting.
- Incorporate New Colors: Load the brush with a specific color and use it to paint new elements or to introduce color variations into existing areas of an image.
- Achieve Unique Effects: Combine the Mixer Brush with Photoshop's blend modes and layer masks to achieve sophisticated artistic outcomes that go beyond simple color mixing.
The journey of mastering the Mixer Brush Tool is one of exploration and practice. Its versatility, allowing for everything from subtle color adjustments to bold, expressive painting, makes it an indispensable tool in any digital artist's arsenal. By understanding its core mechanics, diligently exploring its options, and practicing consistently, you can transform your digital creations with the authentic touch of hand-painted artistry.