Photoshop's artboards offer a revolutionary way for designers to manage multiple canvases within a single document, streamlining workflows and enhancing organizational efficiency. Think of artboards as individual, self-contained canvases, akin to special container groups, each capable of holding its own layers, objects, text, and design elements. This feature is particularly invaluable for projects that require designs for various devices, screen sizes, or orientations, all consolidated within one cohesive Photoshop file.
The Genesis of Artboards: Setting Up Your Workspace
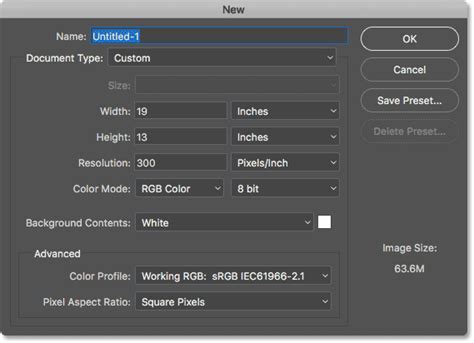
To embark on your journey with artboards, the process begins with creating a new document. Navigate to File > New. Within the New Document dialog box, you will find a crucial option: Document Type. Here, select Artboard from the pop-up menu. This initial step transforms your standard canvas into a versatile artboard-enabled document.

Once the artboard document is established, you are presented with a wealth of pre-defined sizes. Photoshop offers over 35 Artboard Size presets, meticulously tailored to accommodate specific devices and common screen dimensions. This extensive library empowers you to quickly establish artboards for iPhones, iPads, Android devices, web resolutions, and more, significantly accelerating the initial setup phase of your design project.
Crafting and Cultivating Your Artboards
The Artboard Tool is your primary instrument for creating and manipulating artboards. Select this tool from the Photoshop toolbar (shortcut: V). With the Artboard Tool active, you can click directly on the canvas to generate a new, blank artboard. Furthermore, this tool provides the flexibility to design, resize, and reposition your artboards with ease.
To add a new artboard, you can either utilize the Artboard Tool as described above or, more conveniently, click the + icon that appears adjacent to an existing artboard in the Layers Panel. This intuitive approach allows for rapid expansion of your design space.
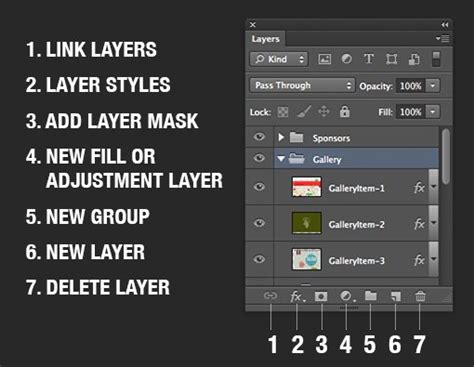
Organizing Layers within Artboards
The Layers Panel is central to managing your artboard-based projects. Each artboard functions independently, allowing you to add and organize layers within it. You can add images, objects, text, and other design elements to an artboard, and these will appear as layers in the Layers Panel. The ability to manage, rearrange, and edit these layers within their respective artboards is seamless. Employing Layer Groups further enhances organization, making it simpler to navigate and edit complex designs across multiple artboards.
For instance, if you need to create a similar design across several artboards but wish to preserve the original, duplicating an artboard is a straightforward process. Select the desired artboard in the Layers Panel and then click the duplicate artboard icon located at the bottom of the panel. This preserves your original work while providing a foundation for variations.
Resizing and Rearranging Artboards
Adjusting the dimensions of an artboard is an essential part of the design process. To resize an artboard along with its contents, first select the Artboard Tool (V) from the toolbar. Click on the specific artboard you intend to resize. The Artboard Options bar will appear, typically at the top of your workspace. Within this bar, you can directly modify the "Width" and "Height" fields to adjust the dimensions of the artboard.
Rearranging the layout of your artboards is equally simple. Again, with the Artboard Tool (V) selected, click and hold on the artboard you wish to move. You can then drag it to a new position within the document. This visual manipulation is highly intuitive and allows for dynamic layout adjustments.
To duplicate an artboard, select the Artboard Tool (V). Click on the artboard you wish to duplicate. Then, in the Artboard Options bar, select the "Duplicate Artboard" option. This creates an exact replica of the selected artboard and its contents, which can then be further modified.
Saving time and Effort in Adobe Photoshop with Artboards and Smart Objects.
Optimizing for Diverse Outputs: Exporting Your Artboards
The power of artboards truly shines when it comes to exporting your designs for various applications. Photoshop offers robust export options to cater to different needs. You can choose from a variety of file formats, including PDF and PNG, and customize export settings to ensure your designs meet specific requirements.
When exporting, consider enabling options to include overlapping areas if your design necessitates it. It is highly recommended to export your artboards in multiple sizes and resolutions to accurately accommodate the diverse range of devices and screens your designs will be displayed on.
The Export As dialog is your command center for these configurations. Here, you can meticulously set dimensions, resolution, and scaling options for each artboard export. For particularly complex projects involving numerous export variations, creating a table to manage these different settings can prove to be an extremely efficient strategy.
Advanced Export Techniques for Web and Beyond
For optimizing your artboards specifically for web pages, Photoshop provides the Save for Web (Legacy) option. This powerful feature offers advanced controls to fine-tune your exports, ensuring optimal file sizes without compromising visual quality. Within this dialog, you can select optimized file formats like PNG-24 or JPEG, and precisely adjust quality, compression, and other critical settings.
Enhancing Performance and Workflow
Working with multiple artboards can sometimes impact performance, especially on less powerful hardware. Fortunately, Photoshop offers features to mitigate this. Leveraging Photoshop's Advanced GPU Drawing Mode can significantly improve the responsiveness and speed when working with artboards.
To activate this feature, navigate to Photoshop's Preferences (Edit > Preferences on Windows, Photoshop > Preferences on macOS). Select the "Performance" tab. Under the "Graphics Processor Settings," ensure that "Use Graphics Processor" is enabled. Then, from the "Drawing Mode" dropdown menu, choose "Advanced." Be aware that this feature relies on your graphics card, and some older GPUs may not fully support it.
Integrating Assets from Other Adobe Applications
A common scenario involves incorporating vector assets created in Adobe Illustrator into your Photoshop artboards. This integration is remarkably seamless. Simply copy the desired vector object from Illustrator and paste it directly into a Photoshop artboard. When prompted with the paste options, select "Smart Object." This ensures that the vector asset retains its scalability and can be edited non-destructively within Photoshop.
Artboards vs. Traditional Canvases: Understanding the Distinction
It is crucial to understand how artboards differ from the traditional Photoshop canvas. While a traditional canvas is a single, monolithic space, artboards function as distinct, independent canvases residing within that single document source. They are, in essence, special container groups that allow for the creation and management of multiple individual design spaces. The primary purpose of this innovation is to facilitate the creation and management of designs tailored for a multitude of devices, screen sizes, and orientations, all within one unified Photoshop document. This consolidation drastically simplifies project management and ensures consistency across different design outputs.