Capturing the fleeting moments of a newborn's arrival is a profound joy for any photographer. The delicate features, the innocent slumber, and the burgeoning connection with parents create a narrative that is both intimate and universally resonant. Delivering a finished gallery of these precious memories is, for many, the ultimate reward. This tutorial delves into the art of editing newborn images using Lightroom presets, offering a structured approach to achieving clean, punchy, and emotionally resonant photographs. We will explore techniques that simplify the editing process, ensuring consistency and efficiency, whether you're shooting in a hospital, a client's home, or your own studio.

The Foundation: In-Camera Settings and RAW Capture
The journey to a stunning final image begins long before you open your editing software. Achieving the best possible exposure in-camera is paramount. For newborn sessions, where capturing soft, ethereal tones is often the goal, a slight overexposure can be beneficial. This technique helps to minimize the natural redness often present in a newborn's skin, providing a cleaner starting point for your edits.
Crucially, always shoot in the RAW file format. RAW files contain significantly more image data than JPEGs, offering unparalleled flexibility in post-processing. This allows for more extensive adjustments to white balance, exposure, and color without degrading image quality. While some photographers are transitioning to using Lightroom more extensively for its time-saving capabilities, understanding the benefits of RAW is fundamental.
White Balance: Setting the Scene with Kelvin
Accurate white balance is the cornerstone of a natural-looking edit. While in-camera presets can be a starting point, many photographers prefer to set their white balance using Kelvin. This method offers greater precision and allows for a more consistent starting point across multiple images, especially when lighting conditions remain stable. As you'll see, a well-set Kelvin white balance can significantly minimize the need for extensive adjustments later in the RAW edit.
Mastering White Balance: Choosing the Right Kelvin Temperature for Perfect Colors
The Lightroom Workflow: From Basic Adjustments to Polished Portraits
Your editing workflow in Lightroom can be streamlined by establishing a set of go-to adjustments that you apply to almost every image. This consistency not only saves time but also ensures a cohesive look across an entire gallery.
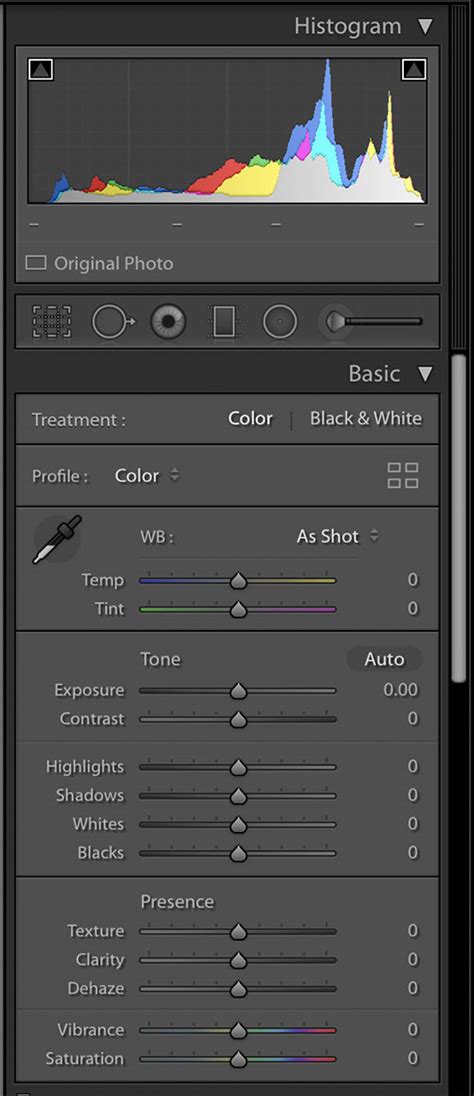
Step 1: Initial RAW Adjustments in the Basic Panel
Begin with the tools in the Basic panel. This is where you'll fine-tune your exposure, white balance, and overall tonality. If you've set your white balance in-camera using Kelvin, these adjustments should be relatively minor. A common practice is to slightly underexpose images, especially in well-lit scenarios, to retain highlight detail. You can then gently bump up the exposure and warm the image a touch as needed.
When aiming for soft, airy newborn photos, rather than edgy high-contrast imagery, pay close attention to the contrast and clarity sliders. Reducing contrast will smooth out tonality, helping to remove dark shadow areas or overly bright highlights. Be mindful of the histogram as you make these changes. Similarly, adjusting the clarity slider downward can contribute to a "creamy" skin tone effect. However, it's crucial to exercise caution and avoid reducing clarity too much, as this can lead to a loss of essential detail.
Step 2: Refining Tones with the Tone Curve
Adding a touch of contrast in the Tone Curve panel can further enhance the image. A subtle S-curve is often employed here to add depth and dimension. This panel allows for precise control over the tonal range of your image, from shadows to highlights.
Step 3: The Magic of Split Toning
A favorite technique for many is the judicious use of the Split Toning panel. This allows you to add subtle color casts to the highlights and shadows, creating a more artistic and polished look. For instance, a common approach involves setting a Hue of 21 in the Highlights with a Saturation set at 3. This can add a touch of warmth and depth without being overtly noticeable.
Step 4: Noise Reduction and Luminance Adjustments
Newborn sessions, particularly those in lower light conditions, may require noise reduction. Adding luminance in the appropriate panel helps to mitigate noise and can also contribute to a smoother appearance.
Step 5: Polishing in Photoshop with Curves Layers
While Lightroom offers powerful editing tools, many photographers find that a final polish in Photoshop using a series of Curves Layers elevates their images. The first Curves Layer can be applied to the image as a whole to establish a base. Subsequent layers are then used to selectively adjust specific areas, drawing the viewer's eye to the subject. A final Curves Layer set to Soft Light at a lowered opacity can be used for overall contrast enhancement, achieving that signature "clean, punchy edit." This layered approach allows for intricate control and customization based on the specific light and narrative of each image.
Specific Techniques for Newborn Skin Tones
Newborn skin is delicate and often presents unique editing challenges, primarily due to redness and undertones. Several techniques and tools within Lightroom are particularly effective for addressing these issues.
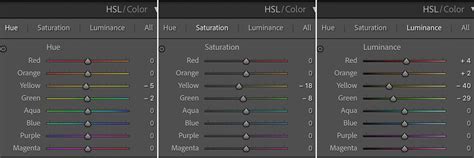
HSL Sliders for Targeted Adjustments
While basic white balance adjustments can correct overall color casts, fine-tuning skin tones often requires more granular control. The HSL (Hue, Saturation, Luminance) sliders in Lightroom are invaluable for this. You can manually adjust each color slider, but a more efficient method is to use the Targeted Adjustment Tool. This allows you to click and drag directly on specific elements within the image to adjust their hue, saturation, or luminance. For instance, if a baby's skin has a dominant yellow undertone, you can use the Targeted Adjustment Tool on the yellow areas to shift the hue, reduce saturation, or adjust luminance.
Addressing Redness: The Red Baby Fix
Redness in newborn skin is a common concern. Some presets are specifically designed to combat this. For example, a "Red Baby Fix" adjustment brush can be used to paint over areas of redness, such as the baby's feet or cheeks, to neutralize the color. The key is to apply these adjustments subtly, preserving the natural pinkness of the baby's skin rather than creating an unnaturally pale appearance. Presets like "Hush the Reds with Baby Powder Light" are designed to correct skin tone while maintaining a natural look.
The "Blanket of Haze" for Softness
To enhance the soft, airy aesthetic often desired in newborn photography, consider using presets that add a gentle "blanket of haze." These can introduce a subtle diffusion, further softening the image and contributing to a dreamy quality.
Gray Skin Fix Brush
Occasionally, certain areas of a baby's skin might appear slightly "off" in color, perhaps looking too gray or dull. A "Gray Skin Fix Brush" can be used to gently warm these areas up, bringing them back into harmony with the rest of the skin tone.
Leveraging Lightroom Presets for Efficiency and Consistency
For photographers who handle a high volume of newborn sessions, the ability to edit quickly and maintain a consistent style is crucial. This is where Lightroom presets become indispensable tools.
Creating Your Own Presets
A powerful aspect of Lightroom is the ability to create your own custom presets. Once you've developed a specific editing style or have a set of adjustments that work exceptionally well for your newborn images, you can save these settings as a preset. This not only makes your editing process lightning-fast but also ensures a very consistent look across your entire client gallery. Each gallery you deliver to parents should exhibit a similar aesthetic, reinforcing your brand and professional style.
Utilizing Pre-made Preset Collections
Numerous pre-made Lightroom preset collections are available, many specifically designed for newborn photography. These can be a fantastic starting point, especially for photographers who are still developing their signature style. For example, MCP's "Baby Steps Lightroom presets" are noted for their effectiveness in editing newborn skin. These presets often include a range of tools, from white balance and exposure adjustments to specialized brushes for fixing redness and enhancing skin tones.
When using pre-made presets, it's important to understand their intended use. Some presets are designed for specific lighting conditions or camera settings. Always preview presets on your images and be prepared to make minor adjustments to tailor them to your specific needs.
The "Baby Steps" Example: A Practical Application
Consider an example of editing a newborn image using a preset collection like "Baby Steps." The process might involve:
- Cropping and Cloning: Initial cleanup, such as removing distractions or cloning out unwanted elements in the background.
- Applying Initial Presets: Using presets like "Auto White Balance," "Fix Underexposure 1," and "Pick Me Up (Crisp Color)" to establish a baseline. These can significantly improve the overall look and feel, correcting color casts and improving exposure.
- Targeted Redness Correction: Employing a "Red Baby Fix" adjustment brush on specific areas like feet or hands to neutralize redness while retaining natural pinkness.
- Overall Skin Tone Correction: Using a preset like "Hush the Reds with Baby Powder Light" to address redness across the entire skin tone.
- Contrast Adjustment: Applying a contrast preset, such as "Crying for Contrast Light," to add desired depth.
- Softness and Airiness: Using a preset like "Baby Bottle Strong" to add a "blanket of haze" for increased softness.
- Warming Gray Skin Tones: Utilizing the "Gray Skin Fix Brush" to warm up any areas of the skin that appear dull or gray.
This step-by-step application demonstrates how presets can guide the editing process, leading to a polished final image.
The Importance of Softness and Creamy Skin Tones
In newborn photography, the emphasis is often on achieving a soft, airy, and creamy aesthetic. This contrasts with styles that might favor high contrast and edgy imagery. Achieving this look involves a delicate balance of adjustments.
Reducing Contrast for Smoothness
As mentioned earlier, reducing the contrast slider in Lightroom is a key technique for smoothing out tonality. This helps to blend transitions between light and shadow, contributing to a softer appearance. However, it's crucial to monitor the histogram to ensure you're not losing essential detail or clipping highlights and shadows.
Clarity for Creaminess
The clarity slider plays a significant role in achieving "creamy" skin tones. Adjusting it downward can soften details and create a more ethereal look. Again, moderation is key. Overdoing it can lead to a loss of texture and make the skin appear overly smooth or plastic-like. The goal is a subtle enhancement, not a complete erasure of natural skin texture.
Avoiding Overly Light Wraps and Blankets
While light-colored wraps and blankets can be visually appealing, they can sometimes present challenges for editing, especially if aiming for classic, timeless black and white images. Extremely light or white materials can sometimes blow out highlights or lack the subtle texture that adds depth to an image. Photographers who prefer a timeless aesthetic may opt for wraps and blankets with slightly more color or texture.
The Role of Photoshop in the Final Polish
While Lightroom is a powerful tool for initial edits and batch processing, Photoshop remains the go-to for advanced retouching and final polishing.
Curves Layers for Precision Control
As previously discussed, Curves Layers in Photoshop offer unparalleled control over the tonal range of an image. By stacking multiple Curves Layers, photographers can selectively enhance contrast, adjust luminosity, and sculpt the light within the image. This allows for precise adjustments to draw attention to the baby's face, enhance the connection with parents, or simply refine the overall mood.
Soft Light Blend Mode for Contrast
A common technique for adding final contrast is to use a Curves Layer set to the Soft Light blend mode. By lowering the opacity of this layer, you can introduce a subtle yet effective boost in contrast without making the image appear harsh. This method contributes to the "clean, punchy" look that many photographers strive for.
Photography Gear and Settings Considerations
While editing plays a crucial role, the quality of the initial capture is equally important. The camera settings and lenses used can significantly impact the editing process.
Camera Settings
For studio environments, typical settings might include:
- Shutter Speed: 1/160 sec
- Aperture: f/2.2
- ISO: 320
These settings, combined with controlled lighting, help to achieve sharp images with good depth of field. However, these can vary based on the specific lighting conditions, desired depth of field, and camera model.
Lenses
Popular lens choices for newborn photography include:
- Sigma ART 35mm f/1.4: A versatile wide-angle lens suitable for capturing the baby within their environment and including parents.
- Sigma ART 50mm f/1.4: A classic "nifty fifty" that offers a slightly tighter perspective, excellent for portraits.
- 100mm f/2.8L Macro: This macro lens is ideal for capturing intricate details like tiny fingers, toes, and eyelashes, creating super dreamy macro images.
The choice of lens will influence the perspective and depth of field, which in turn affects how sharpening and other adjustments are applied during editing. Sharpening, for instance, will depend on the camera settings used during capture.
Conclusion: A Harmonious Blend of Simplicity and Skill
The art of editing newborn photography in Lightroom, often complemented by Photoshop, is a blend of technical skill and artistic vision. By understanding the fundamental principles of exposure, white balance, and color correction, and by leveraging the power of presets and targeted adjustments, photographers can create images that are not only beautiful but also emotionally resonant. The motto of keeping things simple, finding the light, and making it a part of the story, is key. The finished product is a testament to this harmonious balance, delivering a clean, punchy edit that captures the essence of this precious time.