Achieving a professional look for your live streams, YouTube content, or Zoom meetings has always been a significant consideration for creators and professionals alike. While the traditional green screen has long been the cornerstone of this endeavor, its effectiveness hinges on a meticulously executed setup. Proper lighting, maintaining a sufficient distance from the background, and ensuring a wrinkle-free surface are all crucial elements that contribute to a sharp, polished viewer experience, mimicking the quality of a high-end studio. However, the landscape of digital content creation is continually evolving, offering increasingly sophisticated tools that allow for background manipulation without the need for physical setups. This guide delves into the various methods for removing and replacing your webcam background within OBS Studio, exploring both traditional green screen techniques and modern plugin-based solutions.
The Power of Chroma Key: Leveraging Green Screens in OBS
For those aiming to remove the background of a live broadcast or a recording, OBS Chroma Key presents a powerful and accessible solution. This feature is designed to efficiently isolate your portrait, delivering high-quality results through adjustable parameters like smoothness and contrast. The fundamental prerequisite for employing Chroma Key effectively is the proper setup of your green screen.
The process begins with ensuring your green screen is taut, evenly lit, and free from shadows or wrinkles. Once your physical environment is optimized, the next steps involve configuring OBS Studio. After downloading, installing, and launching OBS, navigate to the “Sources” window. Here, you will click the “+” icon to add a new source. Select “Video Capture Device” from the list, assign a descriptive name, and then choose your webcam from the available camera drop-down list.
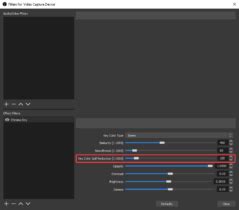
With your camera source added to the scene, the next crucial step is to apply the Chroma Key filter. Right-click on your camera source within the “Sources” list and select “Filter.” Within the “Effect Filters” section, click the “+” icon and choose “Chroma Key” from the emerging menu. You will then be prompted to select the “Key Color Type,” which should be set to “green” for a standard green screen. Subsequently, you can fine-tune the keying process by adjusting sliders for parameters such as similarity, smoothness, and key color spill reduction. These adjustments are vital for achieving a clean cutout and minimizing any green haloing around your subject.
Should you wish to replace the removed background with something entirely new, the process continues seamlessly within OBS. Click the “+” icon under the “Source” window once more. This time, choose the appropriate media type and select your desired source, which could be an image, a video file, or even another scene. By layering your new background source below your camera source in the “Sources” list, it will become visible once the green background has been keyed out.
Exploring Advanced Alternatives: OBS Background Removal Without a Green Screen
For users who either lack the space for a physical green screen or desire a more dynamic and adaptable solution, OBS offers advanced capabilities through plugins that can remove backgrounds without any physical setup. These plugins, often powered by sophisticated AI algorithms, can be a game-changer for achieving professional results with minimal effort.
It is important to note that these advanced background removal features may require a specific version of OBS Studio, such as OBS 28 or later, and a 64-bit operating system. Since these functionalities might not be integrated into the initial OBS installation, they often come as separate plugins that need to be downloaded and installed.
The installation process typically involves downloading a zip file containing the plugin's components. For Windows users, it's advisable to be mindful of potential firewall blocks that might interfere with the installation wizard. After downloading, you will need to extract the contents of the zip file. The extracted files, usually including data and plugin folders, then need to be copied into the main OBS Studio installation directory. The default location for this directory is typically found in C:\Program Files\obs-studio. It is imperative to ensure that OBS Studio is not running during the extraction and installation process to avoid conflicts.
Once the plugin is successfully installed, launching OBS Studio will reveal the new background removal option. To apply it, you will again add your camera as a “Video Capture Device” source. Then, right-click on this source, select “Filters,” and in the “Effect Filters” tab, click the “+” icon. You should now find a “Background Removal” or similar option to add. Applying this filter will allow the AI to detect and remove your background in real-time. Similar to Chroma Key, these plugins often offer adjustable settings to refine the background removal process, ensuring clean edges and natural-looking results.
Integrating OBS with Other Platforms: Virtual Camera Output
A significant advantage of using OBS Studio for background removal, whether through Chroma Key or a plugin, is its ability to output a “virtual camera.” This virtual camera feed can then be selected as the video source in other popular communication and streaming software, such as Zoom, Microsoft Teams, Discord, and others. This bypasses the often-limited built-in virtual background features of these applications, offering a more robust and customizable solution.
To utilize this feature, after you have successfully configured your background removal in OBS, you will need to enable the OBS Virtual Camera. This is typically done by locating a “Start Virtual Camera” button within the OBS main controls. Once the virtual camera is active, open your chosen application (e.g., Zoom). Within the video settings of that application, instead of selecting your physical webcam, choose “OBS Virtual Camera” from the list of available camera devices. Your OBS output, complete with the removed background, will now be displayed in your meeting or stream within that application.
OBS for Zoom: easy way to get started with OBS Virtual Camera
This method allows you to maintain a consistent and professional background across all your online interactions without reconfiguring settings in each individual application. It’s a powerful way to leverage OBS’s advanced capabilities for a polished presence in any virtual setting.
Comparing Approaches: Green Screen vs. AI Plugins
The decision between utilizing a physical green screen and relying on AI-powered background removal plugins hinges on individual priorities, including the desired level of professional precision, available space, and budget. While AI-powered background removal has seen remarkable advancements, particularly in recent years, the traditional green screen, when meticulously set up, often remains the gold standard for achieving the most pristine and high-end broadcast quality.
A physical green screen, when properly lit and positioned, offers a predictable and controllable method for background keying. The clean, uniform color of the screen allows the Chroma Key effect to precisely differentiate between the foreground subject and the background. This can lead to sharper edges and fewer artifacts, especially in complex scenarios involving fine details like hair or translucent objects. However, achieving this level of perfection requires dedicated space, careful lighting arrangements, and a commitment to maintaining the physical setup.
On the other hand, AI-powered background removal plugins offer unparalleled convenience and flexibility. They eliminate the need for physical equipment, making them ideal for users with limited space or those who frequently change their recording environment. These plugins can adapt to various lighting conditions and background complexities, automatically segmenting the subject from the background. While the technology has advanced significantly, there can still be instances where AI struggles with challenging lighting, intricate details, or highly detailed backgrounds, potentially leading to minor imperfections or a less defined edge.
Factors to Consider:
- Quality and Precision: For absolute precision and the highest broadcast standards, a well-executed green screen setup is often superior.
- Convenience and Flexibility: AI plugins offer superior convenience, ease of use, and adaptability to different environments.
- Cost: While green screens can be relatively inexpensive, professional setups can incur costs. AI plugins may be free, freemium, or subscription-based.
- Technical Requirements: AI plugins often require more processing power from your computer, potentially impacting stream performance.
Ultimately, the "better" option is subjective and depends on your specific needs and resources. Many users find a hybrid approach beneficial, using AI plugins for everyday calls and opting for a green screen for critical productions.
Troubleshooting Common Issues in OBS Background Removal
While the tools for background removal in OBS are powerful, technical glitches can occasionally disrupt your workflow. Understanding common issues and their solutions can help ensure a smooth streaming or recording experience.
One frequent problem is when the OBS background removal effect, whether Chroma Key or an AI plugin, does not work as expected. This can stem from several factors:
- Poor Lighting: Inconsistent or insufficient lighting is a primary culprit for both Chroma Key and AI-based removal. For Chroma Key, uneven lighting creates variations in the green hue, making it difficult for the filter to key out the background uniformly. For AI plugins, harsh shadows or overexposed areas can confuse the algorithm, leading to inaccurate subject segmentation.
- Solution: Aim for soft, even lighting across your entire green screen or your background. A ring light or a two-point lighting setup can help minimize shadows and provide consistent illumination. Ensure your subject is also well-lit.
- Messy or Complex Background: A cluttered or visually complex background can challenge both Chroma Key and AI algorithms. For green screens, this includes wrinkles, folds, or objects that are too close to the screen, casting shadows or reflecting green light. For AI plugins, highly detailed or busy backgrounds can make it harder for the AI to distinguish between the subject and the background.
- Solution: Simplify your background as much as possible. For green screens, ensure it's smooth and free of obstructions. For AI, try to maintain a relatively uncluttered background or choose a solid color if possible.
- Incorrect Chroma Key Settings: Over-reliance on default settings or improper adjustment of sliders can lead to poor keying.
- Solution: Carefully adjust the similarity, smoothness, and spill reduction sliders. Start with default settings and make incremental adjustments, observing the preview window closely.
- Inactive Camera Source (Plugin Issue): If you are using an AI background removal plugin and it appears not to be working, the issue might be with the camera source itself.
- Solution: Ensure your camera source is active and correctly selected within OBS. Sometimes, simply re-adding the camera source can resolve this.
System Resource Consumption
Using background removal, especially with advanced AI plugins, can be resource-intensive. These processes require significant CPU or GPU power. If you notice your stream lagging, your computer fans spinning loudly, or your overall system performance degrading, it's a sign that the background removal is consuming substantial system resources.
- Solution: Try lowering the resolution or quality settings of your video capture device within OBS. You might also consider using a more optimized background removal plugin or, if your system supports it, offloading some of the processing to your GPU. If using an NVIDIA GPU, the NVIDIA Broadcast app offers hardware-accelerated background removal that can be more efficient.
OBS Crashing When Removing Background
Occasionally, OBS might crash when background removal features are applied. This can be particularly frustrating during a live session.
Potential Causes:
- Outdated Plugins: The background removal plugin might be outdated and incompatible with your current version of OBS Studio.
- OBS Version Incompatibility: The plugin might not be compatible with a recent OBS update.
- Driver Issues: Outdated graphics drivers can sometimes cause instability with video processing features.
Solution:
- Update OBS Studio: Ensure you are running the latest stable version of OBS Studio.
- Update Plugins: Check for updates for any background removal plugins you are using.
- Update Graphics Drivers: Download and install the latest drivers for your graphics card from the manufacturer's website (NVIDIA, AMD, or Intel).
- Clean Installation: If problems persist, try uninstalling and then reinstalling OBS Studio and the relevant plugins.
Enhancing Your Audio for a Professional Stream
While this guide focuses on visual background removal, it's important to remember that audio quality is equally critical for a professional presentation. Background noise from PC fans, air conditioners, or keyboard clicks can detract from your content.
- Tip: To minimize background audio noise, position your microphone strategically. Try to place it further away from noisy equipment like computer fans or air conditioning units. Using a directional microphone and adjusting its sensitivity can also help isolate your voice and reduce ambient sound. OBS itself offers built-in noise suppression and noise gate filters that can further clean up your audio.
Advanced Options and Recommendations
When considering the best background removal solution, several options stand out:
- NVIDIA Broadcast: For users with an NVIDIA GPU, NVIDIA Broadcast offers impressive real-time background removal capabilities. It is known for delivering excellent results with natural-looking foreground edges and minimal impact on system performance. The primary drawback is its hardware requirement, limiting its use to NVIDIA users.
- Third-Party Tools (Post-Production): While real-time background removal in OBS is convenient, it may not always yield perfect results. For situations where absolute perfection is paramount, consider recording your video first and then using dedicated video editing tools like FlexClip for post-production background removal. These tools often employ advanced AI algorithms that can achieve highly accurate results with clear edges, even in complex scenarios. FlexClip, for instance, works directly in your browser and offers an automated background removal process, allowing you to easily swap in new backgrounds and download the processed video.
- Free Plugins: For those seeking a cost-effective solution, free plugins like the OBS Background Removal Plugin (often referred to as Portrait Segmentation) are available. These can be installed directly into the OBS plugins folder and offer a viable alternative to paid software or dedicated hardware.
Tips for Optimal Background Removal Without a Green Screen
When employing background removal techniques that don't rely on a green screen, several tips can help maximize quality:
- Start with High-Quality Video: The effectiveness of any background removal tool, whether real-time or post-production, is significantly influenced by the initial video quality. Ensure your webcam is set to its highest possible resolution and frame rate. A clear, high-resolution source provides more data for the AI to work with, leading to better segmentation.
- Simplify Your Background: While AI is advanced, a simpler background generally yields better results. Avoid highly detailed, busy, or rapidly changing backgrounds if possible. Solid, non-reflective surfaces tend to be easier for algorithms to process.
- Consistent Lighting: As mentioned previously, good lighting is crucial. Soft, even lighting on your subject minimizes shadows, which can be misinterpreted by AI as part of the background or obscure details of your subject.
- Consider "Virtual Green Screening": Some advanced techniques or specific plugins allow you to "color" your background green within the editing software before applying a traditional Chroma Key. This can sometimes help achieve a cleaner key even without a physical green screen, especially if the tool can accurately identify and uniformly color the background.
Understanding Costs and Performance
- FlexClip Pricing: For services like FlexClip, background removal is typically priced on a credit-based system. For example, removing the background from a 10-second video might cost around 4 credits, translating to a modest per-second cost.
- Performance Impact: The performance impact of background removal varies greatly depending on the method used and your computer's hardware. NVIDIA Broadcast is optimized for NVIDIA GPUs and generally has a lower performance impact. Other AI plugins might be more CPU-intensive. Always monitor your system's resource usage and adjust OBS settings accordingly.
Whether you opt for the traditional green screen, a powerful AI plugin, or a post-production workflow, OBS Studio provides the flexibility to achieve professional-looking webcam backgrounds, enhancing the quality and engagement of your online presence.
tags: #obs #webcam #background #removal