Procreate, a powerful digital drawing and graphics editing application for the iPad, offers a versatile toolkit for artists of all levels. Much like its desktop counterpart, Photoshop, Procreate allows for intricate manipulation of artwork through the use of layers. A fundamental yet crucial aspect of this layering system is opacity, which dictates the transparency of each layer. Understanding and effectively utilizing opacity can elevate your digital art, enabling effects ranging from subtle atmospheric nuances to bold, layered compositions. This tutorial will guide you through the various methods of adjusting layer opacity in Procreate, ensuring you can harness its full potential.
Accessing and Understanding Layers in Procreate
Before diving into opacity adjustments, it's essential to be familiar with Procreate's layer management. When you open Procreate, you'll typically land on the main Gallery screen, which displays your existing projects. To begin working on a piece, simply tap on the image of the project you wish to edit. If you're starting a new creation, tap "Gallery" and then select the plus icon (+) located in the upper-right corner of the screen to initiate a new art project.
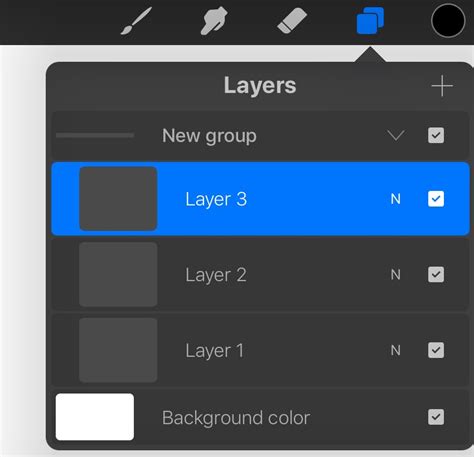
The "Layers" icon is your gateway to managing the different elements of your artwork. It is visually represented by two white sheets of paper, or rectangles with rounded edges, stacked on top of one another. This icon is conveniently situated in the upper-right corner of the Procreate app screen, readily accessible once your canvas is open.
Navigating the Layers Panel
Upon tapping the Layers icon, the "Layers" panel will slide into view, presenting a chronological list of all the layers that constitute your current artwork. Each layer is displayed with a thumbnail preview and its name. This panel is where all layer-specific adjustments, including opacity, are made.
Simple Opacity Adjustment: The Double-Tap Method
One of the most straightforward ways to alter a layer's opacity in Procreate involves a simple double-tap gesture.
- Open Your Project: Launch Procreate and open the artwork, photo, drawing, or file you intend to modify.
- Access the Layers Panel: Tap the Layers icon (the stacked sheets of paper) in the upper-right corner of the project screen.
- Select the Target Layer: Identify the specific layer within the Layers panel whose opacity you wish to change.
- Double-Tap with Two Fingers: With the desired layer selected, double-tap it using two fingers. This action immediately brings up an opacity adjustment interface.
Upon performing the double-tap, an opacity bar will appear at the top of the screen. The layer's current opacity level is clearly displayed above this bar.
Fine-Tuning Opacity
The opacity bar functions as a slider. You can manipulate it using your finger, an Apple Pencil, or any compatible third-party drawing stylus.
- To Lower Opacity: Swipe your finger (or stylus) to the left along the opacity bar. As you move left, the layer will become more transparent.
- To Raise Opacity: Swipe your finger (or stylus) to the right along the opacity bar. Moving right will increase the layer's opacity, making it more opaque.
Continue adjusting until you achieve the desired level of transparency or solidity for that layer.
Opacity Adjustment via the Blend Mode Panel
Another accessible method for adjusting opacity is through Procreate's Blend Mode panel. This approach offers a slightly more integrated experience within the layer management interface.
- Open Your Canvas and Layers: As before, open your Procreate project and tap the Layers icon to reveal the Layers panel.
- Locate the Layer: Find the layer you wish to adjust within the panel.
- Access Blend Modes: To the right of each layer's name and thumbnail preview, you'll notice a small letter, often an "N" by default (representing Normal blend mode). Tap this letter. This action opens the Blend Mode menu for that specific layer.
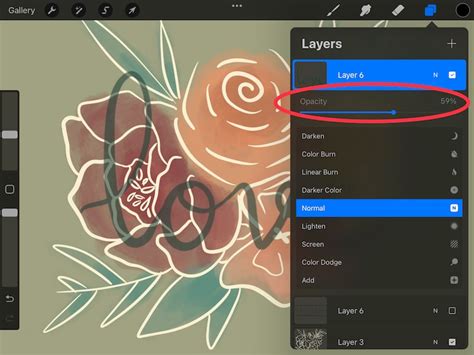
- Utilize the Opacity Slider: At the very top of the Blend Mode panel, you will see the "Opacity" setting along with a slider bar.
- Adjust Opacity: Tap and drag the slider bar to the left to decrease the layer's opacity or to the right to increase it. This slider provides the same functionality as the double-tap method, allowing for precise control over transparency.
Once you've set the opacity to your satisfaction, you can tap outside the Blend Mode panel or on the canvas to close it and return to your artwork.
Adjusting Opacity for Multiple Layers
When working with complex artworks, you might need to adjust the opacity of several layers. Procreate offers two primary strategies for this:
Adjusting Layers Individually
The most direct approach is to repeat the opacity adjustment process for each layer you wish to modify. This provides granular control, allowing each layer to have a unique opacity setting. While time-consuming for many layers, it offers the ultimate flexibility.
Merging Layers for Uniform Opacity
If you intend to set multiple layers to the same opacity level, merging them into a single layer first can be a more efficient workflow.
- Group Layers (Optional but Recommended): To keep your Layers panel organized, you can group the layers you intend to merge. Swipe right on each layer you want to include in the group, then tap "Group."
- Merge Layers: Once grouped (or if you choose to merge them directly), you can merge them into one. You can either merge the entire group by double-tapping the group folder and selecting "Merge Group" or select multiple layers by tapping them after swiping right, then tapping "Merge" at the bottom of the panel.
- Adjust Opacity of the Merged Layer: With the layers now combined into a single layer, you can adjust its opacity using either the double-tap method or the Blend Mode panel as described previously.
Important Consideration: When merging layers, remember that the resulting single layer will adopt a uniform opacity. If you need different opacity levels for elements within that merged group, you must adjust them before merging.
Opacity Adjustments on Procreate Pocket (iPhone)
While Procreate Pocket is the iPhone version of the app, its interface differs slightly. The core functionality of adjusting opacity remains, but the steps are adapted for the smaller screen.
- Open Procreate Pocket and Your Project: Launch the app and open your desired artwork.
- Access Layers: Tap the Layers icon, similar to the iPad version.
- Select the Layer: Choose the layer you want to adjust.
- Tap "Modify": Look for a "Modify" tab or button, often located near the top of the screen.
- Locate the Magic Wand: Within the "Modify" menu, find the magic wand symbol, which represents adjustments and filters.
- Select "Opacity": Tap on the "Opacity" option.
- Use the Slider: A slider will appear. Swipe your finger to the left to decrease the layer's opacity or to the right to increase it until you reach your desired transparency.
Advanced Opacity Techniques and Considerations
Creating Realistic Effects with Lowered Opacity
Lowering the opacity of a layer is a powerful technique for achieving nuanced visual effects. For instance, creating realistic-looking smoke, fog, or smog effects often relies on building up multiple layers with reduced opacity. Each layer adds a subtle density, contributing to a more natural and believable atmospheric appearance. Similarly, fading elements into the background or creating soft glows can be accomplished by carefully dialing down opacity.
The "Empty" Layer Mystery: Checking Opacity
Sometimes, a layer that you believe should be filled with content might appear completely empty or almost invisible. Before assuming the layer is truly blank, always check its opacity setting. It's possible the opacity was accidentally reduced significantly, making the layer appear transparent. Re-adjusting the opacity to 100% will reveal the layer's content. This is a common troubleshooting step for unexpected transparency issues.
Creating New Layers from Selections for Targeted Opacity Control
For even more precise control, you can create a new layer from a specific selection within your artwork and then adjust the opacity of that new layer. This is particularly useful when you want to modify the transparency of only a portion of an existing layer without affecting the rest.
- Activate Selection Tools: Locate the "S" or Selection icon, usually found in the upper-left corner of the Procreate menu. Tap it to access the selection tools.
- Choose a Selection Shape: Select the appropriate tool for your needs (e.g., Rectangular, Oval, Freehand, Automatic). The choice depends on the shape of the area you wish to isolate.
- Make Your Selection: Carefully draw or define the area of your artwork you want to isolate.
- Copy and Paste to New Layer: Once your selection is made, perform a three-finger swipe down on the canvas. This action opens the Copy & Paste menu. From this menu, select "Cut & Paste." This action will create a brand-new layer containing only the selected portion of your artwork, and importantly, it will be placed above the original layer.
- Adjust Opacity of the New Layer: With your selection now on its own layer, you can adjust its opacity using either the double-tap method or the Blend Mode panel, allowing you to control the transparency of just that specific element.
This method allows for non-destructive editing and offers a high degree of control over individual elements within your artwork.
Understanding Opacity in Groups
When you group layers, you can also adjust the opacity of the entire group. Double-tapping on the group folder in the Layers panel will often reveal an option to adjust the group's overall opacity, affecting all layers within it simultaneously. This is a convenient way to control the combined visual weight of multiple elements.
Mastering opacity in Procreate is a fundamental skill that unlocks a vast array of creative possibilities. Whether you're aiming for subtle atmospheric effects, building complex compositions, or simply refining your artwork, understanding how to precisely control layer transparency is key to achieving professional-looking results. By utilizing the intuitive double-tap gesture, the comprehensive Blend Mode panel, and advanced selection techniques, artists can effectively manipulate opacity to bring their visions to life on the iPad.