Opacity, a fundamental concept in Adobe Photoshop, dictates the level of transparency or opaqueness of an image or layer. It is a critical tool that allows users to control the visibility of layers and elements within their designs, influencing how pixels blend and interact to create a desired visual outcome. Understanding and effectively utilizing opacity is paramount for achieving nuanced and impactful results in digital art and photo editing.
The Core Concept: Defining Opacity
In Photoshop, opacity refers to the degree to which a layer obscures or reveals the layer beneath it. This property is quantifiable, ranging from 0% to 100%. At 0% opacity, a layer is fully transparent, rendering it invisible and allowing the underlying content to show through completely. Conversely, at 100% opacity, a layer appears completely opaque, fully obscuring anything beneath it. The spectrum between these two extremes allows for subtle to dramatic blending effects.
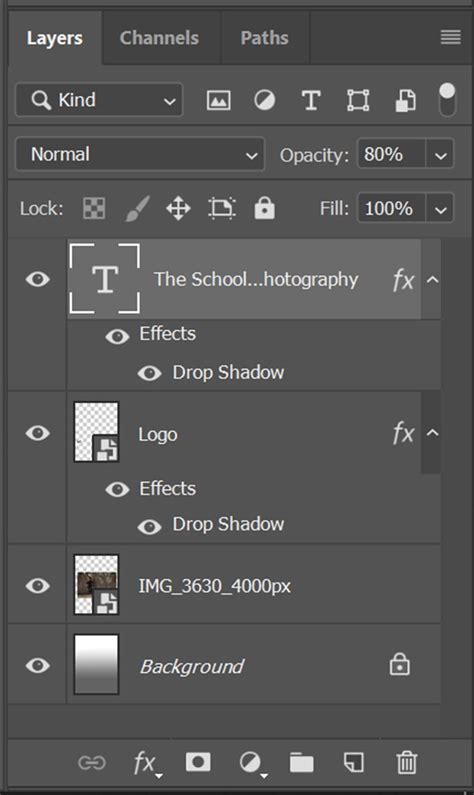
The opacity of a layer can be adjusted using a slider, typically found in the Layers Panel. This slider provides a visual representation of the transparency level, enabling users to fine-tune how elements interact within a composite image. When discussing opacity, it's crucial to differentiate it from "Fill opacity," a concept that will be explored later in this article, as they have distinct behaviors, especially when layer styles are involved.
Layers and Opacity: The Foundation of Blending
The blending mode of a layer is a powerful determinant of how its pixels interact with the pixels of the layers beneath it. Opacity, in conjunction with blending modes, allows for an extensive range of visual effects. By default, layers in Photoshop are set to the "Normal" blending mode. In this mode, the active layer's opacity is applied directly without any special blending calculations.
When you choose a different blending mode for a group, you effectively change the order in which the image components are put together. All of the layers in the group are put together first. However, the "Normal" blending mode simply applies the layer's opacity without altering the color values of the underlying pixels. For instance, "Screen" blend mode lightens the image by combining the colors of underlying layers, and its effect is also modulated by the layer's opacity.
Blending Modes - Photoshop for Beginners | Lesson 5
It's important to note that certain blending modes are unavailable for specific image modes. For example, in Lab images, the Color Dodge, Color Burn, Darken, Lighten, Difference, Exclusion, Subtract, and Divide modes are unavailable. This limitation is due to the mathematical operations these modes perform, which are not compatible with the color model of Lab images.
To preview the impact of various blending modes, Photoshop offers a real-time visual feedback mechanism. By scrolling over different options in the Blend Mode pop-up menu, users can observe how each mode affects their image instantly, removing the guesswork and facilitating informed choices.
Opacity vs. Fill Opacity: A Crucial Distinction
While opacity and fill opacity might appear similar at first glance, they behave very differently, particularly when layer styles are applied. The primary distinction lies in what each setting affects.
Opacity: When you adjust the Opacity value for a selected layer, the change applies to the entire layer. This means that any layer styles (such as drop shadows, strokes, or bevels) and the blending mode for that layer are also affected. A decrease in overall opacity makes the layer, including its effects, more transparent.
Fill Opacity: In contrast, Fill Opacity affects only the actual layer content or fill pixels inside the shape of the layer, excluding the layer styles applied to it. This allows for a greater degree of control. For example, you can specify a Fill value and blending mode for a layer, and only the fill pixels inside the shape are affected-not the layer styles applied to the layer.
This difference becomes especially pronounced when dealing with layer styles. Try adding some text to an image, apply layer styles like a drop shadow or a stroke, and then experiment with changing the overall Opacity versus the Fill Opacity. You will observe that reducing the Fill Opacity will make the text itself more transparent, while the drop shadow and stroke remain fully visible (or retain their original opacity settings). Conversely, reducing the overall Opacity will make both the text and its applied styles more transparent.

It is important to note that Opacity and Fill behave differently when used in conjunction with "Special 8" blend modes compared to when standard Opacity is adjusted. Understanding this distinction is key to achieving precise control over the visual appearance of your designs. For instance, 20% Opacity will look different than 20% Fill, and 30% Opacity will look different than 30% Fill. These nuances can extend the capabilities of these blend modes.
Advanced Opacity Techniques: Beyond the Basics
Mastering opacity in Photoshop extends beyond simple layer adjustments. Several advanced techniques can further enhance your control and creative possibilities.
Blending Options and Clipping Masks
Blending options are specific settings within layer styles that allow you to customize how layers blend together. Working with blending options gives us the ability to fine-tune opacity. For example, within the "Blend If" section of the Layer Style dialog box, you can use the "This Layer" and "Underlying Layer" sliders. These sliders allow you to set the brightness range of the blended pixels-measured on a scale from 0 (black) to 255 (white). Dragging the white slider, for instance, sets the high value of the range, determining which bright pixels from the active layer will blend. Similarly, the Underlying Layer sliders specify the range of pixels in the underlying visible layers that will blend. This enables sophisticated effects like dropping dark pixels out of the active layer or forcing bright pixels from underlying layers to show through.
Clipping masks are another powerful tool that works in tandem with opacity. By creating a clipping mask, you can non-destructively limit the effects of a layer to the shape of the layer directly beneath it. By default, layers in a clipping mask are blended with the underlying layers using the blending mode of the bottommost layer in the group. However, you can choose to have the blending mode of the bottommost layer apply only to that layer, allowing you to preserve the original blending appearance of the clipped layers. Selecting "Blend Clipped Layers As Group" applies the blending mode of the base layer to all layers in the clipping mask, offering unified control.
Layer Masks and Adjustment Layers
Layer masks provide a non-destructive way to control the visibility of a layer. By painting with black on a layer mask, you conceal parts of the layer, while painting with white reveals them. Grays create semi-transparent areas. Opacity plays a crucial role here, as painting with a brush at a lower opacity on a layer mask allows for gradual transitions and more subtle masking effects.
Adjustment layers are also invaluable for managing opacity. These non-destructive layers enable you to apply image adjustments, such as color balance or exposure, with an independent opacity attribute. This means you can adjust the intensity of an adjustment layer without permanently altering the original image data, and you can control how strongly that adjustment affects the layers below it.
Brushes, Flow, and Density
Opacity is not only applicable to layers but also to various tools in Photoshop, such as brushes. Brush opacity controls the degree of transparency of the brush strokes, allowing for more subtle and gradual effects as you paint. For quick access to brush opacity, you can use the keyboard shortcut 1-0 (corresponding to 10-100%) while the Brush Tool is active. For example, pressing "2" while the Brush Tool is selected will set the brush opacity to 20%.
In conjunction with opacity, Photoshop also offers the "Flow" setting for brushes. While opacity determines the overall transparency of the brush stroke, flow controls the speed at which paint is laid down. Low flow settings mean that paint is applied more gradually, requiring multiple passes to build up to full intensity. This is akin to shading with a pencil; a light touch with low flow is like a light pencil stroke, while a hard press with 100% flow is like a dark, solid mark.
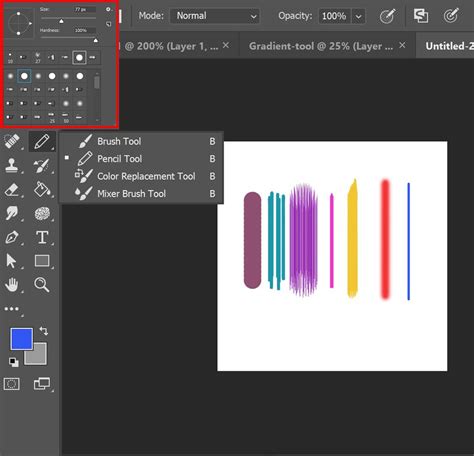
The interplay between opacity and flow is particularly beneficial for masking and creating smooth, natural-looking effects. When using a low flow setting, especially with a soft brush, you can gradually build up color or transparency in an area, achieving nuanced results that would be difficult with a single 100% opaque stroke.
Special Blend Modes and Fill with Neutral Color
It's worth re-emphasizing that Opacity and Fill behave differently when used in conjunction with "Special 8" blend modes. These modes, often found in the advanced blending options, can interact with opacity and fill in unique ways, allowing for highly specialized effects.
Furthermore, there are instances where you cannot apply certain filters (such as the Lighting Effects filter) to layers with no pixels. Selecting "Fill With (Mode)-Neutral Color" in the New Layer dialog box resolves this problem by first filling the layer with a preset, neutral color. If no effect is applied, filling with a neutral color has no effect on the remaining layers, but it provides a canvas upon which filters can be applied.
Opacity in Photography and Workflow
In the realm of digital photography and editing, opacity plays a significant role in shaping the final image. When working within applications like Photoshop or Lightroom, understanding how applying opacity to different elements can alter the output is essential.
For instance, when working with type layers, adjusting opacity modifies the transparency of the text, allowing the background to become more or less visible. A common technique involves adding a solid white layer and adjusting its opacity to create a more subtle, faded look for an image. This non-destructive approach allows for easy experimentation.
When saving files, especially in formats that support transparency, adjusting opacity settings can influence file size and composition. Therefore, maintaining clear and concise thumbnails in the layers panel is important to keep track of your progress. Finally, to ensure your work is preserved and easily accessible, it's crucial to save the PSD file regularly, especially after making significant opacity adjustments.
Conclusion: Mastering Opacity for Enhanced Designs
In conclusion, mastering opacity is essential when striving to create impactful designs and polished photographic work. By understanding how to work with image and effect transparency, you enhance your ability to produce visually appealing and highly refined results. Whether adjusting the transparency of a layer, fine-tuning brush strokes, or utilizing advanced blending techniques, opacity provides a powerful means to control the visual narrative of your creations. The ability to manipulate how elements interact, blend, and reveal themselves is a cornerstone of effective digital art, making opacity an indispensable tool in any Photoshop user's arsenal.