Procreate offers a powerful and intuitive system for creating and customizing brushes, transforming your iPad into a versatile digital art studio. Whether you're a beginner looking to understand the basics or an experienced artist aiming to unlock advanced techniques, this tutorial will guide you through the intricacies of Procreate brushes, from their organization and import to the deep customization available within the Brush Studio.
Navigating Your Brush Libraries
Accessing your brush libraries in Procreate is straightforward. You can find them stored within the iPad's Files app. There are two primary locations: "On My iPad" → "Procreate" → "Brushes," or within your "iCloud Drive" → "Procreate Brushes." This integration with the Files app means that changes made to brushes within Procreate are reflected in Files, and vice versa, ensuring a seamless workflow.
Brush libraries, individual brush sets, and even single brushes are treated as files and folders. This file-based system means that certain characters cannot be used in names due to operating system restrictions. When you import individual .brush files, they should be placed within a brush set folder in the Files app.
There are two main ways to access your brush libraries. You can scroll through the list to navigate all the brush sets, and then tap a set to view the brushes it contains on the right. The brush list displays the name of each brush and a preview of the stroke it makes, providing a clear visual guide to your tools.
Managing Your Brushes and Sets
Procreate provides robust tools for managing your brush collection. To create a new brush, simply tap 'Create new brush,' which will open the Brush Studio for customization. Similarly, you can create a new brush set by tapping the designated area within your current brush library. Importing brushes, brush sets, or entire libraries is also easily done directly from the Files app.
Duplicating brushes and brush sets is a vital practice for experimentation and backup. To duplicate a brush, swipe left on its thumbnail in the brush panel and tap 'Duplicate.' For brush sets, tap twice on any set (or tap and hold) and select 'Duplicate.' An exact copy will appear below the original, allowing you to modify it without affecting the primary set.
Renaming brushes and sets is also flexible. In versions before 5.4, renaming could be done within Brush Studio's "About this Brush" section. More commonly now, you can rename a brush set by tapping it twice or tapping and holding, then selecting 'Rename.' Brushes can also be renamed directly from the Files app.
You can even personalize your brush sets with emoji icons. If no icon is set, Procreate will use the first emoji in the brush set's name as its icon, adding a visual flair to your library.
Sharing individual brushes or custom brush sets is also a breeze. Swipe left on a brush thumbnail and tap 'Share,' or tap twice on a brush set and select 'Share.' For backing up your valuable brushes and sets, consider saving them to an external hard drive or a dedicated cloud service.
Moving brushes and brush sets is an intuitive drag-and-drop process. Tap and hold the item you want to move, and it will 'lift up' slightly. Dragging it over the title of another brush set will copy the brushes, placing copies in the new location. To move multiple items, pick up the first one, and with another finger, tap additional items to create a stack. A number will appear indicating how many items are in the stack. When moving brushes and sets between libraries in Procreate 5.4 and above, the files are completely moved, not copied.
Deleting a brush or brush set is permanent and removes it from both Procreate and the Files app. Always ensure you have backups before deleting. If you accidentally delete something, check the 'Recently Deleted' section in your Files app locations.
Discovering Procreate's Brush Sets
Procreate ships with 18 core, handcrafted brush sets designed to offer a wide range of useful tools for various artistic needs. These brushes range from realistic to fantastical, catering to diverse styles and techniques.
- Defaults: This set features clean and simple, mostly rounded brushes, perfect for general use.
- Inks: Your go-to for comic or manga-style art, this set includes brushes with inks and halftones.
- Technical: Clean and purpose-built for projects with a more technical lean, ideal for practical drawing, planning, sketching, and quick studies.
- Artistic: This set offers a range of rendering brushes for artistic drawing.
- Dry Media: Ideal for cleaning up artwork and drawing in ink-centric styles like sumi-e.
- Paintbox: These brushes encompass a range of realistic and digital painting effects, covering mediums from acrylic to stucco to oil.
- Texture: The focus of this fascinating brush set, offering a range of effects from watery to clumpy.
- Calligraphy: Brushes in this set all have Streamline enabled, allowing letterers to create smooth and even calligraphic forms.
- Gouache: A staple of classic digital art, these brushes lay down large areas of texture quickly.
- Magic: This playful set demonstrates the unique capabilities of Procreate’s versatile Brush Studio, including brushes that change color, create smoky effects, and generate chaotic shapes.
- Materials: Featuring a variety of Material brushes with metallics and roughness, created for 3D painting.
- Grunge: This mind-blowing brush takes full advantage of the power of digital art, designed to add realistic grunge textures to your art.
- Organic: The Organic brush set offers all things natural, including scatter brushes for adding grass, leaves, and bark textures, as well as brushes mimicking handmade mediums.
- Watercolour: This set offers several realistic watercolour brushes.
Experimenting with these different brushes is key to exploring the vast possibilities within Procreate.
The Power of the Brush Studio: Deep Customization
The Brush Studio is where the true magic of Procreate brushes lies. It offers total control over each aspect of your brush, allowing you to alter shape, grain, behavior, color, responsiveness, opacity, taper, and much more. With hundreds of settings, you can create limitless combinations.
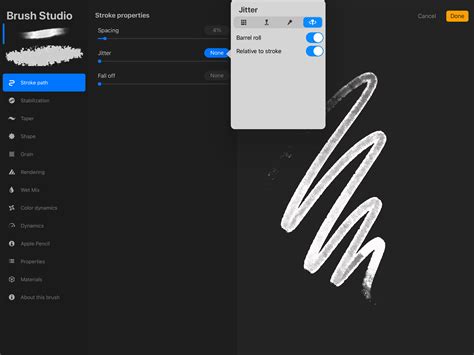
Brush Stroke Path and Jitter
The Stroke Path settings control how frequently your brush shape "stamps" itself along a path. Increasing spacing reveals individual stamps, useful for understanding brush behavior. Spacing adds variability to this, making the gaps between stamps larger and more "random" with higher values. Jitter controls how much the stamps shift perpendicular to your stroke (Lateral) or in the direction of the stroke (Linear). Both can be controlled by Apple Pencil pressure and tilt, and barrel roll with Apple Pencil Pro.
Stabilization and Motion Filtering
Stabilization smooths out strokes as you draw, reducing wobbles and shakes. It can be applied globally or to individual brushes. StreamLine is particularly important for inking and calligraphy, ensuring smooth and even results. Motion Filtering is Procreate's advanced algorithm for stabilization, providing even smoother and straighter strokes regardless of drawing speed. Motion Filtering Expression works in conjunction with Motion Filtering.
Taper: Shaping Your Strokes
Taper controls the brush size reduction at the beginning and end of a stroke. This replicates the natural feeling of pencils and paintbrushes. You can adjust the taper length using sliders, affecting how much artificial taper is applied. Pressure Taper is for Apple Pencil use, while Touch Taper is for fingers. Procreate cannot use pressure settings when painting with a finger. Taper settings don't suit every brush but can add realism when used appropriately.
Shape: The Brush Tip
The Shape setting defines the brush tip. You can import an image into the Shape Source to change the brush's fundamental form. A smooth circular shape creates a smooth stroke, while an irregular shape creates a rougher one. You can adjust existing shapes or load your own. The Source Library offers many unique shapes, or you can import your own from photos or files.
Azimuth, Tilt, and Barrel Roll
Advanced users can leverage Azimuth and Barrel Roll for more dynamic brush control. Azimuth detects the Apple Pencil's tilt radius to determine the shape's stamping orientation, mimicking a calligraphy pen. Barrel roll adds control over shape orientation, color, and size as you rotate the Apple Pencil Pro. Relative to stroke adjusts the shape's rotation in relation to your stroke's direction, while Scatter randomizes rotation for each stamp. Count and Count Jitter allow for multiple stamps per point with varying degrees of randomness.
Grain: Adding Texture to Your Brushes
Grain is the texture that sits inside your brush shape, acting like a paint roller. The Grain Source allows you to import and edit images to turn them into tiling textures. You can set the grain to move with the stroke for a streaky effect or stay static for a crisp texture. The Scale slider controls how the grain size is fixed or scales with your brush size. Movement options dictate how the grain texture blends and interacts with your stroke, including options like "Moving," "Texturized," "Follow Stroke," and "Inverse."
Exploring Stabilization in the Brush Studio | Learn to Procreate
The Depth setting adjusts the strength of the texture over the base color, while Contrast sets the minimum level of texture contrast. Offset and Offset Jitter create more organic effects or ensure pattern consistency. Blend Mode controls how the grain texture blends with the underlying color. Grain filtering adjusts antialiasing.
Rendering Modes: How Your Brush Behaves
Procreate offers various Render Modes to control how brush strokes are applied to the canvas, simulating different paint behaviors. Light Glaze is akin to diluted paints, while Intense Blending is like laying thick paint. Chisel Hard and Chisel Soft offer distinct edge effects. Intense Blending is excellent for wet brushes that mix colors.
Color Dynamics: Bringing Your Brushes to Life
Color Dynamics allows your brush to change color, saturation, brightness, and more based on Apple Pencil pressure, tilt, or even the applied color. You can set brushes to shift through hue, saturation, lightness, and darkness. A secondary color can be introduced, allowing you to shift between primary and secondary colors with each stroke. Each stamp can deviate from your chosen color, saturation, lightness, or darkness with varying degrees of randomness.
Apple Pencil and Stylus Integration
Procreate's brushes are optimized to work natively with Apple Pencil pressure and tilt, as well as Apple Pencil Pro's squeeze and barrel roll features. The App Pressure Sensitivity curve allows you to customize how your stylus interacts with the app, adjusting the feel of your brush. Scribble functionality is also supported, enabling you to write in text fields.
Hover functionality, available on newer iPad models, makes the brush cursor visible while hovering your Apple Pencil just above the canvas, offering unique gesture controls for brush size and opacity.
Understanding Brush Properties
- Size Limits: Accessible under Properties, these settings allow you to increase or decrease the maximum and minimum size ranges for your brush.
- Pressure Curve: Editing the Pressure Curve in Preferences allows you to fine-tune how pressure affects your brush's stroke, from opacity to size.
- Tilt Settings: Found under the Apple Pencil tab, these settings control how tilt affects stroke attributes like opacity, size, and bleed. The Tilt Graph allows you to set "trigger points" where brush attributes change based on the degree of tilt.
- Brush Taper: As mentioned, this controls stroke reduction at the start and end. The Tip slider within Taper settings determines the shape of the tapered endings, with "Sharp" producing a pointed end.
- Wet Mix: This tab is for creating Blend brushes that mix and drag existing colors. Dilution is the primary setting affecting paint amount, while Charge impacts paint applied to the brush. The Pull slider works in conjunction with Dilution.
By understanding and experimenting with these numerous settings, you can create truly unique and expressive brushes that perfectly suit your artistic style and workflow within Procreate. The possibilities are truly limitless.