Perfect bound books represent a popular and sophisticated choice for achieving a polished, professional aesthetic. Characterized by their glued edges and individual sheets, these books present a classy, durable spine that is ideally suited for a variety of applications, including catalogs, magazines, and high-end lookbooks. This comprehensive guide is tailored for advanced users who possess a working familiarity with Adobe Illustrator or InDesign. It will systematically lead you through the entire process of creating perfect bound books, commencing with the crucial step of calculating spine width, and extending to the meticulous setup of the correct page count and bleeds.
Understanding the Fundamentals of Perfect Bound Books
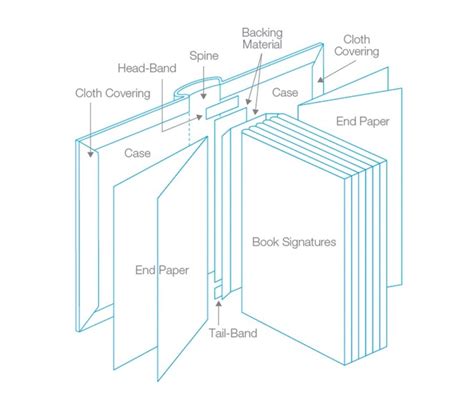
Perfect bound books offer a sleek, stylish appearance with pages that are neatly and securely glued along the spine. This binding method is particularly well-suited for larger projects, typically accommodating a page range from 48 to 300 pages, and results in a smooth, seamless finish that exudes professionalism. The inherent structure of a perfect bound book means that the pages are essentially a block, with the cover wrapped around it and adhered to the spine. This creates a clean, book-like appearance often seen in commercially published paperbacks and hardcovers.
Step 1: Calculating the Spine Width - The Foundation of Your Cover Design
The initial and most critical step in preparing your perfect bound book project is accurately calculating the spine width. This calculation is paramount to ensuring that your custom-designed cover will fit flawlessly around the book block. The spine width is determined by the combined thickness of the interior pages, which in turn is dependent on the number of pages and the caliper (thickness) of the paper stock chosen for the inside pages.
The fundamental formula for calculating spine width is as follows:
Spine Width = (Number of Pages / 2) * Thickness of Interior Paper Stock
It is crucial to note that the "Number of Pages" in this formula refers to the total number of pages in your book, not the number of sheets of paper. Since each sheet of paper has two sides, and each side constitutes a page, you will use the total page count as provided by your printer. The "Thickness of Interior Paper Stock" should be the caliper measurement of the paper you intend to use for the inner pages, typically measured in points or millimeters.
For rapid reference and to facilitate design decisions, consider these tabulated examples for common text and cover stocks:
Text Stocks (Inside Pages) - Example Caliper Measurements (in points)
| Paper Weight (lb) | Paper Type | Caliper (points) |
|---|---|---|
| 80lb | Uncoated Text | 4.6 |
| 100lb | Silk Text | 5.2 |
| 70lb | Smooth Text | 4.0 |
| 60lb | Offset Text | 3.5 |
Cover Stocks - Example Caliper Measurements (in points)
| Paper Weight (pt) | Paper Type | Caliper (points) |
|---|---|---|
| 10pt | C1S | 10 |
| 12pt | C1S | 12 |
| 15pt | C1S | 15 |
| 16pt | C2S | 16 |
Note: These caliper measurements are approximate and can vary by manufacturer and specific paper product. Always confirm the exact caliper with your paper supplier or printer.
Step 2: Navigating Popular Sizes and Stocks for Informed Decisions
To assist you in making informed decisions regarding your book project, we present a compilation of frequently used sizes and paper stocks. A thorough understanding of these examples will prove invaluable in accurately calculating your spine width and meticulously preparing your print-ready files.
Example Scenarios for Total Flat Size Calculation
These scenarios demonstrate how to combine page count, paper stock thickness, and cover stock to determine the overall flat size of your cover. The "Total Flat Size" refers to the dimensions of the cover laid out flat, before it is folded and bound. It includes the front cover, the spine, and the back cover, plus any necessary bleed.
Scenario 1: 52 PagesFor a 52-page book utilizing a 15pt C1S (Coated 1 Side) cover and an 80lb Uncoated text stock for the inside pages:
- First, calculate the spine width: (52 pages / 2) * 4.6 points (thickness of 80lb Uncoated Text) = 26 * 4.6 = 119.6 points. Convert to inches: 119.6 points / 72 points/inch ≈ 1.66 inches.
- The total flat size calculation would incorporate the front cover width, the spine width, and the back cover width, plus bleed. Assuming a standard trim size of 8.5" x 11" for the finished page, the flat size would be: (Trim Width + Trim Width + Spine Width + Bleed x 2) x Trim Height.
- Total Flat Size = 17.1874" x 11" (This figure suggests a specific trim size and calculation method used by the provider, which incorporates bleed and potentially other factors).
Scenario 2: 24 PagesFor a 24-page book with a 10pt C1S cover and a 100lb Silk Text inside stock:
- Calculate the spine width: (24 pages / 2) * 5.2 points (thickness of 100lb Silk Text) = 12 * 5.2 = 62.4 points. Convert to inches: 62.4 points / 72 points/inch ≈ 0.87 inches.
- Total Flat Size = 17.087" x 11" (Again, this indicates a specific calculation method and trim size).
Step 3: Setting Up Your Cover - Flat Size and Bleeds for a Professional Finish
Once you have successfully calculated your spine width and reviewed the total flat size dimensions, you are ready to meticulously set up your cover file in Adobe InDesign. The "flat size" is the crucial measurement that encompasses the entire cover as if it were laid out open and flat: this includes the front cover panel, the spine panel, and the back cover panel.
Crucially, remember to extend your design elements beyond the trim edge by adding a bleed of 0.125 inches (or 3mm) around all edges of the flat artwork. This bleed area is essential to guarantee that your design extends fully to the very edge of the page after the book is trimmed to its final dimensions. Without adequate bleed, any slight misregistration during the trimming process could result in unsightly white edges.
Important Note: Score Lines for Effortless Folding
To ensure that your cover opens and folds smoothly without cracking or creasing improperly, it is standard practice to incorporate score lines. These score lines should be positioned 0.25 inches (or 6mm) in from the edges where the cover will be folded around the book block (i.e., where the spine meets the front and back covers). This pre-creasing guides the fold and prevents stress on the paper fibers, maintaining the integrity and appearance of your cover.
Working with Bleeds and Slugs in InDesign
Step 4: Clarifying Pages vs. Sheets - A Critical Distinction
When embarking on the setup of perfect bound books, it is imperative to maintain a clear understanding that printers typically count and refer to everything in terms of "pages." Each individual sheet of paper used in the interior of the book has two sides, and each of these sides is considered a distinct page. This means that if your book is specified as having 88 pages, it will comprise 44 physical sheets of paper.
Here's a helpful guide to keep this distinction in mind:
- One Sheet = Two Pages
- Always provide your total page count, not the number of sheets, when submitting your project for printing. This ensures accurate production and avoids potential confusion.
Step 5: Page Count and Bleeds for Interior Pages - Every Page Matters
For your perfect bound book project, the interior pages are printed on individual sheets of paper, with each side of each sheet contributing to the total page count. It is vital to include every single page in your total count, even those that will appear blank in the final book. This includes title pages, half-title pages, chapter start pages, and any other intentionally blank pages.
Here's what to keep in mind regarding interior pages:
- Sequential Numbering: Ensure your InDesign document accurately reflects the final page order and numbering.
- Blank Pages: Include all blank pages in your document setup. These are essential for maintaining the correct pagination and ensuring proper imposition by the printer.
- Bleed for Interior Pages: While less common than for covers, if any interior page artwork or background colors extend to the trim edge, they will also require a bleed, typically 0.125 inches (3mm). Consult your printer's specifications.
- Gutter Considerations: When designing content that is close to the inside margin (the gutter), consider that a portion of the page will be lost within the binding. Typically, 5-10mm of content closest to the spine may become obscured. If text or critical design elements are placed too close to the gutter, they may become illegible or appear distorted. This is particularly relevant for content that might "stop at the inside fold."
Addressing Content Near the Gutter
A common question arises regarding content that appears to stop at the inside fold of a page. This refers to the area that falls into the gutter of the perfect bound book. Normally, this should not present a significant problem, as that area is destined to be obscured by the binding adhesive. Most of the time, anything within 5-10mm of the spine will fall into the gutter and will not be visible in the finished book, rendering it unnoticeable.
However, the degree to which content is lost in the gutter can be influenced by the binding method. In the case of perfect binding with side gluing, a "hinge crease" is often needed. This hinge crease is a slight indentation or score line near the spine that allows the pages to lie flatter when the book is opened, preventing undue stress on the binding. The presence and placement of this hinge crease can subtly affect how much of the page is truly visible. Therefore, it is always advisable to keep critical design elements and text at a safe distance from the inside margin to ensure readability.
Step 6: Preferred File Submission Formats for Optimal Print Quality
To ensure the highest possible quality for your print project and to maintain the integrity of your intricate designs, we strongly prefer that all final files be submitted in either EPS (Encapsulated PostScript) or PDF (Portable Document Format). These vector-based formats are designed to preserve image quality, scalability, and font information, making them ideal for professional printing workflows.
Leveraging Adobe InDesign Templates and Features
The most efficient way to initiate your book design process is by downloading the provided Adobe InDesign templates. These templates are pre-configured with the correct document size, bleeds, and often include guides for safe margins.
- Template Selection: Make your selections for every product option on the printer's website. Once you have finalized all product choices, scroll down to find and download your specific Adobe InDesign template.
- Design Layer Placement: It is crucial to place all of your design elements exclusively on the "Your Design" layer within the InDesign template. This layer is typically set up to accommodate your artwork, ensuring that non-design elements (like guides or pre-set margins) remain separate. The inside margins of the template are usually set to the minimum values required by the printing and binding process, providing a safe zone for your content.
Exporting Your Files for Print
When you are ready to export your completed InDesign document for printing:
- Navigate to File > Export.
- A new dialog box will appear, allowing you to choose your PDF export options.
- Crucially, go to the Marks and Bleeds tab. Here, you should check the box labeled "Use Document Bleed Settings." This ensures that the bleed you meticulously set up in your document is automatically included in the exported PDF. Avoid checking other mark options unless specifically requested by your printer.
The Power of Print Booklet Feature (Imposition)
Adobe InDesign's "Print Booklet" feature is an indispensable tool for professional printing, particularly for perfect bound books. This feature allows you to create "printer spreads" from your "layout spreads." In your InDesign document, pages are typically arranged in sequential order (page 1, page 2, page 3, etc.). However, for printing, these pages need to be arranged in a specific order to create signatures that can be folded and bound. This process of rearranging pages for printing is called imposition.
The Print Booklet feature automates this complex process:
- Imposition: This is the process of arranging pages onto larger sheets of paper in such a way that when the sheets are folded and trimmed, the pages appear in the correct sequence.
- Printer Spreads: These are the arrangements of pages on the large sheets that will be printed. For a perfect bound book, these are typically two-page spreads that will eventually form the front and back of a folded signature.
- Customization: While imposing pages, you can adjust settings to control spacing between pages, margins, bleed, and "creep."
- Layout Unaffected: Importantly, the Print Booklet feature does not alter the layout of your original InDesign document. The imposition is handled entirely within the print stream or the exported PDF's print settings. You cannot create a new InDesign document based on the imposed pages.
Using the Print Booklet Dialog Box:
- Access this feature via File > Print Booklet > Print Booklet….
- From the Print Preset menu, you can select predefined settings or create your own.
- Pages: You can specify a range of pages to impose, such as "1-2, 27-28" to create a specific signature (e.g., for a color cover).
- Binding: This is a critical setting for perfect bound books. Selecting "Perfect Bound" or "Booklet" (which can be configured for perfect binding) will arrange the pages accordingly.
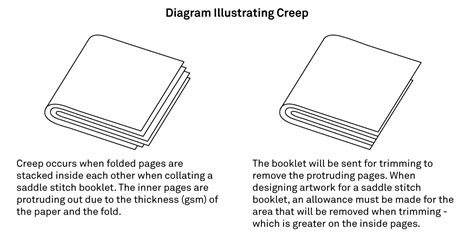
- Creep: This setting is particularly important for perfect bound books. Creep is the slight outward adjustment of pages from the spine to compensate for the thickness of the paper and the folding process. As more sheets are added, the inner pages of a signature tend to shift outwards slightly. Creep ensures that the outer edges of all pages align correctly after trimming. You can specify a positive creep value to push pages away from the spine, or a negative value for a "push-in" effect.
- Between Pages: This controls the spacing between the two-page spreads in the printer spread.
- Signature Size: This determines the size of the sheets that will be printed on. For example, "3-up Consecutive" means three pages side-by-side on a sheet, and "Consecutive" options are often dimmed when specific binding types are selected as they dictate the layout.
- Summary Area: The dialog box provides a summary of your current booklet settings. Pay close attention to this area for any conflicting settings, which will be highlighted at the bottom.
Understanding Creep in Detail:
Creep is a phenomenon specific to folded printed sheets, most notably in saddle-stitched and perfect bound documents. It accounts for the build-up of paper thickness towards the center of a folded signature. When a sheet is folded in half, the innermost pages are thicker than the outermost pages. If not accounted for, this can cause the outer edges of the inner pages to extend further out than the outer pages, leading to an uneven edge after trimming.
In InDesign's Print Booklet feature:
- "Cover" vs. "Centerfold": In the context of imposition, the "cover" of the final piece is considered the outermost printer spread, and the "centerfold" is the innermost printer spread.
- "Sheet" Representation: A "sheet" in this context represents two printer spreads - the front and back of the physical printing paper.
- Positive Creep Value: When you provide a positive creep value, InDesign adjusts the pages. The centerfold is not adjusted, but the pages on the outer sheets are moved away from the spine.
- Creep Increment: The total creep value is divided by the number of "steps" or sheets from the centerfold outwards. For example, if a 16-page document yields eight printer spreads (four sheets), and a creep value of 24 points is set, the creep increment is 8 points per sheet (24 points / 3 sheets). The innermost sheet (closest to the centerfold) receives the full 24 points of creep, the next sheet receives 16 points, and the sheet after that receives 8 points. The amount of creep decreases for each successive sheet moving outwards.
By correctly utilizing the Print Booklet feature and understanding concepts like creep, you can ensure that your perfect bound books are imposed accurately, leading to professional and precise finished products.