Adobe Lightroom, a powerhouse in photo editing, offers a transformative experience for photographers of all levels. Whether you're a seasoned professional or just beginning your photographic journey, {{lightroom}} brings powerful photo editing tools to your desktop, web, and mobile, regardless of the type of photography you do. You can start using {{lightroom}} in seconds, and customizing a preset is as easy as changing the sliders. For the modern portrait photographer, the editing process is as crucial as capturing the moment itself. While the click of the shutter is the beginning, the real magic, the part where your unique voice and style come to life, happens in post-production. However, editing can often feel like a grind, with hours spent behind a screen making the same adjustments repeatedly, leading to burnout and lost time. This is where Lightroom presets come into play, offering a pathway to efficiency and artistic expression.
The Essence of Lightroom Presets: More Than Just a Filter
At its core, a Lightroom preset is a saved configuration of editing settings. Think of it as a recipe for a specific look. When applied to a photograph, it applies a series of adjustments - like changes to exposure, contrast, color balance, and tone curves - to achieve a desired aesthetic. This allows photographers to replicate complex editing styles with a single click, dramatically speeding up their workflow. {{lightroom}} has dozens of presets to match the look you want for your photography, as well as automated suggestions from the {{lightroom}} community. Presets can transform your photos and images in seconds. Our premium Presets for Lightroom & Camera Raw help professional photographers make superior quality photo edits in LR & ACR and deliver stunning results with just a click of the mouse. The best Lightroom presets and filters can transform your images into polished works of art quickly.
Emulating Iconic Film Looks: The Kodak Collection
Among the vast array of presets available, those inspired by classic Kodak film stocks hold a special allure. These presets aim to capture the distinct character and nostalgic tones of beloved analog films, bringing a tangible piece of photographic history into the digital realm. A selection of 19 Adobe Lightroom presets based on the looks of Kodak film stocks offers a gateway to achieving these iconic aesthetics. These presets are compatible with current Adobe Creative Cloud versions of Adobe Lightroom CC, Adobe Lightroom Classic (version 8 and above), and Adobe Photoshop CC (via Camera Raw filter). For those on the go, the Lightroom Mobile/Tablet app is also supported, though a Creative Cloud subscription is necessary for importing them. It is important to note that these presets will not work in Lightroom 6 and below; they are exclusively for the Creative Cloud versions.
Kodak Aerochrome: A Touch of Infrared Magic (Approximation)
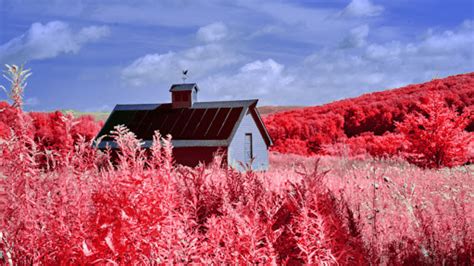
Kodak Aerochrome was a color infrared film, long discontinued, renowned for its unique reaction to light bouncing off chlorophyll in live vegetation, rendering it in striking shades of red, magenta, or orange. While it's impossible to perfectly replicate the look of infrared film with a digital preset, as you cannot create light information that wasn't captured, these presets can approximate some of its most distinctive features. With the aid of carefully tweaked profiles, these presets offer a glimpse into Aerochrome's vibrant and unusual color rendition. It's important to understand that these presets won't work on every image with foliage; rather, they encourage an understanding of the types of images that lend themselves to this look, fostering a creative eye for shooting with this aesthetic in mind.
Kodak ColorPlus 200: Everyday Warmth and Accessibility
Kodak ColorPlus 200, a readily available and affordable consumer film stock, offers a pleasing warmth to its tones and produces perfectly acceptable images in most conditions. This preset captures that accessible, slightly warm characteristic, making it a versatile choice for everyday photography.
Kodak Ektachrome E100: Punchy Slides with Vivid Colors
Ektachrome E100, a slide film, is known for its punchy colors and vibrant appeal. This preset aims to replicate that characteristic punch, delivering images with a lively and saturated look.
Kodak Ektar 100 - Pushed: Enhanced Contrast and Saturation
Pushing a film means rating its ASA higher than the box speed during exposure, resulting in increased contrast and saturation. Ektar 100 is already a highly saturated film, particularly in its reds. When pushed, this preset accentuates those qualities, offering a more intense and dramatic rendition. However, care must be taken when applying this to skin tones due to the enhanced saturation.
Kodak Portra 160 - Pulled: Soft, Muted Tones and Low Contrast
Pulling a film involves exposing it at a lower ASA than the box speed. Color negative films, especially Portra and Ektar, possess considerable latitude for overexposure. Exposing Portra up to five or six stops over can still retain highlight detail, leading to a compression of highlights, resulting in low contrast and soft, muted tones. This preset emulates that characteristic, offering a gentle and subdued aesthetic.
Kodak Portra 400 - Pulled: Warm, Orangey-Brown Palettes for Portraits
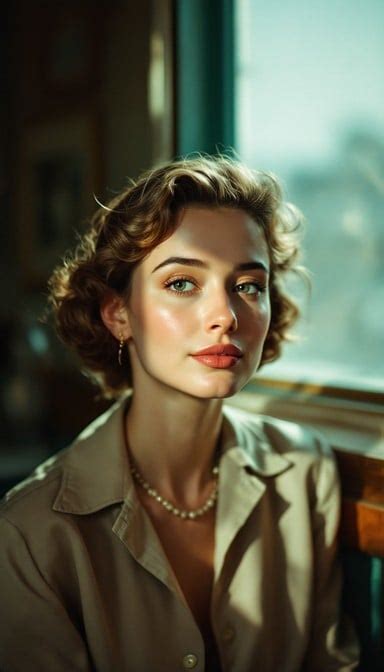
Portra 400, when pulled, exhibits warmer, orangey-brown tones compared to Portra 160, making it an excellent choice for portraits. This film stock is also known for its fine grain for a 400 ASA film, a quality long appreciated by photographers. This preset aims to capture that flattering warmth and fine detail, ideal for enhancing portraiture.
Kodak T-MAX 100: Ultra-Fine Grain Black and White
Kodak T-MAX 100 is a black and white negative film celebrated for its extremely fine grain, which complements its high sharpness. This preset translates that clarity and subtlety into a digital black and white image, offering crisp detail and a smooth tonal range.
Kodak Tri-X: The Photojournalist's Classic Black and White
Kodak Tri-X is a classic black and white negative film, a favorite among photojournalists for its timeless look and robust grain structure. This preset aims to evoke that iconic, gritty, and authentic feel, perfect for storytelling through monochrome imagery.
Beyond Film Emulation: Presets for Every Style
While film emulation is a popular category, the world of Lightroom presets extends far beyond. {{lightroom}} has skin tone presets to quickly match an image to a particular look or subject matter. From black-and-white to retro looks, add a professional touch with the best presets for photography editing. Presets can be designed to enhance portraits, create moody atmospheric shots, achieve a light and airy aesthetic, or imbue images with a vintage charm.
Understanding Preset Functionality and Workflow
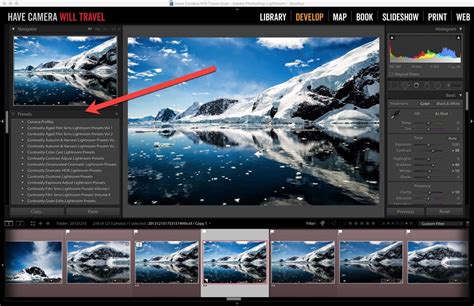
Presets are more than just a filter; they are a starting point, not a final destination. They adjust various parameters in Lightroom, including tone curves, HSL (Hue, Saturation, Luminance), camera calibration, and grain. Users apply a preset to a RAW image and can then make further adjustments to exposure, white balance, and other settings to refine the look for that specific photo. Upon purchase, users download the preset packs and install them into Lightroom. The presets then appear in the “Presets” panel within the Develop module. The workflow typically involves selecting a preset and then manually adjusting basic sliders to correct for the specific lighting conditions of the photo. The effectiveness of a preset is dependent on the original photo being well-exposed and having a correct white balance.
Installing Presets in Lightroom Classic CC 2019 2020 [ How To Tutorial for XMP & LR Template Files ]
Mastin Labs: Meticulous Emulation of Film and Scanners
Mastin Labs focuses on a series of preset packs meticulously crafted to emulate specific film stocks and the look of particular film lab scanners, such as the Fuji Frontier or Noritsu. Each pack includes several variations to handle different lighting conditions. The system is built around a three-step workflow: apply a preset, adjust for tone, and adjust for white balance. These presets manipulate a wide array of settings within Lightroom, including custom camera profiles, to achieve their filmic look. Mastin Labs presets are installed into Lightroom Classic and are designed for RAW files, encouraging users to apply the preset first and then use basic panel sliders for corrections.
Noble Presets: Luminosity, Soft Palettes, and Natural Skin Tones
Noble Presets offer collections characterized by enhanced luminosity, soft color palettes, and natural-looking skin tones. Their packs are designed for versatility across various lighting situations, from bright sunlight to indoor settings, and include variations for different lighting conditions (e.g., "backlit," "overcast") and tool presets for adding grain or adjusting contrast. These presets are installed as .xmp files and are optimized for RAW images.
Tribe Archipelago: A Marketplace of Diverse Artistic Styles
Tribe Archipelago functions as a marketplace and creative collective, featuring preset collections from different artists, resulting in a broad library of styles. One photographer’s pack might be dark and cinematic, while another’s is light and adventurous. These presets impart a distinct artistic style, often creating a more dramatic look than presets focused purely on film emulation. They are compatible with Lightroom and ACR and are available for one-click application.
The Evolution of Editing: AI-Powered Presets and Adaptive Styles
While traditional presets offer a significant time-saving advantage, they are inherently static. They apply the same set of adjustments regardless of the specific photo's lighting, color, or composition. This often necessitates further manual tweaking for each individual image. This is where the future of editing, powered by artificial intelligence, is making significant strides.
Imagen: Learning Your Unique Editing Style
Imagen represents a fundamental shift away from static presets. It's not just a collection of presets; it's an AI-powered editing platform that learns your personal editing style to create a Personal AI Profile. The concept is brilliantly simple: you teach the AI by uploading at least 3,000 of your previously edited photos. The AI then analyzes every adjustment you've made, learning the relationships between them. Once your Personal AI Profile is built, Imagen can edit new, unedited RAW photos with incredible precision and speed, adapting to each photo’s unique characteristics.
The Imagen Workflow:
- You Teach the AI: Upload a substantial catalog of your previously edited photos.
- The AI Learns: Imagen’s neural network analyzes your editing patterns.
- The AI Edits for You: New photos are edited individually, applying your unique style with adaptive precision.
This AI-driven approach offers unmatched speed, capable of editing an entire wedding in under 20 minutes, a task that could take days manually. Your Personal AI Profile is completely unique to you, becoming your signature style bottled.
Talent AI Profiles: Leveraging the Styles of Renowned Photographers
What if you haven't yet defined your style, or you admire the work of a specific photographer? Imagen also offers Talent AI Profiles. These are AI profiles created in collaboration with world-renowned photographers. You can browse their styles, find one that resonates with you, and apply it to your photos, effectively having an industry-leading photographer edit your work with AI speed and consistency.
Choosing the Right Preset: A Critical Decision
Navigating the world of presets can be overwhelming, and not all presets are created equal. Choosing an editing tool is a big decision that shapes your work, your brand, and your efficiency. Simply picking the most popular option isn't enough; you need to find the solution that truly aligns with your artistic goals and business needs.
Key Criteria for Selecting Presets:
- Artistic Alignment: Ask yourself: What emotions do I want my portraits to evoke? Browse the provider’s portfolio and before-and-after examples. Do the final images align with the style you want to be known for? Be critical.
- Versatility: A preset is useless if it only works on one specific type of photo. Look for examples from a full gallery, not just cherry-picked hero shots. AI-powered solutions like Imagen have a massive advantage here, as static presets will apply the same settings regardless of lighting, forcing heavy adjustments.
- Skin Tone Handling: This is non-negotiable for portrait photography. Ask yourself: How does this preset handle a variety of skin tones? Scrutinize example images. Do they showcase models with diverse skin tones? The best tools are designed to protect and accurately render skin tones.
- Range and Customization: Does the pack offer a range of looks, or is it a one-trick pony? A good preset pack will often include several variations and “toolkit” presets to adjust things like grain, sharpening, and tone curves. An even better solution is one that is inherently customizable.
- Workflow Efficiency: Consider the entire process. How long does it take to find the right preset, apply it, and then make all the necessary tweaks? Compare this to a workflow where editing is done for you automatically.
Defining Your Signature Style and Evaluating Options
Before you start looking, spend time defining your desired aesthetic. Create a mood board or save images from photographers you admire, identifying common elements like warmth, coolness, contrast, or softness. Based on your style, research and shortlist 2-3 providers. Evaluate full galleries, not just single hero images.
When considering presets, think about the future:
- Static Presets: Good for establishing a base look but will always require photo-by-photo adjustments.
- Dynamic AI Profiles (like Imagen): Learns your unique style and adapts to every photo.
Test if possible. Some providers offer sample presets. If you’re considering Imagen, you can get started for free to see the power of AI editing on your own photos. Make your investment by choosing the tool that best fits your style, your workflow, and your business goals.
Frequently Asked Questions About Lightroom Presets
- What exactly is a Lightroom preset?A Lightroom preset is a saved configuration of editing settings.
- How do I install presets in Lightroom?In modern versions of Lightroom Classic, go to the Develop module, click the “+” icon on the Presets panel, and select “Import Presets.” Navigate to the .xmp files you downloaded and import them.
- Can presets damage my original RAW photos?No, never. Lightroom uses non-destructive editing. Applying a preset creates a set of instructions for how the photo should be displayed, not altering the original file.
- Why don’t my photos look like the examples after I apply a preset?A preset’s final look is highly dependent on the starting photo’s exposure, white balance, and lighting. The beautiful examples you see were likely shot in ideal conditions.
- What is the difference between a traditional preset and an AI Profile from Imagen?A traditional preset is static; it applies the exact same set of adjustments to every photo. An AI Profile learns your unique style and adapts to each image.
- Are presets a good investment for beginner photographers?Yes, for beginners, presets can be a great way to learn how different settings interact and to explore different styles. However, it’s important not to become completely reliant on them.
- How do presets handle different skin tones?This varies greatly by the quality of the preset. Poorly made presets can create unnatural, orange, or muddy skin tones because they apply blanket color shifts.
- Can I create my own Lightroom presets?Absolutely. Once you’ve edited a photo to a look you love, you can go to the Presets panel, click the “+” icon, and choose “Create Preset,” selecting which settings you want to save.
- What are the biggest limitations of using traditional presets?The biggest limitation is that they are not adaptive. They can’t account for variations in lighting, location, or subject matter.
- Do professional photographers actually use presets?Yes, many professional photographers use presets as a core part of their workflow, typically as a starting point to establish a consistent base, not as a final, one-click solution.
- Are mobile presets the same as desktop presets?Not usually. Mobile presets are in the .dng format for the free Lightroom mobile app. Desktop presets are .xmp files for the paid subscription versions of Lightroom Classic and Lightroom CC.
- How can I organize my presets in Lightroom?In the Presets panel, you can right-click to create new folders.
- What’s the difference between .xmp and the old .lrtemplate files?.xmp is the newer, more versatile format that also works in Adobe Camera Raw, while .lrtemplate was the older format.
{{lightroom}} offers access to tons of high-quality, customizable presets and professionally created Premium Presets for mobile and desktop. Simplify your post-processing, enhance portraits in a flash with presets for every skin tone, and make them your own. Use {{lightroom-mobile}} presets to create stunning images wherever you are. You can even create your own {{lightroom}} presets to share. Presets make your life easier, whether you’re a beginner or a professional photographer. The Discover tab in {{lightroom}} puts in-app learning and inspiration at your fingertips. Level up your photo editing with over 40 free {{lightroom}} presets.