Adobe Premiere Pro is a robust and versatile video editing software that has become a cornerstone for creators, from seasoned professionals crafting commercials and television shows to amateurs documenting life's moments. Its capabilities extend to transforming multiple video clips into a cohesive movie, seamlessly integrating transitions, layering music and sound effects, and adding polished titles. For those embarking on the journey to learn Adobe Premiere Pro, understanding its core functionalities is paramount. This guide will delve into the essential workflows and techniques necessary to begin editing with confidence.
The Foundation: Setting Up Your Premiere Pro Project
The initial step in mastering Adobe Premiere Pro is the creation of a new project. Upon launching the software, you'll be presented with an option to "New Project." If you're already within Premiere, this can be accessed via File > New > Project. This action prompts a dialog box where you'll assign a name to your project and select a location for its storage. It is highly recommended to save your project on a fast drive with ample free space to ensure optimal performance.
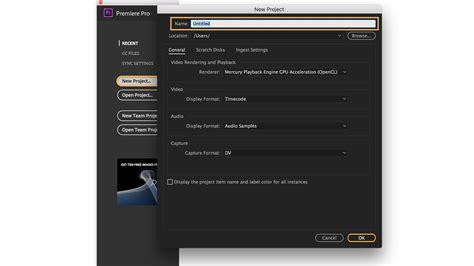
Following project creation, you'll encounter the crucial step of configuring your "scratch disks." These are designated folders where Premiere Pro generates temporary files during editing and rendering processes. Accessing these settings is done through File > Project Settings > Scratch Disks. For optimal organization and performance, it's advisable to set all scratch disk dropdown menus to "Same as Project." However, if you possess an external or secondary drive, utilizing it for scratch disks can significantly enhance performance by separating cache files, previews, and autosaves from your primary drive.
Understanding the Premiere Pro Interface: Your Editing Canvas
At first glance, the Premiere Pro interface is composed of several distinct panels, each serving a specific purpose in the editing workflow. Across the top of your screen, a menu bar provides access to a multitude of options for opening and arranging additional panels to aid in video editing. Premiere Pro organizes its interface into five primary workspaces: Assembly, Editing, Color, Effects, and Audio. These are essentially customizable panel arrangements tailored for specific tasks, allowing you to dedicate distinct layouts for editing, color correction, audio mixing, and more. You also have the flexibility to create your own custom workspaces as you become more familiar with the software.
Within these workspaces, a collection of panels with specialized functions awaits. Key panels essential for beginners include:
- Project Panel: This serves as your media library, housing all imported footage, audio, graphics, and sequences. It's akin to a digital filing cabinet, and maintaining organization with bins (folders) is crucial for quick asset retrieval.
- Source Monitor: This panel allows you to preview clips and set "in" and "out" points before adding them to your timeline. It's where you precisely select the portions of footage you intend to use.
- Program Monitor: This displays your edited sequence as you build it, offering a real-time preview of what your final video will look like.
- Timeline Panel: This is the heart of your editing process. Here, you'll arrange clips, trim footage, add transitions, and layer audio and video tracks chronologically.
You can rearrange these panels by dragging their tabs and save your preferred configurations as custom workspaces via the Window > Workspaces menu.

Project Settings: The Blueprint of Your Video
Premiere Pro's project settings are fundamental, dictating the core properties of your audio and video project. These settings define the format, source, aspect ratio, time frame, and bit depth, among other critical aspects. When initiating a new project, Adobe Premiere applies a project preset. Selecting incorrect settings can lead to rendering issues, quality degradation, or problematic exports.
Critical project settings to verify before you begin include:
- Frame Rate: This must align with your source footage. For a cinematic look, 23.976 fps is common, while 60fps is ideal for slow-motion effects. Mismatching frame rates can result in stuttering playback.
- Resolution and Aspect Ratio: Common resolutions include 1920x1080 (HD) and 3840x2160 (4K), with 1080x1080 being popular for social media content. It's essential to match these to your intended delivery platform.
- Video Format: H.264 is generally suitable for web content, ProRes is favored for professional workflows, and DNxHD is often used for broadcast.
- Audio Settings: A standard sample rate is 48kHz, with 16-bit or 24-bit depth being common choices.
It is important to note that these settings cannot be altered after a project has been created. Therefore, meticulously verifying your footage specifications before starting is paramount.
Importing and Organizing Your Media
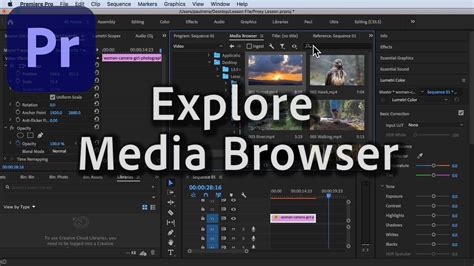
Before any editing can commence, you need to import your video and audio files into the Project panel. The Media Browser is the most reliable method for this task. To access it, navigate to Window > Media Browser. Within the Media Browser, you can use the folder tree to locate your files. Select the desired clips and right-click to choose "Import." Alternatively, you can drag and drop files directly from a folder on your computer into the Project panel. Keeping your media organized within the Project panel using bins is crucial for efficient workflow.
Crafting Your Narrative: Timelines and Sequences
A sequence is essentially your working project within Premiere Pro. It's the canvas where you arrange clips, layer audio and video tracks, and construct your final edit. The timeline, in turn, is the visual representation of your sequence, displaying all your tracks and clips chronologically. Think of a sequence as a container with specific settings (frame rate, resolution, audio channels), and the timeline as the interface where you manipulate its contents.
Creating a Sequence
To create a new sequence, beginners are recommended to drag a video clip directly from the Project panel onto the timeline icon or into an empty timeline area. Premiere Pro will automatically generate a sequence that matches your clip's frame rate, resolution, and codec settings. For more specific requirements, you can manually create a sequence by going to File > New > Sequence. Here, you can browse preset categories (e.g., Digital SLR, ARRI) and choose one that aligns with your camera and footage specifications. If unsure, select presets that match your camera model, resolution, and frame rate. You will then be prompted to enter a descriptive name for your sequence, which will appear in both the Project panel and open in the timeline.
Syncing Audio
If your footage was captured with audio, Premiere Pro often syncs them automatically. However, if manual synchronization is required, you can align clips by dragging them into place. Look for distinct audio markers to match with the video. If this manual alignment proves difficult, Premiere Pro offers an audio synchronization feature. Select both the video and audio clips (hold Shift and click), right-click, and choose "Synchronize" from the menu. In the Synchronize Clips dialog box, select the "Clip Start" option and press OK. The clips should then snap into alignment. Always check playback to confirm successful synchronization.
The Art of Editing: Cutting, Arranging, and Refining
Once your footage is populated in the timeline, the real editing process begins. This involves cutting, arranging, and refining your clips to construct your narrative.
Basic Editing Tools
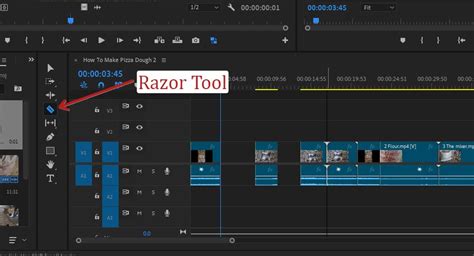
A fundamental editing workflow involves using the Razor Tool and the Selection Tool.
- Razor Tool (C): This tool allows you to split clips at any desired point. Your cursor will transform into a blade icon. Click anywhere on a clip in the timeline to make a cut. You can perform multiple cuts by clicking at various positions.
- Selection Tool (V): After making cuts, switch back to the Selection Tool. This enables you to select and drag the resulting clip segments.
- Deleting Unwanted Sections: Select a clip segment you wish to remove and press the Delete key (or Backspace). For automatic gap closure, use Ripple Delete: select the segment and press Shift + Delete.
Enhancing Your Story: Titles, Transitions, and Effects
Titles, transitions, and effects are instrumental in elevating raw footage into a polished, professional-looking video. Premiere Pro provides a range of built-in options, and you can further expand these with third-party templates and plugins.
Adding Titles
To add text, press the 'T' key to activate the Type Tool. Click directly in the Program Monitor and begin typing. Font, color, size, and position can be customized within the Essential Graphics panel (Window > Essential Graphics).
Applying Effects
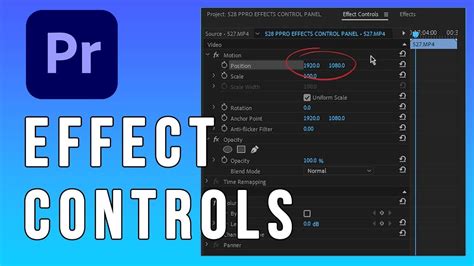
Effects can be found in the Effects panel (Window > Effects). Search or browse for the desired effect and drag it onto a clip in your timeline. Adjustments to the effect's parameters are made in the Effect Controls panel. For instance, changing the "Blurriness" value alters the degree of blur applied to a video.
Incorporating Transitions
Transitions are found within the Effects panel under Video Transitions. Drag a transition to the point between two clips, or onto the start or end of a single clip. The duration of a transition can be adjusted by dragging its edges directly on the timeline.
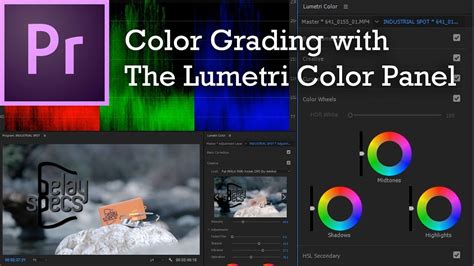
Color Correction and Grading: Setting the Mood
Sometimes, footage may appear too dark or lack the desired visual tone, necessitating color correction. Premiere Pro offers robust tools for this. Within the Lumetri Color panel, you can select a clip on the timeline and explore the "Creative" tab, located just below "Basic Correction." Here, you'll find pre-made "LUT" (Look-Up Table) templates that can be quickly applied to videos to achieve specific looks. Experimenting with these looks is a great starting point for color grading.
Advanced Integration: Working with Photoshop and After Effects
Premiere Pro offers seamless integration with other Adobe Creative Cloud applications, significantly expanding your creative possibilities.
Photoshop Integration
You can edit video frames using tools like the Patch tool. You can also copy layers from Photoshop compositions and paste them directly into your Premiere Pro timeline. Photoshop layers, solid-color layers, and even entire Photoshop documents can be incorporated. Photoshop layers are converted to clips in the sequence, and their source footage is copied to Premiere Pro's Project panel. Solid-color layers are transformed into color mattes. This allows for intricate graphic design and compositing directly within your video edit.
After Effects Integration
Adobe Dynamic Link enables dynamic connections between After Effects and Premiere Pro without the need for rendering. You can copy layers from After Effects compositions and paste them into Premiere Pro sequences. Nested compositions from After Effects are converted to nested sequences in Premiere Pro. This collaborative workflow is invaluable for complex motion graphics and visual effects.
Optimizing Performance: Media Cache Management
Managing the Media Cache in Premiere Pro is crucial for maintaining smooth performance. When Premiere Pro encounters unsupported file formats, it flags these issues. It's important to gather your footage and media files, ensuring they are in formats supported by Premiere Pro. Checking the official list of supported file formats is recommended. If your system doesn't meet the recommended system requirements, Premiere Pro will alert you upon launch. For those without immediate footage, using the sample project files within Premiere Pro is a good way to practice.
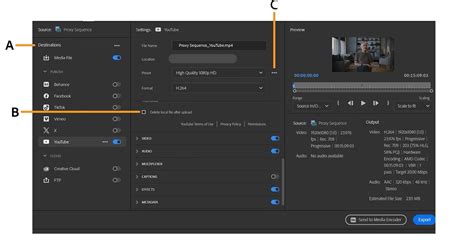
Exporting Your Masterpiece: Sharing Your Creation
Exporting converts your edited sequence into a shareable video file. Choosing the correct export settings is vital for achieving optimal video quality, manageable file size, and compatibility across various platforms.
The Export Process
- Access Export Settings: Select your desired sequence in the timeline and go to File > Export > Media, or use the keyboard shortcut Cmd + M (Mac) or Ctrl + M (Windows).
- Choose Format: In the Export Settings window, click the "Format" dropdown. H.264 is a common choice for web uploads, while QuickTime is suitable for high-quality files intended for further editing.
- Select Preset: Under the "Preset" dropdown, choose a setting that matches your intended delivery platform. "Match Source â Adaptive high bitrate" is often a good choice for web platforms, maintaining sequence quality while managing file sizes.
- Initiate Export: Click the "Export" button. A progress bar will indicate the rendering time, which depends on the length, complexity, and quality of your footage, as well as your computer's processing power. You can continue working in Premiere Pro while the export processes in the background.
Cross-Platform Compatibility
Adobe Premiere Pro is designed for cross-platform compatibility. You can work on a project on Windows and continue on macOS, or vice versa. All video effects available on macOS are also present on Windows. However, effects exclusive to Windows may appear as "offline" if the project is opened on a Mac. All audio effects are universally available. Preview files generated on one platform are not compatible with the other; Premiere Pro will re-render them when a project is opened on a different operating system. While playback quality of non-native files might be slightly lower on different platforms (e.g., AVI files on macOS compared to Windows), Premiere Pro always renders preview files in a native format for the current platform.
Accessibility in Video Editing
Accessibility is a crucial aspect of modern software design, ensuring that products are usable by individuals with diverse needs, including visual, auditory, and motor impairments. Adobe Premiere Pro is continually evolving to improve its accessibility features.
Continuous Learning and Community Support
Learning Adobe Premiere Pro is an ongoing process. Adobe offers extensive official resources, including step-by-step guides on topics like video stabilization, audio cleanup, adding sound effects, and optimizing Premiere Pro performance. Both Storyblocks and Adobe maintain substantial YouTube libraries filled with free tutorials. For hands-on learning, actively working through real projects is highly effective, as repetition builds muscle memory more efficiently than passive observation.
If you encounter challenges or have questions, the Premiere Pro community forums are an invaluable resource for reaching out and connecting with other users and Adobe support. Mastering Premiere Pro is a rewarding skill that empowers users to produce high-quality video content, and with dedication and the right resources, even its initial complexities can be navigated successfully.
Exploring Creative Assets with Storyblocks
For those looking to enhance their video projects, Storyblocks offers a vast library of stock video clips, templates, and other assets. An unlimited subscription allows creators to download as many resources as needed, breathing life into stories and streamlining the content creation process, whether you're a beginner or an experienced producer.