As important as the visual is, the size of the image file matters too. For the images you choose to compliment your content and not distract from it, you should format them to work with your page and be consistent with size and resolution. You can change the size of each image one-by-one, but this process is hugely inefficient if you have a large number of pictures. Luckily, Photoshop offers powerful tools to streamline this process, allowing you to resize entire folders of images in mere seconds. This tutorial will guide you through the most effective methods for batch resizing in Photoshop, ensuring your images are perfectly sized and optimized for any application.
The Image Processor: A Powerful Built-in Solution
Photoshop's Image Processor script is a robust, built-in tool designed specifically for automating repetitive tasks like batch resizing. It's an accessible option for users of all skill levels, providing a straightforward way to manage multiple image files simultaneously.
Preparing Your Images
Before you run the script, it's crucial to organize your files. Identify which image files you want to use and either open them or, more efficiently, save them to the same dedicated folder. This collection of files will serve as the "batch" on which you will run the script. For this example, we'll assume you've selected your desired folder and navigated to it.
Initiating the Image Processor Script
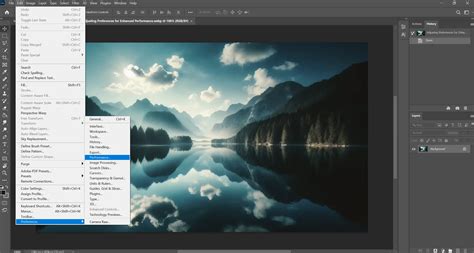
To begin, navigate to File > Scripts > Image Processor within Photoshop. This action will launch the Image Processor dialog box, presenting you with a series of options to customize your batch processing.
Selecting Your Source and Destination Folders
In the first section of the Image Processor dialog box, you'll need to identify the images you want to batch resize. You can select a folder containing your original images. Once you've chosen your image folder, you need to determine where you want your resized images to go. You can choose to save them in a new location or select "Save in Same Location." If you choose "Save in Same Location," Photoshop will intelligently create a subfolder within that original location to store your processed files, keeping your original images untouched. This is a critical step to maintain an organized workflow.

Defining Output Settings: File Type and Quality
In section three of the Image Processing window, you'll choose the file type for your new, resized files. The available options typically include JPG, PSD, and TIFF. You can select one, some, or all of these file types, and Photoshop will create separate subfolders for each format you choose.
When saving as JPEGs, you have the important option to set the Quality parameter. This is a number between 0 (lowest quality, smallest file size) and 12 (highest quality, largest file size), based on your preference. This setting determines how much image data Photoshop will sacrifice to achieve consistent sizing and smaller file footprints. Balancing quality with file size is essential for web use and efficient storage.
Setting Image Dimensions for Resizing
To resize all the images to the same pixel dimensions, check the "Resize to fit" box. You will then need to enter your desired width (W) and height (H) settings. It's important to note that the dimensions you dial in are maximums. So, if you type in 300 for the width and 300 for the height, the files will be resized so that the longest side of every image is 300 pixels, maintaining the aspect ratio to avoid distortion. Alternatively, you can specify different width and height measurements, such as 400 pixels wide and 300 pixels high. In this scenario, all images would be constrained to a width of 400 or a height of 300, whichever constraint is met first.
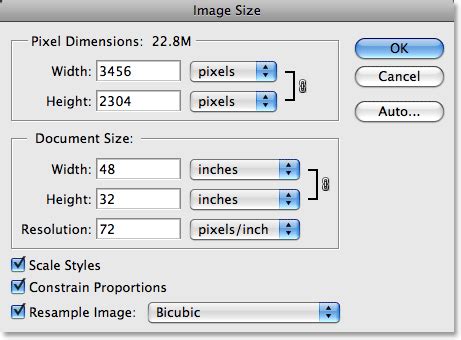
If you're unsure about the exact dimensions or are not confident with calculations, a helpful tip is to open one representative image in Photoshop and use the Image > Image Size dialog box. With the chain icon (constrain proportions) clicked, you can adjust one dimension, and Photoshop will automatically calculate the other to maintain the aspect ratio. This ensures your resized images won't appear stretched or squashed.
Advanced Options and Running the Script
In the fourth section of the Image Processor window, you can select the "Include ICC Profile" option. This embeds color profile information into your images, ensuring consistent color representation across different devices and software. You can also use the drop-down lists to add other formatting to your images, though for basic batch resizing, this is often unnecessary.
Once all your settings are configured, click the "Run" button in the upper-right corner of the Image Processor window. Photoshop will then process all the images in your selected folder according to your specifications.
Verifying Your Results
After the script has finished running, navigate to the location or folder where you chose to save your new files. The new folder will be named with the file type you selected in the script (e.g., JPEG, PSD, or TIFF). It's always a good practice to double-check your results. Open a few of the processed images from the new folder in Photoshop and verify their dimensions using the Image > Image Size dialog box to ensure they were resized correctly.
Leveraging Photoshop Actions for Complex Batch Operations
For users who require more intricate batch processing or have recurring specific editing tasks, Photoshop's Actions feature offers a more powerful and customizable solution. An Action is essentially a recorded sequence of commands that can be replayed on multiple files.
Creating a New Action
To create an action for batch resizing:
- Prepare Your Workspace: First, create two new folders on your computer: one for "Original Images" and another for "Resized Images."
- Open a Sample Image: Open one of the images from your "Original Images" folder into Photoshop. This image will serve as the basis for recording your action. For instance, if its original dimensions are 960 x 635 pixels.
- Create a New Action Set: In the Actions panel (Window > Actions), click the Folder icon to create a New Set for your action. Name it something descriptive, like "Batch Resizing."
- Record Your Action: With your new action set selected, click the Paper icon to Create a New Action. Give your action a specific name, such as "Resize for Web" or "Tuts+ Post Images," depending on its intended purpose.
- Perform the Resize: With the action now recording, go to
Image > Image Size. Adjust the width or height to your desired specifications. Remember to ensure "Constrain Proportions" is checked to avoid distortion. - Save the Image: Once the image is resized, it's time to save it. Go to
File > Save AsorFile > Save a Copy. Choose your desired file format (e.g., JPEG) and select the "Resized Images" folder as your destination. Then, select the image Quality that you would prefer for these JPEGs. For example, keeping the file size low with a Medium Quality of 6. - Close the File: The last step for this action is very important. With the action still recording, go to
File > Closeor use the keyboard shortcutControl-W(orCommand-Won Mac) to close out of the Photoshop file. If you don't include this step, Photoshop will load all your images in the folder without closing any of them, which can lead to a cluttered workspace and potential performance issues.
Running Your Recorded Action
After you have finished recording your action, you can run it on an entire folder of images using the Image Processor or the Automate > Batch function:
- Using Image Processor: At the bottom of the Image Processing dialog box, under the Preferences heading, click on "Run Action." Then you can select the Action Set you created as well as the specific Action you want to play. Photoshop will then apply this recorded action to every image in your selected source folder.
- Using Automate > Batch: Alternatively, you can go to
File > Automate > Batch. In the Batch dialog box, select your Action Set and the specific Action you want to play. Specify your source and destination folders, and then click "OK."
Record Your Own Actions | Photoshop
This method provides incredible flexibility, allowing you to incorporate multiple steps into a single action, such as resizing, applying filters, adjusting levels, or adding watermarks, all in one automated process.
Alternative Solutions for Batch Resizing
While Photoshop offers powerful built-in solutions, there are also external tools and web-based applications that can facilitate batch resizing, particularly for users who may not have access to Photoshop or need a quick, no-frills solution.
Web-Based Resizing Tools
For those who don't use Photoshop or require a very simple and fast method, several online tools are available. Websites like bulkresizephotos.com allow you to quickly drag and drop multiple files into their interface and resize them all at once. These platforms often offer basic editing capabilities like cropping, rotating, and flipping alongside resizing. While they may not offer the granular control over quality and output formats that Photoshop provides, they are excellent for straightforward batch resizing needs.
Considering the Trade-offs
The Image Processor script and Photoshop Actions are generally more robust and offer greater control over the output. The Image Processor script provides a good balance of ease of use and functionality, allowing for quick bulk resizing while also adjusting for image quality. Other options, like web-based applications, are often just as quick but might not have that little extra quality tweak for uniformity that Photoshop's controls offer. When choosing a method, consider your specific needs, the complexity of your batch tasks, and your familiarity with the software.
Conclusion: Embracing Efficiency in Image Management
Mastering batch resizing in Photoshop can significantly boost your productivity, especially when dealing with large volumes of images. Whether you opt for the straightforward Image Processor script or the more advanced capabilities of recorded Actions, Photoshop's tools are designed to make your life easier. By understanding and implementing these batch processing techniques, you can ensure your images are consistently sized, optimized, and ready for any project, saving you valuable time and effort.
Have you tried the Image Processing script or Photoshop Actions yourself? How did they work for you? Or have you found other web-based applications to be more effective for your workflow? Share your experiences and insights!