Photoshop compositing is a powerful technique that allows photographers and digital artists to combine multiple images into a single, cohesive, and often fantastical final piece. This process is not merely about stitching photos together; it's about creative problem-solving, artistic expression, and achieving visual results that are impossible to capture in a single photographic session. Whether you're a seasoned professional or just beginning your journey with digital editing, understanding the principles and techniques of compositing can unlock a new realm of creative possibilities.
The Essence of Compositing: What and Why
At its core, compositing in Photoshop is the process of combining two or more images to create a single, unified final image. This technique is invaluable for photographers who frequently encounter situations where the ideal shot cannot be achieved in one go. Common scenarios include insufficient lighting, distracting backgrounds, or the desire to create scenes that simply don't exist in reality. Compositing provides the control and flexibility to overcome these limitations, allowing for both creative freedom and precise manipulation of the final aesthetic.
For instance, a photographer might envision a product shot with a specific, vibrant sky. If the actual shoot conditions don't provide the desired backdrop, compositing allows for the replacement of the original sky with a more suitable one, seamlessly integrated into the existing image. Similarly, food photographers often use compositing to create elaborate "gather scenes" when working alone, by taking multiple shots with their hands in different positions and then combining them. This technique also proves essential for achieving perfect lighting on challenging subjects like liquor bottles, where ideal illumination might only be attainable through multiple exposures.
The Foundation: Isolating Subjects and Elements
The crucial first step in creating a composite image is the accurate isolation of subjects from their original backgrounds. This process, often referred to as masking or cutting out, can range from straightforward to highly complex depending on the subject's details and the background's nature.
The Pen Tool: A Precise Approach to Selection
When it comes to precise selection, the Pen Tool in Photoshop is an indispensable asset. While it may require a learning curve, its ability to create clean, sharp paths makes it an excellent choice for beginners looking to enhance their proficiency. The process involves selecting the Pen Tool, choosing a starting point on the subject, and then clicking and dragging to outline the desired area. Each click creates an anchor point, and by carefully plotting these points around the subject, a path is formed. This path can then be saved in the Paths Palette and converted into a selection, which can subsequently be used to create a layer mask. Mastering the Pen Tool, though initially challenging, leads to increased speed and accuracy in subject isolation.

Alternative Selection Methods
While the Pen Tool offers unparalleled precision for defined edges, other selection tools can be equally effective depending on the subject matter. The Quick Selection Tool, for example, can be highly efficient when the subject has a clear contrast with the background. By simply clicking and dragging over the subject, Photoshop attempts to intelligently detect and select the area. For more complex selections, such as hair or fur, tools like the Select and Mask workspace offer advanced refinement options, allowing for the fine-tuning of edge details.
Integrating New Elements: Placing and Combining Images
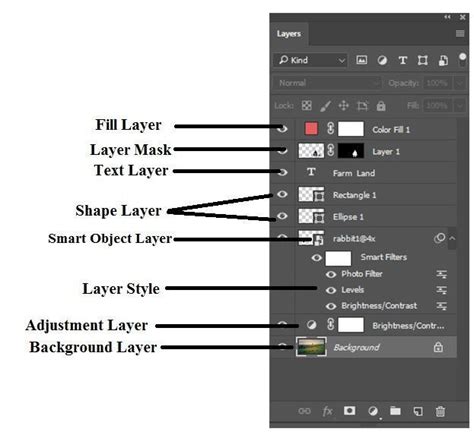
Once subjects are isolated, the next step is to bring in new elements or backgrounds. Photoshop's "Place" function is a preferred method for incorporating additional images into a composite. When an image is "Placed" into a PSD file, it is inserted as a Smart Object on a separate layer. This preserves the original image data, allowing for non-destructive scaling, rotating, and transforming without loss of quality.
For example, if you have a photograph of toilet rolls and a clothesline but desire a bright blue sky with fluffy clouds as the background, you would first isolate the toilet rolls and clothesline using the Pen Tool. Then, you would use "File > Place" to import the desired sky image. This new sky will appear as a Smart Object layer. After positioning and scaling the sky to your satisfaction, you can merge all the layers into a single image. A useful keyboard shortcut for this is Cmd/Ctrl+Alt+Shift+E, which creates a merged copy of all visible layers while keeping the original layers intact.
Refining the Composite: Color and Lighting Harmony
Achieving a believable composite hinges on ensuring that all elements look as though they belong together. This involves harmonizing color, lighting, and overall tone.
Matching Colors for Cohesion
A critical adjustment for seamless integration is matching the color of the newly introduced elements to the existing image. Photoshop's "Match Color" feature, found under "Image > Adjustments > Match Color," is instrumental here. By selecting the source image (the one with the desired color characteristics) and the target image (the one being adjusted), and then manipulating the provided sliders, you can achieve a more uniform appearance across the combined images. This process helps eliminate jarring color discrepancies and makes the composite feel more natural.
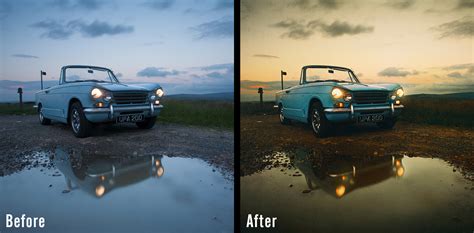
Simulating and Enhancing Lighting
Lighting is paramount in photography, and compositing offers the ability to manipulate it significantly. You can composite images with different lighting conditions to achieve a desired effect. For instance, a shot might require specific highlights or shadows that weren't present in the original capture. By combining multiple exposures with varied lighting, or by adding artificial lighting effects, the overall mood and realism of the composite can be dramatically enhanced.
A common technique for adding depth and atmosphere is the use of texture overlays, such as smoke or snow. These can be placed on new layers, their blend modes adjusted (e.g., "Screen" or "Lighten"), and their opacity fine-tuned to create a sense of movement, atmosphere, or debris. This technique can make a person, the focal point of an image, pop more by keeping the effect around the image rather than directly over the subject.
How to create Adjustable FOG! Photoshop Tutorial for Beginners and Pros
Advanced Compositing Techniques and Applications
Beyond the foundational steps, Photoshop compositing opens doors to a multitude of advanced techniques and creative applications.
Creating Dynamic Scenes with Multiple Elements
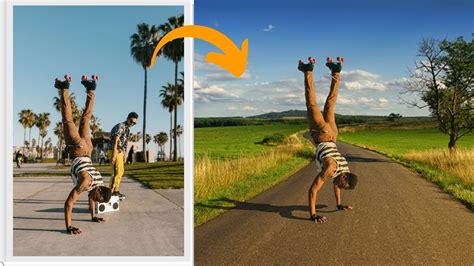
Compositing is particularly useful for creating complex scenes that would be impossible to shoot in a single frame. For example, a photographer might want to depict a soccer player in the act of scoring a goal within a stadium. This would involve isolating the player from their original background and placing them into a pre-existing image of a stadium. The process might begin by selecting the background of the stadium, then inverting the selection to isolate the player. Further refinements can be made using the Select and Mask workspace.
To enhance the realism and dynamism of such a scene, additional elements can be incorporated. A lens flare can be added to simulate the effect of stadium lights or the sun. This is achieved by creating a new layer, setting its blend mode to "Lighten," and then applying the "Lens Flare" filter ("Filter > Render > Lens Flare"). The placement and intensity of the flare can be adjusted to complement the scene.
Achieving Cinematic Looks and Stylization
For a more dramatic or cinematic feel, photographers often employ techniques like the "Block Buster Look." This involves adjusting colors to mimic the grading found in big-budget Hollywood movies, typically by adding a teal blue to the shadows and a yellow or orange hue to the highlights. This can be achieved using adjustment layers or filters like Camera Raw. Camera Raw itself is a powerful tool for compositing, allowing for global adjustments to contrast, color, and clarity across all combined layers. Applying "blacks" to add low-end contrast and punch, and perhaps pulling back vibrance slightly, can contribute to a more stylized, cinematic aesthetic.
Problem Solving with Composites
Compositing serves as a powerful problem-solving tool for photographers. When faced with elements that are difficult to remove or challenging lighting conditions, combining multiple images can provide an elegant solution. For instance, if an object is particularly hard to erase from a photo, compositing two or more images together, where the object is absent in one of them, can be the most effective way to remove it. This is especially true for complex removals where cloning or healing alone might not yield satisfactory results.
Utilizing Stock Images for Composites
Stock images from sources like Adobe Stock can be invaluable for compositing projects. These images can be edited to fit the artist's vision and even used for commercial purposes. By creating a free account, users can download watermarked versions of images to practice with, following along with tutorials and developing their skills. This accessibility makes learning and experimenting with compositing more feasible for a wider audience.
The Creative Journey: Experimentation and Practice
The true power of Photoshop compositing lies in its potential for boundless creativity. It allows artists to bring to life concepts that exist only in their imagination, placing themselves or others into fantastical scenarios, or creating entirely new visual narratives. The key to becoming proficient is consistent practice and a willingness to experiment.
How to create Adjustable FOG! Photoshop Tutorial for Beginners and Pros
As Aaron Nace, founder of PHLEARN, emphasizes, creativity flows freely when one is not restricted by gear or technique. By learning and implementing various Photoshop compositing techniques, photographers can elevate their work significantly. The advice often given is to find suitable images and start compositing immediately. Documenting the before-and-after results and sharing them can be a motivating way to track progress and engage with a creative community.
The journey of mastering Photoshop compositing is one of continuous learning and exploration. Each project offers an opportunity to refine existing skills and discover new possibilities, ultimately transforming how you create and perceive images.
tags: #photoshop #compositing #ideas