Sepia toning, a photographic technique that imbues images with a warm, nostalgic, brown hue, has captivated artists and viewers for generations. Far from being a relic of the past, this aesthetic is readily achievable with modern digital tools, offering a simple yet profound way to evoke a vintage or sentimental feel. While early photography relied on an emulsion dye derived from cuttlefish ink, today's digital realm provides a far more accessible path to this distinctive look. This tutorial will guide you through creating a sepia effect in Adobe Photoshop, focusing on efficient and impactful methods, suitable for both beginners and those seeking to quickly master the technique.
Understanding Sepia: From Emulsion to Pixels
The allure of sepia lies in its historical roots and its ability to transform a photograph into something that feels both familiar and ancient. The term "sepia" itself is a Latin derivative of the Greek name for the common cuttlefish, the source of the original dye. In the early days of photography, sepia toning was a crucial step in the development process, offering not just an aesthetic choice but also an archival benefit, as the sepia emulsion dye was more stable than silver-based images.
The sepia tone is essentially a monochrome image rendered in shades of brown rather than the typical grayscale tones used in traditional black and white photography. This subtle shift in color palette lends a warmth and depth that can make an image feel more intimate and evocative. Today, achieving this effect is remarkably straightforward, often requiring just a few clicks in sophisticated editing software like Adobe Photoshop or Lightroom. The goal is to replicate that vintage charm efficiently, allowing you to achieve your desired shot in mere minutes, even from images captured with a simple compact camera.
The One-Minute Sepia Effect: A Swift and Simple Method
For those who appreciate speed and efficiency, a remarkably quick method exists to imbue your images with a sepia tone. This approach is ideal for users who want to achieve professional-looking results without investing extensive time in complex editing. This tutorial, designed for Photoshop, can be completed in approximately one minute, making it a staple for any digital artist's toolkit.
Step 1: Setting the Sepia Hue
The first crucial step involves defining the color that will form the basis of your sepia tone. In Photoshop, this is achieved by selecting the foreground color. The specific HEX color code that closely mimics the classic sepia tone is #704214. This warm, earthy brown will be the foundation upon which the rest of the effect is built.
Step 2: Creating a New Layer
To maintain the integrity of your original image and allow for non-destructive editing, it's essential to work on a new layer. This can be done in several ways:
- Keyboard Shortcut: Press
Cmd+Shift+N(on Mac) orCtrl+Shift+N(on Windows). - Menu Navigation: Go to
Layer > New > Layer. - Layer Panel Icon: Open the Layers panel by pressing
F7, and then click on the "Create New Layer" icon, which typically looks like a page with a folded corner.
Step 3: Filling the New Layer with Sepia Color
With your new layer created, the next step is to fill it entirely with the sepia color you selected in Step 1.
- Keyboard Shortcut: Press
Opt+Delete(on Mac) orAlt+Backspace(on Windows). This action will fill the active layer with the current foreground color.
Step 4: Applying the "Color" Blend Mode
This is where the magic truly happens. With the new layer filled with the sepia color now active, change its blend mode to "Color." This blend mode applies the hue and saturation of the color layer to the luminosity of the layers beneath it. The result is that your image will adopt the sepia tone without losing its original tonal variations, creating a natural-looking sepia effect.
By following these four simple steps, you can achieve a convincing sepia effect in Photoshop in under a minute. This method is highly effective, and the results can be further refined by adjusting the opacity of the sepia layer or by using layer masks for more selective toning.
Enhancing the Sepia Effect: Deeper Dives and Refinements
While the one-minute method offers a quick entry into sepia toning, more nuanced approaches can yield even richer and more personalized results. These methods often involve adjustments to contrast, brightness, and the subtle manipulation of color channels to achieve a specific vintage aesthetic.
Pre-Conversion Adjustments: Optimizing for Sepia
Before applying the sepia tone itself, it's beneficial to ensure your image is well-prepared. Sepia photos are, in essence, black and white images with a brown filter. Therefore, optimizing the image in grayscale first can significantly enhance the final sepia effect.
- Gentle Exposure Reduction: Slightly decreasing the exposure can prevent highlights from becoming blown out, preserving detail.
- Highlight and Shadow Adjustments: Gently smoothing the image can be achieved by reducing the brightness in the highlights and enhancing the darkness in the shadows. This increases the overall tonal dynamic of your picture in broad strokes.
- Contrast and Clarity: Increasing sharpness and contrast enhances the clarity and texture of the image. This is often achieved by adjusting the contrast slider and setting the clarity of the image to around 25.
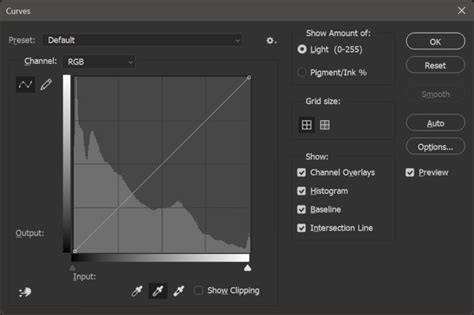
Working with Curves for Tonal Control
The curves adjustment in Photoshop is a powerful tool for fine-tuning the tonal range of an image. When aiming for a sepia look, curves can be used to subtly manipulate the blacks and whites.
- Equilibration: It's important to have some sort of equilibration, which makes certain that information in the center does not shift when you ‘slide’ the left and right ends.
- Lightening Blacks: Increasing the right end of your curve can lighten up your blacks, contributing to a softer, vintage appearance.
- Adding Points: Including points around the bottom and the apex of your curve allows for more precise control over the shadow and highlight regions.
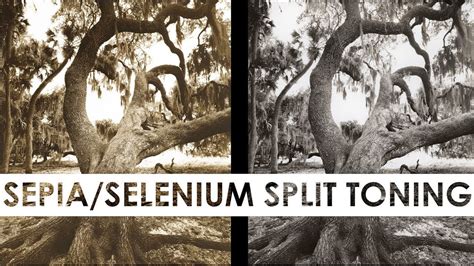
Split Toning and Color Balance
While the core sepia effect is monochrome, the subtle interplay of colors in the highlights and shadows can further define the vintage feel.
- Monochrome to Monochrome Range: The goal here is to achieve an effect running from one monochrome tone to another, rather than a full spectrum of color.
- Red Primary Color Adjustment: Reducing the saturation of the red primary color and shifting it towards orange, often to around 50, can help create the characteristic warm tones of sepia. This is particularly effective when using the Split Toning feature.
Advanced Techniques: Layer Masks and Smart Filters
For maximum flexibility and non-destructive editing, advanced users can leverage layer masks and smart filters within Photoshop.
The Camera Raw Filter for Precise Sepia Toning
One of the most effective ways to apply a sepia tone non-destructively is by using the Camera Raw filter. This is particularly beneficial in Photoshop CC, where Camera Raw can be applied as a filter directly within the application.
- Convert to Smart Object: Before applying the filter, convert your image layer into a Smart Object. This ensures that the Camera Raw filter will be added as a "Smart Filter," meaning it can be edited or toggled on and off at any time without permanently altering the original image data.
- Open Camera Raw Filter: Navigate to
Filter > Camera Raw Filter. - Black and White Conversion: Within the Camera Raw dialog box, locate the "HSL / Grayscale" panel. Here, you can convert your image to black and white. Fine-tune the conversion by adjusting the individual color sliders (Reds, Oranges, Yellows, Greens, etc.) in the "Grayscale Mix" section. Dragging a slider to the right will lighten areas of the image that originally contained that color, while dragging it to the left will darken them.
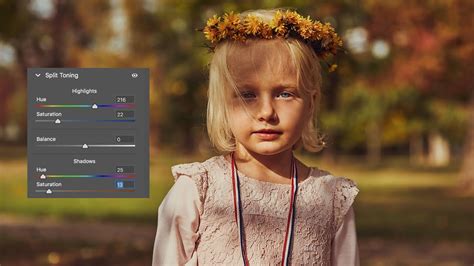
- Split Toning for Sepia: Once the image is in black and white, move to the "Split Toning" panel. This panel allows you to apply different color tones to the highlights and shadows.
- Shadows: For a sepia tone, focus on the "Shadows" section. Use the "Hue" slider to select a warm, brownish-orange color (a value between 40 and 50 is often effective). You won't see the effect until you increase the "Saturation" slider.
- Highlights: You can leave the "Highlights" section at its default settings (Hue and Saturation at 0) to maintain grayscale in the brighter areas, or use the "Balance" slider to subtly blend the sepia tone further into the lighter parts of the image. Dragging the "Balance" slider towards the left will shift more of the sepia tone into the highlights.
By applying the Camera Raw filter as a Smart Filter, you gain the advantage of being able to revisit and tweak your sepia effect at any point. You can even toggle the effect on and off by clicking the small "eyeball" icon next to the "Camera Raw Filter" listing in the Layers panel.
Manual Sepia Toning with Adjustment Layers
Another effective non-destructive method involves using Adjustment Layers. This approach offers granular control over the sepia effect and can be combined with other editing techniques.
- Hue/Saturation Adjustment Layer: Add a "Hue/Saturation" Adjustment Layer from the "Create New Adjustment Layer" button at the bottom of the Layers palette.
- Colorize Option: Check the "Colorize" box within the Hue/Saturation properties. This will convert your image to a single color.
- Creative Color Selection: This is where you define your unique sepia tone. Experiment with the Hue, Saturation, and Lightness sliders. The exact color of sepia can vary, as photographers of old had their own signature tones. You can achieve your own signature sepia by adjusting these sliders to find a combination that personally suits your taste. A Hue around 45-50 and a Saturation of 20-30 often yield good results, with Lightness adjusted to taste.
- Levels or Curves for Contrast: Turn-of-the-century photos were often more contrasty but lighter. If your image needs lightness adjustment beyond what the Lightness slider in Hue/Saturation provides, use a "Levels" or "Curves" Adjustment Layer.
- Levels: Add a "Levels" Adjustment Layer. Adjust the input sliders to control the black, white, and mid-tone points.
- Curves: As described earlier, use the curves to fine-tune the tonal range, lightening blacks and controlling highlights.
- Adding Shadows and Vignette: To further enhance the vintage feel:
- Shadows: Create a new layer above your background but below your subject. Using a soft brush with low flow, sample a dark color from your subject and gently paint shadows around the lower parts to add depth.
- Vignette: Create another new layer above your subject. Fill this layer with a lighter color sampled from your subject or background. Then, use a layer mask and a soft black brush to gradually fade the edges of this layer, creating a subtle vignette that draws attention to the center of the image.
How to VINTAGE Sepia Tone look in Photoshop CS6, CC | Photoshop Effects
By combining these techniques, you can craft sepia-toned images that not only capture a nostalgic aesthetic but also possess a refined and professional finish. The key lies in understanding how each adjustment layer and filter contributes to the overall mood and appearance, allowing you to move from particular tonal tweaks to a general, cohesive vintage look.