Selecting intricate details and defining precise edges is a cornerstone of effective photo manipulation in Adobe Photoshop. Whether you're isolating a subject for a composite, removing unwanted elements, or preparing an image for print, understanding how to accurately find and refine edges is crucial. Photoshop offers a diverse array of tools, each with its strengths, catering to different edge complexities and user needs. This tutorial will guide you through the process, from initial selection to the final refinement of your edges.
Understanding Edge Detection in Photoshop
The effectiveness of edge detection in Photoshop often hinges on the distinctness of the edges within an image. Different tools approach this challenge from varied perspectives: some analyze contrast, others focus on content, and the most advanced leverage machine learning for sophisticated content-aware edge recognition. The choice of tool and technique will depend significantly on the specific characteristics of the edges you need to define, such as the clear outline of a barn against a uniform sky or the delicate strands of hair against a busy background.
The Power of Automated Selections: Select Subject and Object Selection Tool
Photoshop's advancements in artificial intelligence have introduced powerful automated selection capabilities. The Select > Subject command is a prime example, capable of recognizing a dominant subject within an image and generating a selection in a single step. While this selection might not always be perfect, it often provides a remarkably close approximation, significantly reducing the manual cleanup required. This tool is particularly effective when the subject has clear boundaries and contrasts well with its surroundings.
For more targeted automated selections, the Object Selection tool serves as an excellent next step. It functions as a more focused version of Select Subject. By simply drawing a rough outline around the object of interest-for instance, a barn-the tool intelligently identifies and selects just the barn's outline.

Navigating Object Selection Tool Modes
The Object Selection tool offers different modes to enhance its precision. The default Rectangular mode is useful for quickly encompassing objects, but if it doesn't yield an accurate enough selection, switching to the Lasso mode provides greater control. The Lasso mode allows you to draw a more precise selection boundary directly around irregular edges, offering a more refined starting point for complex shapes. This flexibility ensures that you can adapt the tool to the specific contours of your subject.
Semi-Automatic Tools: Quick Selection and Magnetic Lasso
When automated tools don't quite hit the mark, or for more hands-on control, Photoshop provides "semi-automatic" tools. The Quick Selection tool is designed to intelligently detect edges as you paint over them. By dragging the Quick Selection tool inside the desired edge, it can often discern and extend the selection to encompass the rest of the edge automatically, making it efficient for areas with clear tonal or color differences.
Similarly, the Magnetic Lasso tool offers a way to trace edges by anchoring itself to them. As you drag the Magnetic Lasso along the edge you intend to select, it attempts to "snap" to the strongest contrasting lines, effectively following the edge's contour. This tool is particularly useful for subjects with well-defined borders where you can guide the lasso effectively.
Learn how to use the Quick Selection and Lasso tools | Make selections 2 | Photoshop
Precision Refinement: The Select and Mask Workspace
In scenarios demanding extreme precision, such as selecting individual tree branches for removal or isolating children for a photo collage, Photoshop's Select and Mask workspace is indispensable. This powerful environment allows for meticulous cleanup and refinement of your initial selections.
The Select and Mask Workflow
Initial Selection: Begin by using one of the selection tools-such as the Object Selection tool, Lasso tool, Magic Wand tool, or Quick Selection tool-to create a preliminary selection around your object. This will be visually indicated by a row of animated dashed lines, often referred to as "marching ants."
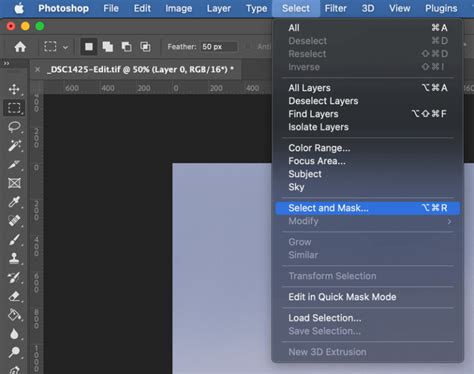
Entering Select and Mask: With your initial selection active, navigate to the top menu and click on the Select and Mask option. This action will open a dedicated workspace with a new Properties panel on the right.
Utilizing the Refine Edge Tool: Within the Select and Mask sidebar, ensure the Refine Edge tool (often represented by a brush icon) is selected. This tool is the workhorse for cleaning up complex edges.
Refining Edges: To use the Refine Edge tool effectively, click inside your existing selection and then paint outwards towards the edge you wish to refine. The Refine Edge tool intelligently analyzes the area you brush over, distinguishing between your subject and the background, and adjusting the selection boundary accordingly. This is especially critical for soft or detailed edges like hair, fur, or foliage. The tool's sensitivity can be adjusted in the Properties panel to better suit the specific edge you are working with.
Adjusting Edge Properties: The Properties tab within the Select and Mask workspace offers several crucial controls:
- Radius: This setting determines how much of the area around your subject the Refine Edge tool will consider. A larger radius can help capture finer details but may also include unwanted background elements if not used carefully. Adjusting the radius is key to balancing detail capture with background isolation.
- Smooth: This slider helps to reduce jaggedness in your selection, creating a smoother, more natural-looking edge.
- Feather: Feathering softens the edge of the selection, creating a gradual transition between the selected area and the background. This is useful for blending subjects seamlessly into new backgrounds.
- Contrast: Increasing contrast sharpens the edge of the selection, making it more defined.
- Shift Edge: This slider allows you to expand or contract the selection boundary, which can be useful for fine-tuning the fit of a selection.
Outputting the Selection: Once you are satisfied with the refined edges, return to the Properties tab and locate the Output To option at the bottom of the panel. From the drop-down menu, choose how you want to use your finished selection. Common options include:
- Selection: This outputs the selection as marching ants, ready for use in another tool or command.
- Layer Mask: This creates a layer mask from your selection, non-destructively hiding or revealing parts of the layer. This is often the preferred method for compositing.
- New Layer: This places the selected content on a new, transparent layer.
- New Document: This creates a new document containing only your selection.
- New Document with Layer Mask: This creates a new document with the selection applied as a layer mask.
Choosing the appropriate output setting ensures that your refined selection can be seamlessly integrated into your workflow, whether for compositing, background replacement, or other creative purposes. Mastering these tools and techniques will empower you to achieve professional-level results in your Photoshop projects.