Creating professional proposals is an essential skill for many industries, and leveraging the power of Adobe InDesign can elevate your presentations from functional to exceptional. This guide explores the process of designing effective proposal templates, focusing on the meticulous application of page masters, precise formatting, and strategic content placement to ensure clarity, impact, and a polished final product.
Mastering the Art of Page Masters in InDesign
The foundation of any well-structured InDesign document lies in its master pages. These act as blueprints, ensuring consistency across your proposal. When designing precedents and project samples, it's crucial to design and format each page master appropriately. This involves a keen consideration of alignment, size, and style of the text to establish a coherent visual hierarchy.
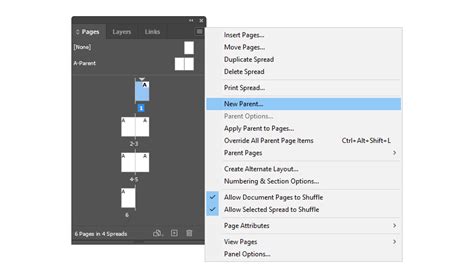
To begin setting up masters for your precedents, which will each occupy an entire spread or two pages, you'll right-click within the Pages panel and select "New Master." A naming convention is important for organization; for instance, naming it "PRE" for Precedent is a practical approach. Basing this new master on an existing one, such as the "B Master," and specifying it to be two pages ensures a robust starting point.
Once your master page structure is in place, you'll need to gather and organize the specific information for each precedent. This often involves consulting external documents, such as an Excel spreadsheet containing all the necessary details for your projects. Copying this information, using keyboard shortcuts like CTRL + C, prepares it for integration into your InDesign layout.
Customizing Titles and Project Specifics
A critical aspect of proposal design is the clear and immediate identification of the project. Customizing titles and adding specific information about the projects, such as the location, are crucial to provide a comprehensive understanding of the proposal. For example, naming the title "Common Grounds Coffee" and adding "Coast City" as the location immediately grounds the reader and sets the context.
To implement these details on your master page, you'll engage with the text tools. Double-clicking into a text frame allows you to type the project title. Subsequently, adding the location below requires careful attention to spacing and alignment. Re-adding the view of the Baseline Grid can be instrumental in ensuring that text elements align precisely. Triple-clicking within a text frame allows for editing, and typing "Coast City" for the location is a straightforward process.
The relative importance of text elements dictates their visual treatment. The title might be in larger, bolder type, while the location, though important, should be less dominant. Adjusting the font size to 16 points and changing the style to "Regular" can achieve this desired balance. Further refinement can include altering the color of the text, ensuring it aligns with your brand or the project's aesthetic.
Designing the Layout: Frames, Callouts, and Spacing
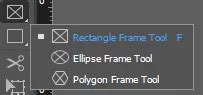
With the foundational text elements in place, the focus shifts to the visual composition of the page. This involves strategically using InDesign's tools to create frames for images and callout boxes for essential project details. The Rectangle Frame Tool is indispensable for adding large frames that will accommodate prominent imagery, immediately capturing the viewer's attention.
Complementing the image frames, the Rectangle Tool can be used to create callout rectangles positioned strategically on the page. These callouts serve as focal points for expressing key project details. Reducing the stroke weight of these rectangles ensures they are subtle yet effective. A guide, precisely placed down the center of the spread at 4.25 inches, can aid in achieving symmetrical and balanced layouts.
Integrating Project Details and Formatting Text
The process of integrating copied project details requires a degree of formatting to ensure they align correctly within the InDesign file. Using the BACKSPACE key to adjust spacing and ensure proper alignment is a common task. Adding a heading such as "Project Details" above the extracted information provides clear labeling.
Creating & Applying Paragraph Styles in Adobe InDesign 2024 | Text Formatting Tips
Styling the text within these frames is paramount for readability and visual appeal. Reducing excessive spacing between lines and adding colons where appropriate enhances clarity. Selecting all text within a frame (CTRL + A) and unaligning it from the Baseline Grid can provide more freedom in adjusting font size. However, it's important to be mindful of specific units like "square feet" which might need to be presented correctly within the text.
Utilizing the Selection Tool to right-click and access Text Frame Options allows for further customization. Increasing the inset spacing to 0.375, for example, adds a comfortable buffer between the text and the frame's edges. Adjusting the size of the text frame itself, holding ALT while dragging, ensures it occupies a more appropriate space on the page, maintaining visual balance.
Precise spacing between design elements is crucial for a professional look. Leaving a defined space between the top image frame and the text frame, or between the text frame and a callout rectangle, can be achieved by measuring in terms of baselines. Creating guides and using InDesign's ability to perform calculations (e.g., adding points to inches) helps achieve exact distances, ensuring visual harmony across the spread. This meticulous attention to spacing, often measured in points or baselines, contributes significantly to the overall aesthetic quality of the proposal.
Structuring Content for Clarity and Impact
The second page of a precedent spread often requires a different layout to present a variety of content effectively. This might involve adding a large text frame and a separate image frame. Populating these frames with placeholder text or relevant project imagery is the next step. For text-heavy sections, ensuring the text is arranged in columns can improve readability, especially when dealing with a significant amount of information.
The principle of keeping section divisions simple is a good rule of thumb when designing templates. An introduction, pricing, and specifications are examples of distinct sections that should ideally be treated as separate blocks within your template. When starting with a blank template, defining the number of sections needed is an early and important step.
Adding and Styling Content Blocks
Once sections are established, you can add "Content Blocks" to each. This is achieved by clicking a plus sign within the editor. While the editor may strip some formatting upon pasting content, re-setting up header text and formatting is a straightforward process. Highlighting text and selecting H1, H2, or H3 provides different heading sizes, establishing a clear hierarchy.
Incorporating brand colors from the outset simplifies the design process. Setting up your brand colors in advance, including darker shades like black and very dark grey, alongside white and light grey, ensures consistency. Color can be applied to your template through the settings of each block, where options for background images, filters, videos, patterns, and trims are available.
A recommended approach is to first choose a theme, either light or dark, and then alternate colors from top to bottom within each section. This creates a visually dynamic yet cohesive presentation. An inside tip suggests starting with the theme, adding imagery, and then returning to apply brand colors.
Enhancing Visual Appeal with Images and Design Elements
Adding images to a proposal is a powerful way to enhance its look and feel. Clicking the plus sign between content blocks and selecting "Full width image" offers a simple method for integration. While InDesign, particularly through platforms like Better Proposals, offers a vast array of design options, it's important not to go overboard.
Trims, such as angled borders, can add a subtle stylistic touch. Columns are particularly effective for presenting comparative information, such as a team page with images and biographies side-by-side. Mixing "Normal" and "Wide" modes can keep the layout visually interesting on larger screens.
Background videos should be used sparingly, as they can slow loading times and become distracting. Background patterns can be effective for highlighting special content, like a callout. The key is to pick a style and stick with it for a unified look.
The Template as a Foundation for Future Proposals
Your proposal template serves as the starting point for all subsequent proposals. Naturally, certain sections will require amendment for each client, while others may remain largely unchanged or need significant revision. The overarching goal is to make the proposal production process as streamlined as possible.
AEC proposal templates, for instance, are designed to streamline the pursuit of projects, helping teams meet deadlines more efficiently. Adobe InDesign is a powerful tool specifically created for desktop publishing, making it an ideal choice for creating such templates.
Inspiration and Branding in Template Design
When designing a template's aesthetic, researching design and branding ideas both within and outside your industry is essential. Within the AEC industry, observing recent proposal selection processes of other agencies can provide valuable insights. Pay attention to how the eye travels around each page, what elements capture attention, how design emphasizes key points, and which words resonate.
The initial impression is critical; a unique and memorable cover design can significantly impact how your proposal is perceived. It's vital to remember that your firm's brand should consistently drive every design decision, from layout to messaging. While matching a client's brand colors might seem appealing, it's crucial to maintain your own brand's distinction.
Creating Coherent and Readable Layouts
A coherent and easy-to-follow layout is paramount. Carefully choosing colors, fonts, and images contributes to the best page layout. The reader should be able to quickly locate the most important information, necessitating a clean, professional design with a clear structure that allows your words to have maximum impact.
Sketching various layout options on paper is a recommended creative exercise. Forcing yourself to create numerous thumbnail sketches for each page layout can unlock innovative solutions. Elements like bullets, quotes, images, and headers are all tools to guide the reader's eye. Empathizing with the selection committee and observing how your eye navigates the design is crucial. Testing final design options with colleagues can provide valuable feedback.
Typography and Visuals in Proposal Design
Fonts play a significant role, especially in text-heavy proposals. Ensuring your template font is legible, easy to read, and adaptable to various RFP regulations is essential. For instance, if your corporate font is condensed, adapting it to a more "generic" font required by an RFP can be challenging. A 12-pt Times New Roman font occupies more space than a condensed 9-pt font, affecting layout flexibility.
Thoughtful graphics are equally important. Proposals can often be dominated by text, and selection committees are typically reviewing numerous documents. AEC-specific infographics can break up dense text and help the committee visualize key information more effectively.
Iterative Design and Advanced InDesign Features
Creating multiple options for each final template is an opportunity for creativity. You might need two projects or resumes on a single page depending on RFP page restrictions, or different options for full-bleed versus bordered pages, or varying numbers of photos.
Character and Paragraph Styles are invaluable tools in InDesign for proposal preparation. These styles define how text looks and behaves, encompassing formatting for fonts, color, scale, indents, alignment, hyphenation, and spacing. Mastering these styles will save considerable time.
Don't overlook the importance of white space. Incorporating ample white space in various areas of the template enhances readability and visual appeal.
The InDesign Book feature can be particularly useful for proposals involving multiple files or contributors. This feature allows individual project pages, firm profiles, and management plans to be assembled, with master page edits automatically updating across all linked documents. This ensures synchronized page numbers and styles, automates table of contents generation, and simplifies packaging for print and PDF creation.
Organizing Information on the Artboard
For proposals where more information is gathered than can fit on the master template page (e.g., square footage, cost, dates, images, quotes, additional project descriptions), storing this extra information on the artboard area of InDesign is a practical solution. This content and imagery can be formatted with the correct font, paragraph style, resolution, and size, ensuring it's readily accessible when needed without cluttering the main layout.
In the AEC industry, framing selling points as features and benefits is crucial. Building sections into your template that prompt you to "call out" feature/benefit statements ensures that your messaging focuses on what the client gains, rather than just what your firm offers. If a selling point elicits a "So what?" response, it's likely a feature that needs to be translated into a benefit.
Template design is an enjoyable aspect of marketing careers, but the reality of proposal production often demands efficiency within deadlines. Using an InDesign proposal template provides a quick and effective way to complete business proposals without sacrificing quality. Professional InDesign proposal templates help content stand out.
Acquiring and Utilizing InDesign Proposal Templates
Whether you seek a template to customize or a fully designed layout for your content, InDesign proposal templates offer a solution. They facilitate the creation of a unified business proposal for continued use and can be easily adapted for newsletters, briefs, and portfolios. A well-designed template grows with your business.
When searching for InDesign proposal templates, you have the choice between premium and free options. Premium templates, often found on platforms like Envato Elements, offer top-tier quality and convenience with a subscription model providing unlimited downloads. These templates may also be compatible with other Adobe software like Photoshop and Illustrator. For example, a template might offer 52 pages, extensive design options, and compatibility across multiple programs.
Alternatively, platforms like GraphicRiver offer high-quality templates on a pay-as-you-go model. When downloading templates, you'll often find multiple file types included: INDD (standard InDesign document), IDML (Adobe InDesign Markup Language, for older versions), and PDF (for previewing).
Navigating and Customizing InDesign Templates
Upon opening an InDesign template, you might notice various lines across the pages. These are guides, visual aids for layout design. They can be toggled on or off via View > Grids & Guides. Text is a critical component, and existing text within a template can be selected and replaced with your own content.
Templates frequently include placeholders for imagery. Using the Selection Tool, select a placeholder square, then navigate to File > Place to insert your image file.
Customizing InDesign templates involves modifying various design elements. With the Selection Tool, click on a component to select it, or click and drag to select multiple elements simultaneously. Adding text outside of predefined text boxes is also possible by drawing a new rectangular frame or using File > Place without a frame selected. Images can be resized and scaled within frames.
Arranging, duplicating, and deleting pages is managed through the Pages panel (Window > Pages). Pages can be sorted by clicking and dragging. Right-clicking a page provides access to further options.
Saving and exporting work differ in InDesign. INDD files are for ongoing editing, while file types like PDF are suitable for printing. Exporting to specific file types is done via File > Export.
Visual Design and Layout Principles
The visual design of a business proposal is crucial. Consistent branding, as seen in many templates, is important, but designs should not be monotonous. Finding a balance between variety and similarity keeps content engaging. Creative layout design can make content visually interesting.
Organization is paramount, especially with dense content. Well-organized layouts, like those that use spacing and visual elements effectively, are highly readable. Visuals are communicative; an infographic or timeline can convey information more effectively than a lengthy paragraph. Ensuring pages feel related through visual similarities, repeated elements like page numbers, footers, type choices, and header styles creates a unified publication.
Free creative InDesign proposal templates are available, offering a starting point for users.
Frequently Asked Questions and Advanced Techniques
Can I easily change the text in an InDesign template?Yes, changing text is straightforward. Specific tutorials can offer additional guidance.
What is Overset Text?Overset text occurs when more text fits into a text box than is visible. Resizing the text box is a common solution, with further techniques covered in tutorials.
How do I check for typos?InDesign has a built-in spell checker. Navigate to Edit > Spelling > Check Spelling to begin.
Can InDesign automatically create a Table of Contents?Yes, InDesign can automate the creation of a table of contents, generating page numbers and associating them with specific pages, which is essential for multi-page documents and avoids manual errors when pages are moved.
Can InDesign Make eBooks?InDesign is excellent for print projects, but it can also be used to create digital content, including eBooks.
To further enhance your InDesign proposal template skills, explore resources on creating custom layouts and more. While tempting, be cautious of free templates found online that may lack quality or proper structure. For high-quality, diverse InDesign business proposal design templates, platforms like Envato Elements offer unlimited downloads, while GraphicRiver provides a pay-as-you-go option.