Photoshop effects are a cornerstone of modern photography, offering creative avenues for both amateur enthusiasts and seasoned professionals. Not only are photo effects fun to create, but they’re a great way to learn Photoshop since they often introduce us to tools, commands, or other features we might otherwise never know about. This article serves as a structured, beginner-friendly guide to Photoshop, aiming to demystify its complexities and empower you to enhance your photography. We'll delve into fundamental concepts, essential tools, and powerful techniques, all presented in an easy-to-understand manner, building a solid foundation for your post-processing journey.
The Complexity of Photoshop and its Place in the Photographer's Toolkit
Photoshop is a vast and complex piece of software, and there are so many built-in and third-party tools available for it, that it would be impossible to try to learn it all. In fact, Photoshop’s tools evolved so much over the years, that one could get similar results using very different tools. If you search online for a way how to get something done in Photoshop, you might be overwhelmed by what you find. In many cases, photographers end up showing a number of different techniques to get to the end result, which can be very confusing, especially for those who are starting out. This very nature of Photoshop demands a steep learning curve. I haven’t come across anyone who can say “I know everything in Photoshop”. Instead of trying to learn everything about the software, many of us choose to only learn the particular tools that we actually need on a day-to-day basis. This is the right way to learn Photoshop. Once we learn a particular tool in Photoshop, it does take time and practice to put it to use. It might be a slow process, but once you get used to it, the results are highly rewarding. So please keep in mind that this article is not meant to be a complete guide to Photoshop. Instead, it is written as a foundation that hopefully makes it easier for our readers to understand some of the basics.
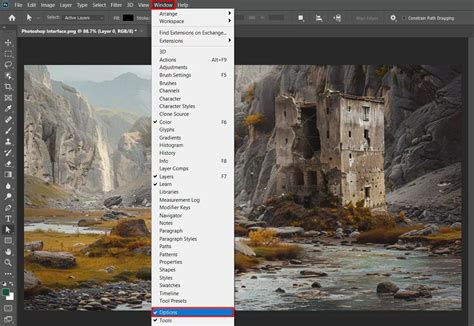
Every artist or craftsman needs tools, and the Photoshop user is no different. However, our tools are not pencils or paint, they are computer tools located in the Photoshop toolbox. An ordered workspace to create in is essential for speed and ease of use. For photographers, it is crucial to set up Photoshop for their specific needs. Going to the menu Window -> Workspace -> Photography will display a workspace with the tools specific to photography, streamlining your workflow.
Lightroom vs. Photoshop: Understanding the Synergy
Serious photographers rarely ever publish images straight out of their cameras, so the journey is usually started with basic post-processing tools like Lightroom. It is important to note that there is a huge difference between Lightroom and Photoshop when we open the software for the first time. With Lightroom, everything seems relatively easy to understand. With a bit of exploration, we can soon get familiar with the software. On the other hand, when we open Photoshop for the first time, we feel like we are in the middle of nowhere. All we see are unfamiliar tools, tabs and windows. Now most of us would have asked ourselves “When I have Lightroom, why would I ever need Photoshop?”
The answer is, almost everything that is in Lightroom is available in Photoshop. But Lightroom cannot even do 10% of what Photoshop is capable of. The difference between Lightroom and Photoshop is similar to the difference between riding a bike vs. driving a race car. It is vast. However, most photographers won’t care for the features that are not relevant to them, such as inserting 3D graphics, editing videos, or running specialized filters.
Lightroom is pretty simple and has most of the functionality that is relevant to photographers. It has built-in functionality for image editing, but it is also a pretty powerful photo organizing tool, which Photoshop is not. Also, Lightroom is “non-destructive” by nature, which means that all the changes you make to images do not get written on the image itself, but rather into the Lightroom database. Whether you shoot in RAW or JPEG, the original image is always intact. In contrast, whenever you open an image in Photoshop, it has already been demosaiced and flattened, so if you make a change to it and save the document, it will either overwrite the original image (in case of JPEG), or create a new file.
The bottom line is, if you are going to make simple edits like adding or removing a few stops of light, adding contrast or saturation, sharpening, or basic blurring, Lightroom does the job. If you want to take your editing skills to a new level and gain access to a whole suite of superb tools, then you have to get into Photoshop. If you subscribe to Adobe’s Creative Cloud Photography plan, you get both Photoshop and Lightroom. They are meant to coexist in harmony, so that you can jump between the two when needed. For example, if you make some basic edits in Lightroom, then open it in Photoshop through Lightroom, you will see all the changes you made in Lightroom within Photoshop. Once you save your changes in Photoshop, it will automatically import the adjusted image into Lightroom.
Adobe Photoshop vs Lightroom Classic | What One Is Right For You?
Opening and Saving Images in Photoshop
Opening an Image in Photoshop
As mentioned above, you can either open an image from Lightroom with all the tweaks that you made visible in Photoshop, or you can open an image directly in Photoshop. As I have mentioned earlier, there is more than one way to do a single task in Photoshop. The most widely used way of opening an image in Photoshop is just dragging the image from your file explorer into the Photoshop window.
Once you open a picture in Photoshop, you see a tab on the upper left with the name of the image. You can also open multiple image documents which will be opened as tabs. On the bottom left, you see the crop percentage. You can zoom in (by pressing Control/Command and +) or zoom out (by pressing the Control/Command and -) to either see the entire picture, or to pixel peep at 100% crop ratio. Pressing Control/Command + 0 fits the image to the workspace, while pressing Control/Command + 1 gets it to 100% crop. While using Photoshop, try to memorize the keyboard shortcuts as they help make things easier and faster.
Next to it is the file size display. Depending on the type of file you are working with, the size of the file increases substantially. For example, the size of a 24MP full frame RAW file would approximately be 30 MB. The same file can go up to 1 GB if you add a dozen layers to it. We will get to layers in just a bit. When you convert it into a JPEG of the same resolution, you might end up with an 8-12 MB file. For every layer you add to a Photoshop document, the size of the file increases in multiples of the size of the base layer.
On the right upper corner, you see an RGB Histogram. Right below it is the Adjustment toolbox. Below that is your current layer selected inside the Layers tab. On the left, you can see an eye icon which can be toggled. Once you click it, the eye symbol appears, which means the corresponding layer is visible. When you click it again, the eye symbol disappears, which means the corresponding layer becomes invisible. On the other end, there is a lock symbol meaning the layer is locked, which means certain tweaks cannot be applied directly to the layer.
Opening a RAW File
The above holds true if we are opening a .psd, .tiff, .jpg, or any other image format that Photoshop can read. But that is not what we often want to open in Photoshop. Most of us shoot RAW. And once we decide an image has to be edited to some extent, we have to shoot RAW. When we try to open a RAW file in Photoshop, instead of just opening the file directly as it does with a TIFF or a JPEG, Photoshop does something extra.
Once you drag a RAW file into Photoshop, you see a new window with the title “Camera Raw”. This is Adobe’s specialized tool for reading and editing RAW files. If you are already familiar with Lightroom, ACR’s (Adobe Camera Raw) layout will not look alien. ACR gives you some basic functionality that is pretty similar to what you find in Lightroom. But do note that, if you have the latest camera but you do not have the ACR update that includes that camera model, you will not be able to open the RAW files from that camera.
In such cases, you have two options. The first option is to use Adobe’s RAW to DNG converter, which is available for free. Once you convert images to DNG format, you will be able to open them even in older versions of Adobe Camera RAW. If Adobe has not yet provided support for your camera, you will need to resort to the second option, which is to use the proprietary software that came with your camera in order to convert the RAW file to something Photoshop can read, such as TIFF.
Also, note that while editing an image, you will need maximum possible data to work with. That is one of the primary reasons why we shoot in RAW, isn’t it? If you convert it to a JPEG, you are left with 8-bits of data to work with. But if you choose TIFF or preferably a format like DNG, you can work with all the original data without losing anything.
For the above opened image, some basic tweaks were made in ACR. In addition to adding a bit of exposure, contrast, and saturation, there is another important fix that is advised to be made in ACR: Lens Correction. ACR provides built-in profiles for correcting lens-specific issues like distortion, chromatic aberration, and vignetting. Again, a corresponding ACR profile has to be available for that particular lens. Outdated ACRs cannot do this, and you have to try making adjustments manually. Once you find your lens profile in ACR, select the camera model & the lens, and ACR will apply that particular profile to your image. Once done, click on “Open image,” and the RAW file will be opened in Photoshop with the adjustments in ACR applied to it.
Saving & File Format Recommendations
Once you are done with your editing, as with most other software, to save a file for the first time, or as a new copy, go to File -> Save As. This lets you choose the type of file which you want your work to be saved as.
It is recommended to use one of two file types: Photoshop (*.PSD, *.PDD) or TIFF (*.TIF, *.TIFF). Photoshop PSD files can only be opened in Photoshop, whereas TIFF is a format that most image viewing and editing software recognize. Certainly, they will lead to a considerable increase in file size, but both formats hold maximum possible data. If you are not going to print and you are planning to use the image primarily for the web, 8-bit TIFF should be sufficient.
Generally, you will be saving two copies of every image. One as a PSD or as TIFF that has all the data, and one more as JPEG for web use. If you are using a version of Photoshop above CC 2015, you can save as JPEG using File -> Export -> Save for Web (legacy). A new window pops up. Make sure the image format selected is JPEG.
Next, you can choose the image quality, from Low to Maximum, depending on how much data you want to preserve in the resulting JPEG image. Basically, the higher the image quality, the larger the file size due to different lossy compression levels. You can see the corresponding file size on the bottom left corner. Once you choose the quality, make sure “Convert to sRGB” is checked. Then you can type in the desired resolution. Generally, a resolution of 2048 on the longer side of the image is sufficient. Make sure the link icon is checked, as it automatically adjusts the other side of the image corresponding to the set aspect ratio. Then click on “Save…” to save a JPEG copy of the edited image.
In addition to PSD, TIFF, and JPEG, there is another format that is worth knowing, namely PNG. The primary difference between PNG and JPEG is the ability to preserve transparency. PNG can do that, but JPEG cannot. For example, if you are planning to make a transparent logo that can be inserted on top of other images, it is best to save it in PNG format rather than JPEG. Always remember that whenever you see an image or a layer that is checkered, it means it is transparent.
If you opened an image from Lightroom by right-clicking and choosing “Edit in Photoshop,” then instead of choosing the “Save as” option, just save the file normally. Once you do that, you will see that the image will be automatically imported into Lightroom from Photoshop.
The Photoshop Toolbox: Essential Tools for Photographers
When you open Photoshop, after you bypass the last opened file list, you will see the illustration screen. Before we proceed to anything else, let us set up your workspace. The applications of Photoshop go beyond editing pictures. So the first step is to tell Photoshop that we are going to use it to edit pictures. Go to the menu Window -> Workspace -> Photography. This will display a workspace with the tools specific to photography.
Now you will see the toolbar on the left. The majority of the tools that you see on the toolbar contain a number of different tools. It is generally denoted by a small arrow at the bottom right corner. This simply means that the tool has a group of tools that pop-up when you right-click it, which perform different operations. When you select a tool from the toolbar, the properties or available options for the corresponding tool get displayed on the top, just below the menu bar. For example, in the illustration above, we have selected the “brush” tool. So the properties of the brush tool like brush size, blend mode, opacity, and other properties related to the brush tool are displayed above. Remember, the tools and pallets can be re-arranged to suit your requirement. Let’s take a look at four of the most frequently used tools.
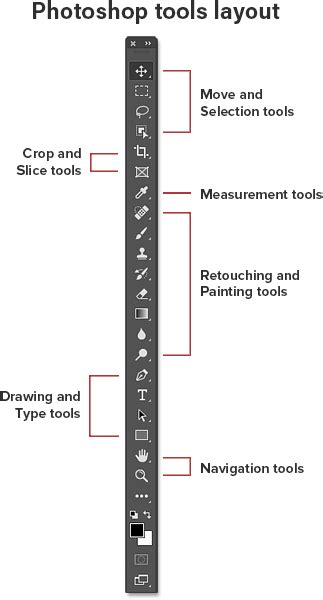
Crop Tool
Cropping an image is typically one of the first steps of post-processing. You can bring in the crop rulers by clicking on the crop tool in the tool palette. You can then resize by dragging the eight corner placeholders. You can also rotate the image by dragging any of the four extreme corners. When you move the mouse exactly to the extreme corner (top left, top right, bottom left & bottom right), the mouse pointer turns into the resize symbol. When you move it a bit out of the image nearer to the corners, the rotate mouse icon appears, and you can tilt the image clockwise or anti-clockwise.
While cropping, you can change its aspect ratio. It is the ratio between the length and the height of an image. By default, Photoshop tends to retain the original ratio of the image. You can change the aspect ratio by selecting one of the ratios from the drop-down.
Spot Healing Brush Tool
The Spot Healing Brush Tool is invaluable for removing small blemishes and imperfections from photographs. It works by sampling surrounding pixels to seamlessly blend away unwanted elements. Simply click or brush over the area you want to correct, and Photoshop will intelligently heal it. This tool is particularly effective for removing dust spots, minor skin blemishes, or small distracting objects.
Clone Stamp Tool
The Clone Stamp Tool is a more advanced tool for retouching and repairing images. It allows you to duplicate pixels from one area of an image and paint them onto another. To use it, you first Alt-click (Option-click on Mac) on the source area you want to copy from, and then paint over the area you want to cover. This is excellent for removing larger objects, duplicating textures, or reconstructing damaged areas of a photograph.
Brush Tool
The Brush Tool is one of the most versatile tools in Photoshop. It allows you to paint directly onto your image with a variety of brush tips, sizes, colors, and opacities. The Brush Tool is fundamental for many editing tasks, from subtle dodging and burning to applying color overlays and creating artistic effects. Understanding its various settings, such as hardness, flow, and blend modes, is crucial for precise control.
Dodge and Burn Tool
The Dodge and Burn tools are used to selectively lighten (Dodge) or darken (Burn) specific areas of an image. These tools are essential for controlling light and shadow, enhancing depth, and guiding the viewer's eye. By subtly applying these tools, you can bring out details in highlights or deepen shadows, adding a more dimensional and polished look to your photographs.
Understanding Global vs. Local Adjustments
When editing photographs, it's important to distinguish between global and local adjustments. Global adjustments affect the entire image, such as overall exposure, contrast, or white balance. Local adjustments, on the other hand, target specific areas of the image, allowing for more nuanced and controlled enhancements.
Global Adjustments
Global adjustments are typically made using adjustment layers or within Adobe Camera Raw. These affect the image uniformly. For instance, increasing the overall saturation will affect all colors equally. While useful for initial tonal and color corrections, global adjustments can sometimes be too broad for complex edits.
Local Adjustments
Local adjustments are where Photoshop truly shines for photographers. They allow you to modify specific parts of an image without affecting the rest. This is achieved through tools like the Brush Tool, Dodge and Burn, or more powerfully, through Layer Masks and Adjustment Layers. For example, you might want to brighten a subject's face without overexposing the background, or enhance the blue of a sky without altering the surrounding clouds.
Layers: The Foundation of Non-Destructive Editing
Layers allow you to work on one part of an image without affecting the others. It’s one of the fundamental parts of Photoshop. Think of layers as transparent sheets stacked on top of each other. You can edit each sheet independently, and the changes on one sheet don't impact the others. This non-destructive workflow is crucial for maintaining image quality and allowing for easy revisions.
Opacity
Opacity refers to the transparency of a layer. A layer with 100% opacity is fully opaque, while a layer with 0% opacity is completely transparent. Adjusting opacity allows you to blend layers subtly or create translucent effects.
Adjustment Layers
Adjustment Layers are a powerful way to add effects to an image non-destructively. They give great control over the effects you want to achieve. Instead of directly altering the pixels of your image, adjustment layers create a separate layer that modifies the layers below it. This means you can change or remove the adjustment at any time without permanently affecting the original image data. Common adjustment layers include Brightness/Contrast, Levels, Curves, Hue/Saturation, and Color Balance.
Layer Masks
Layer masks cause endless confusion for beginners as they learn Photoshop, but they’re such an important part to master. A layer mask is a grayscale image attached to a layer that controls the layer's visibility. White on the mask reveals the layer's content, black conceals it, and shades of gray create partial transparency. This allows you to selectively apply the effects of a layer to specific parts of your image. For instance, you could use a layer mask with an adjustment layer to brighten only a person's eyes or to darken a specific area of the sky.
Blend Modes
Blend modes determine how a layer's pixels interact with the pixels of the layers below it. Photoshop offers a wide array of blend modes (e.g., Multiply, Screen, Overlay, Soft Light) that can create a vast range of creative effects, from subtle color shifts to dramatic textural changes. Understanding blend modes is key to advanced compositing and creative editing.
Advanced Techniques and Creative Effects
Filters
Photoshop's filters are pre-programmed effects that can alter the appearance of an image. While some filters can be used for creative purposes, many photographers use them sparingly, preferring more controlled adjustments. However, filters like Gaussian Blur can be useful for creating depth of field effects or softening backgrounds.
Smart Objects
Smart Objects are layers that contain image data from raster or vector sources. They preserve an image's source content, enabling non-destructive scaling, rotation, and filtering. When you apply a filter to a Smart Object, it becomes a "Smart Filter," which can be edited or removed at any time. This is crucial for maintaining image quality when performing transformations or applying filters repeatedly.
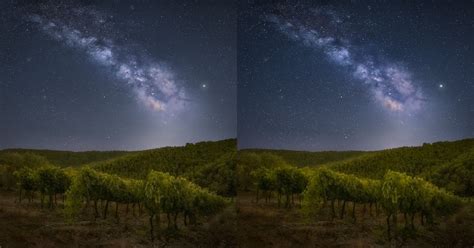
Creating a Starry Night Sky in Photoshop
Add a field of stars to your night skies with Photoshop! This effect can transform a mundane sky into a celestial spectacle, adding depth and wonder to your landscape photography. The process often involves using noise filters and blending techniques to create a realistic starfield.
Blending Text into Clouds with Photoshop
Learn how to easily blend text into clouds with Photoshop, as if your text is floating in the sky! This technique involves carefully selecting cloud areas, masking text layers, and adjusting blend modes and opacity to create a seamless integration. It's a fantastic way to add a surreal or artistic touch to your images.
Vintage Photo Effect with Adobe Lightroom
Learn how to turn a new photo into an old-fashioned, vintage photo with Adobe Lightroom! This effect is achieved through desaturation, adjusting contrast and tones, adding grain, and sometimes applying subtle color casts to mimic the look of old photographs. Lightroom's powerful presets and adjustment tools make this a straightforward process.
Rainbow Eye Color Effect in Photoshop
Why choose a single eye color when you can choose every color at once! Learn step-by-step how to easily give someone rainbow-colored eyes with Photoshop! This effect typically involves isolating the iris, creating color layers, and using masks and blend modes to achieve vibrant, multi-colored eyes.
Removing Objects from a Scene
Removing things from a scene is a very common use of Photoshop, but there is no one definitive way to do it. Tools like the Content-Aware Fill, Clone Stamp Tool, and Spot Healing Brush are essential for seamlessly removing unwanted elements, whether it's a distracting person in the background or an unsightly power line.
Generative AI in Photoshop
Generative AI in Photoshop is the process of using artificial intelligence to add, create, or remove things from your image. This cutting-edge technology is rapidly transforming image editing, allowing for the creation of entirely new elements or the realistic modification of existing ones based on text prompts.
Retouching Skin
One of the top uses of Photoshop is to retouch skin. This involves smoothing blemishes, reducing wrinkles, and evening out skin tone while maintaining a natural look. Techniques include using the Healing Brush, Clone Stamp, Frequency Separation, and subtle adjustments to color and contrast.
Double Exposure
A double exposure is simply merging two images to create another one. This artistic technique involves layering two images and using blend modes and masks to create a surreal and often poetic visual effect.
Creating a Composite Image
Creating a composite is when you mix together several pictures to create another image. This is a more advanced technique that involves combining elements from multiple photographs to create a new, cohesive scene. It requires careful attention to lighting, perspective, and color matching to achieve a believable result.
Learning Photoshop: A Structured Approach
Understanding Photoshop is a journey, and a structured approach is key. The School of Photography offers a professional online Photoshop course designed to guide beginners through this complex program with ease. It’s a structured, beginners’ guide to Photoshop that will clear up any confusion you may have. With accurate and thorough knowledge that is based on over 23 years of teaching experience, you’ll be up and running in no time. It will teach you beginner to advanced editing techniques in an easy-to-understand way and give you the ability to create great photography that will stack up against the best out there.
This course will take you through everything you need to know about this complex program to enhance your photography. Once you’ve learned the basic skills necessary to create stunning imagery, we’ll push your knowledge further with high-end editing techniques like removing objects, skin retouching, blending multiple exposures, using adjustment layers, and much more - the possibilities are endless! Also included in this course are 74 image files. These files will help you follow along with the edits and enable you to learn Photoshop properly.
The course is designed for:
- Beginners who want an easy-to-follow guide to Photoshop.
- Intermediate Photoshop users who want to fill any gaps of knowledge that are stopping them from reaching their full potential.
- Photographers wanting to learn Photoshop online to enhance their photography.
- Professional photographers wanting their work to compete with the best out there.
The instructor, Marc Newton, is an educational speaker, author of the best-seller "Beginner Photography Book," teacher of photography, and the founder of The School of Photography. He graduated with an honours degree in Photography in 2000 and over the years worked for many clients, turning his hand to many genres. His work has been exhibited around the UK and he has had his work published in many national papers and magazines. "Teaching Photography has been my passion for many years," he states. "I got my first paid photography job in 1997 whilst doing my photography degree, but in 2002 I decided to give teaching a go and I haven’t looked back since. I loved seeing the stunning imagery my students produced. I found the process of teaching filled me with a real sense of joy, and it still does today."
The School of Photography offers a no-risk solution: a full 30-day money-back guarantee. If you don’t learn anything, they will give your money back. They offer this because they don’t just show, they teach! And they’ve been teaching photography, with 5-star reviews, since 2002. All of this experience goes into creating their courses. They know that their courses will make you excellent photographers just like they have done for 1000’s of others.
The courses are priced in British Pounds. On checkout, it will show the cost in British Pounds and will be converted into your currency when purchased. On average, someone with a full-time job will complete the course in 1 to 2 months. You can download any course assets like worksheets, RAW files, Lightroom presets, and Photoshop actions. The courses are fully online and accessible anywhere in the world. They work hard to keep the courses compatible with the latest version of Photoshop. It is recommended to use Photoshop CC, however the course will also be fine for people using Photoshop CS6 or later.
For those looking to purchase Photoshop, Adobe doesn’t sell it as a standalone program anymore. Instead, they provide various types of plans which include it. The best one to buy is the ‘Photography Plan (1TB)’ which includes Photoshop CC, Lightroom Classic, and Lightroom CC for a monthly fee.
The School of Photography also offers additional benefits for members, including thousands of videos, worksheets, lighting setups, Lightroom presets, RAW files, critiques of student’s work, monthly assignments, exclusive members discounts on photography brands and services, live Q&A sessions with pro photographers, and personalized support. You can learn in your own time at your own pace. This is real learning delivered by Professional Teachers!
Key Concepts to Master
Beyond the tools, understanding core concepts is vital for effective Photoshop use:
- Composition: In my opinion, composition is the most important thing to get right. Getting it wrong will make the most beautiful scene look awful. This lesson is an in-depth exploration into how different compositional techniques can really enhance the look of your photography.
- Adobe Camera Raw (ACR): ACR is used to process Raw image files. Teaching the power of working with Raw files in Photoshop and how ACR can dramatically enhance your photography is a key element of learning. You’ll also learn how you can use masking to improve landscape and portrait photography.
- Gradient Maps: Using Gradient Maps is a more advanced way to color tone photography, and once mastered, it will transform your imagery. In this lesson, we look in depth into how gradient maps work.
- Photoshop Actions: Photoshop Actions are used to speed up your workflow and create effects that you may want to add to your photography time and again.
- HDR Photography: HDR photography is a way of increasing the detail in tones and colours across an image. It’s used to reproduce a greater dynamic range of colour and luminosity than standard imaging and is particularly suited to landscape photography.
- Colour Popping and Selective Colour: These are popular techniques which allow you to make a part or particular colour stand out from the rest of the image.
- Double Exposure: A double exposure is simply merging 2 images to create another one.
- Compositing: Creating a composite is when you mix together several pictures to create another image. Although not necessary, it’s common for professionals and enthusiasts to use Lightroom and Photoshop together.
By mastering these tools and techniques, you'll be well on your way to creating stunning and professional-level photographic work.
tags: #photoshop #for #photography