Adobe Photoshop stands as a cornerstone in the digital imaging landscape, empowering designers and photographers globally with its extensive capabilities for creating and manipulating visual content. Among its myriad features, the ability to apply a stroke-an outline around an object-plays a crucial role in refining both text and shapes within a design. This fundamental yet versatile tool offers a rich spectrum of customization, allowing users to precisely control the color, width, style, position, blend mode, and opacity of these applied outlines. Strokes in Photoshop are thus an indispensable asset for designers aiming to imbue their creations with defined borders and accents around various elements, including text, shapes, selections, and paths.
The Foundation: Understanding Photoshop Strokes
At its core, a stroke in Photoshop is an outline that can be applied to a selection, a layer, or a path to enhance its visual presentation. This feature is accessible and controllable primarily through the Layer Styles panel, which unfurls a multitude of options and settings for meticulous customization. Whether the goal is to create crisp, solid-color lines, dynamic gradient borders, or intricate patterned outlines, the Stroke effect proves remarkably adaptable. However, a word of caution is often advised: judicious application is key, and designers are encouraged to avoid overuse to maintain overall design balance and impact.
Applying Strokes to Paths: Precision with the Pen and Brush Tools
When working with precise shapes or lines, the Pen Tool or the Brush Tool are generally the go-to instruments for creating paths. To initiate this process, activate the Pen Tool and then select "Paths" from the Options bar. Subsequently, draw the desired shape or line. Once the path is established, stroking it with the Brush Tool can be achieved in a couple of ways. You can either right-click directly on the path and select "Stroke Path" from the contextual menu, or you can switch to the Brush Tool and then click the "Stroke Path" icon, typically found within the Options bar. This method offers a high degree of control, especially when aiming for specific artistic brush effects along a defined trajectory.
For those who prefer a more direct approach to path definition, the Pencil Tool can also be utilized, though the Pen Tool generally offers superior precision for complex curves and sharp angles. When the Pen Tool is active, ensure the "Path" tool mode is selected in the Options bar. After drawing your path, you can directly interact with the stroke options. Clicking the stroke color swatch opens a fly-out menu for color selection. Adjacent to this is the stroke width setting, allowing you to define the thickness of the outline. Further stylization can be achieved using the "Stroke Options" located next to the width setting, offering granular control over the stroke's appearance.
Stroking Layers and Selections: Enhancing Existing Content
Beyond paths, strokes can also be applied to layers or selections. To stroke a layer, the initial step involves making a selection around the content of that layer. This can be accomplished using any of Photoshop's selection tools, such as the Marquee Tool for geometric selections or the Lasso Tool for freeform selections. Once a selection is in place, you can proceed to apply a stroke.
A common method for applying a stroke to a selection or layer content is through the "Edit > Fill" command. After making your selection, navigate to "Edit" in the top menu bar and select "Fill." Within the Fill dialog box, you'll find various options. For a stroke, you would typically choose a color from the "Use" menu, often by selecting "Color" and then picking your desired hue from the Color Picker. The "Opacity" setting here controls how transparent the applied paint is, allowing underlying pixels to show through if desired. The "Mode" setting, which relates to blend modes, determines how the fill interacts with existing pixels. For stroke-specific parameters, the "Stroke" command itself, often found under the "Edit" menu or within Layer Styles, provides more direct control.
Layer Styles: The Powerhouse of Stroke Customization
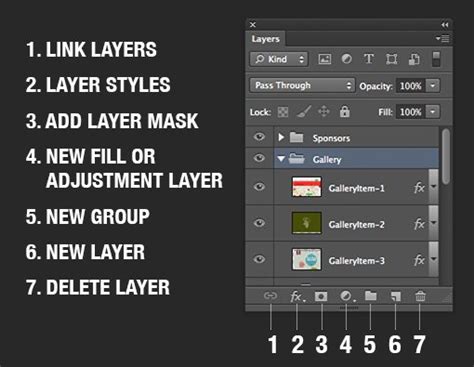
To truly elevate the appearance of strokes, Photoshop's Layer Styles panel is an indispensable resource. Accessible from the Layers panel, this feature offers a vast array of customizations that extend far beyond a simple outline. Layer Styles allow for the application of effects like shadows, bevels, and embossing, which can dramatically alter the overall perception of a stroke. For instance, a subtle drop shadow can imbue a stroke with a sense of depth and dimension, making it pop off the background, while a bevel and emboss effect can create a raised or indented appearance.
Within the Layer Styles, the "Stroke" option itself is a powerful tool. Here, you can define the stroke's characteristics with remarkable precision. The "Fill Type" allows you to choose between a solid color, a gradient, or a pattern for your stroke. This means you're not limited to single-hued borders; you can create dynamic, multi-tonal outlines or even incorporate intricate textures. The "Position" setting is crucial for controlling where the stroke is applied relative to the edge of the layer's content: "Inside" places the stroke within the layer's boundaries, "Center" positions it across the edge, and "Outside" extends it beyond the layer's boundaries. The "Blend Mode" and "Opacity" settings within the Stroke layer style further refine how the stroke interacts with the underlying pixels and how visible it is, respectively.
When incorporating strokes, especially with text layers or background components, it's vital to ensure the stroke complements the other design elements. Experimenting with different colors, sizes, and positions is paramount to achieving the desired aesthetic. Gradients, for example, can add significant visual interest and depth. To apply a gradient stroke, navigate to the Layer Styles panel, select the "Stroke" option, and then choose "Gradient" as the "Fill Type." This opens up the Gradient Editor, where you can select from preset gradients or create your own custom color transitions.
10 TIPS for Awesome Layer Style Effects in Photoshop!
Troubleshooting Common Stroke Issues
Despite the intuitive nature of Photoshop's stroke features, users may occasionally encounter challenges. One common issue is when a stroke appears not to be applied correctly. In such cases, the first step is to verify that the correct selection or path has been made and is active before attempting to apply the stroke. Another potential problem relates to fill commands not uniformly covering the desired area. Inspecting the blend mode and opacity settings within the Fill dialog box or the Layer Style settings is often the solution.
If you find yourself unable to locate desired presets for strokes or fills, remember that Photoshop allows for the loading of additional preset libraries. Clicking the gear icon within the presets panel typically reveals an option to load or import your preferred libraries. For those looking to create pointed or custom-shaped strokes, using the Pen Tool to draw a path with sharp angles and then applying a stroke with a specific width and alignment can yield precise results.
A common point of confusion arises when the "Stroke" option appears greyed out. This usually indicates that the stroke is being attempted on an unsupported layer type. For instance, Smart Objects or certain locked layers might not permit direct stroke application. A common workaround for applying strokes to elements that don't directly support them, such as adjustment layers, is to place a regular layer underneath the unsupported layer and apply the stroke to that base layer using Layer Styles.
The Paint Bucket tool, while not directly a stroke tool, shares some conceptual similarities in that it fills areas. Its behavior is governed by settings like "Tolerance," which defines how similar in color value pixels must be to be filled, and "Anti-aliased," which smooths the edges of the fill. The "Opacity" of the paint applied also dictates how much of the underlying content shows through.
Advanced Techniques and Creative Applications
The versatility of Photoshop strokes extends to creative applications beyond simple outlines. Experimenting with various brush types and filters in conjunction with paths can lead to unique and visually impactful results. For example, selecting a textured brush and then stroking a path with it can create a more organic or artistic border. Applying filters to a layer after a stroke has been applied can further modify its appearance, adding effects like blur, distortion, or artistic stylizations.
For users of Photoshop Elements, the process of applying a stroke is similar, though the interface may differ slightly. The "Stroke" command in Photoshop Elements allows for painting a colored border around pixel content within a selected raster layer or around a specific selection. In the "Stroke" dialog box, users can input the desired pixel width, select the stroke's location (inside, center, or outside the selection edge), choose a blending mode, and set the opacity.
Ultimately, mastering Photoshop strokes involves a combination of understanding the fundamental tools and exploring the advanced customization options available through Layer Styles. By diligently experimenting with colors, sizes, positions, blend modes, and incorporating effects like gradients and textures, designers can effectively enhance their creations and achieve a wide array of sophisticated visual outcomes. The journey of learning Photoshop strokes is ongoing, with continuous exploration leading to new creative possibilities.