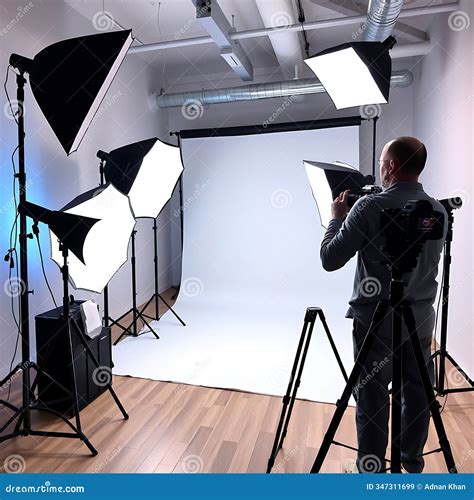
The allure of professionally polished headshots often conjures images of expensive studio setups and a plethora of physical backdrops. However, the reality for many photographers and individuals seeking impactful portraits is that the cost of acquiring and storing numerous physical backgrounds can quickly escalate beyond $2,000, not to mention the added expenses of shipping, taxes, and maintenance. Fortunately, a powerful and accessible alternative exists within the digital realm. With a few minutes of dedicated work in Adobe Photoshop, you can achieve virtually any desired background color, offering unparalleled flexibility and cost-effectiveness. This tutorial will guide you through the relatively easy process of changing the background color in a portrait, transforming your images with precision and creativity.
The Power of Digital Backgrounds: Cost and Convenience
The decision to embrace digital manipulation for headshot backgrounds is often driven by practical considerations. The initial investment in physical backdrops can be substantial, and as your needs grow, so does the demand for space and logistical management. Storing, transporting, and maintaining a variety of backdrops presents ongoing challenges. In contrast, Photoshop offers a solution that is both economically sound and incredibly efficient. Imagine the ability to conjure any color, any gradient, or even a subtle texture with just a few clicks, all without leaving your workstation. This digital approach not only saves significant financial resources but also liberates you from the constraints of physical limitations, allowing for an almost instantaneous transformation of your portrait's ambiance.
Step 1: Isolating the Background - Precision is Key
The foundation of any successful background alteration in Photoshop lies in accurately selecting the existing background. There are several methods to achieve this, each with its own strengths and ideal use cases.
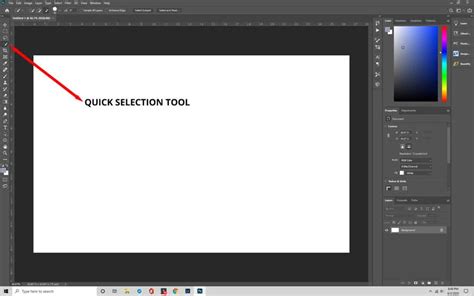
One approach involves utilizing the Quick Selection Tool. This intuitive tool allows you to manually paint over the background area you wish to select. While this method can be remarkably quick and effective, especially in situations where the subject's attire closely matches the backdrop or when other selection methods prove challenging, it can also be somewhat time-consuming depending on the complexity of the image and the intricacy of the subject's outline. Careful, deliberate strokes are often required to achieve a clean separation.
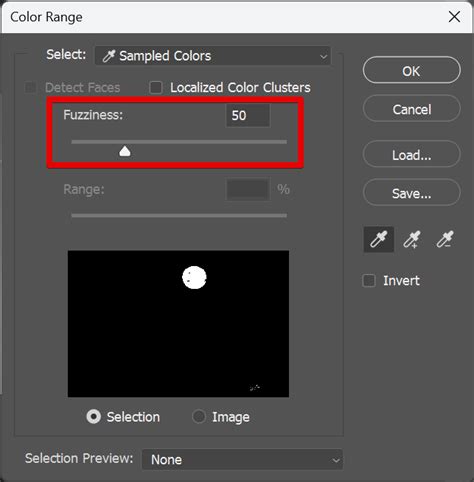
A more automated and often more precise method for color-based backgrounds is the Color Range selection. This feature, accessed through the "Select" menu, offers a sophisticated way to target specific colors. Upon activating Color Range, a dialog box will appear, presenting you with a crucial slider: Fuzziness. This slider dictates the tolerance of the selection - how much variation in color Photoshop will consider a match.
To initiate the Color Range selection, click on a central point of the background color within the dialog box. You will observe a red mask appearing on a preview of your image, indicating the areas that Photoshop has identified as matching the selected color. The Fuzziness slider then becomes your primary tool for refinement. By adjusting this slider, you can expand or contract the selection to encompass the entire background while simultaneously excluding the subject. The goal is to achieve a state where the background is clearly masked in white on the dialog box preview, and the subject remains entirely black, signifying a clean separation.
It's important to acknowledge that color overlap between the subject and the background can occur. This is where the Fuzziness slider truly shines. Experiment with its range to find the sweet spot that captures all the desired background tones without encroaching upon the subject. In instances where the subject might be wearing a color very similar to the background, or if the lighting creates subtle gradients that complicate the selection, the Quick Selection Tool might still be a valuable complementary tool to fine-tune the mask. Every photograph presents a unique puzzle, and adapting your selection strategy accordingly is crucial for achieving a natural-looking result.
Step 2: Constructing the Mask - The Digital Silhouette
Once you have achieved a satisfactory selection using either the Quick Selection Tool or Color Range, the next step is to convert this selection into a mask. After clicking "OK" in the Color Range dialog box or finalizing your Quick Selection, you will observe the characteristic "marching ants" - a dotted line encircling both the subject and the outer edges of the image. This indicates that Photoshop has registered your active selection.
At this stage, you will typically see a new layer appear in your Layers panel, which contains the silhouette of your subject as a mask. This mask is the digital equivalent of a stencil, precisely defining which parts of the image are visible and which are hidden. The mask is inherently linked to the layer it's applied to, meaning that any adjustments made to that layer will only affect the areas not masked out. This non-destructive workflow is a cornerstone of professional photo editing, allowing for easy revisions and experimentation without permanently altering the original image data.
Photoshop Layer Masks Explained in 2 Minutes
Step 3: Unleashing Creative Control - Transforming the Background Color
With the background cleanly isolated by the mask, the creative possibilities for altering its color are virtually limitless. The specific location of the controls for this adjustment might vary slightly depending on your personalized Photoshop interface configuration. However, the general pathway remains consistent. Look for the grayscale icon located adjacent to the silhouette of the mask on your layer. Clicking this icon will typically direct you to the Properties tab. If the Properties tab doesn't appear automatically, you can access it by navigating to the top menu and selecting Window > Properties.
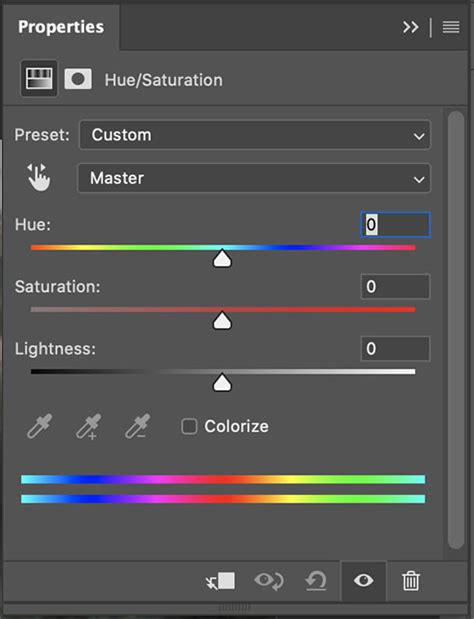
Within the Properties tab, you will discover three powerful sliders: Hue, Saturation, and Lightness. These sliders provide granular control over every facet of the background's color and intensity.
- Hue: This slider directly manipulates the color itself. Moving it up or down will shift the color through the spectrum (e.g., from blue to green, or red to purple).
- Saturation: This slider controls the intensity or purity of the color. Increasing saturation makes the color more vibrant and vivid, while decreasing it leads to a more muted, desaturated, or even grayscale appearance.
- Lightness: This slider adjusts the overall brightness or darkness of the color. Moving it upwards will make the color brighter, while moving it downwards will darken it.
To illustrate, consider an example. If the original background was a neutral gray and you desired a light blue, you would begin by adjusting the Hue slider. For instance, moving the Hue slider up to +147 might introduce a blue tone. However, this initial blue might appear too intense. To rectify this, you would then decrease the Saturation slider, perhaps to -14, to soften the color's vibrancy. If the resulting blue still feels too bright, a slight adjustment to the Lightness slider, perhaps down to -8, can create a more subtle and natural-looking hue.
It is crucial to understand that the optimal settings for these sliders will vary significantly with each photograph. Factors such as the original background color, the subject's colors, the lighting conditions, and the desired final aesthetic all play a role. Therefore, experimentation is key. Play around with the sliders, observe the immediate impact on your background, and don't be afraid to make small, incremental changes. Each minor adjustment can contribute significantly to making the new background color appear seamlessly integrated and natural. With practice, this process becomes remarkably swift, and the muscle memory developed through repetition makes the technique nearly unforgettable.
Beyond Solid Colors: Advanced Background Techniques
While solid color backgrounds are a popular and effective choice for headshots, Photoshop's capabilities extend far beyond single hues. The principles of selection and masking can be applied to introduce more complex and nuanced backgrounds, enhancing the depth and context of your portraits.
When working with digital photo backgrounds, the process is straightforward and offers immense flexibility. Begin by opening your portrait in Photoshop and performing any necessary basic edits, such as exposure adjustments, white balance correction, or minor retouching. This ensures your subject is as polished as possible before introducing a new background.
Next, browse your collection of digital photo backgrounds. Consider the mood, lighting, and perspective of your portrait when selecting a complementary background. A subtle bokeh effect can add a sense of depth, while a textured background might introduce a more artistic feel.
Once you have chosen a suitable background image, drag and drop it into your Photoshop document. Crucially, position this new background layer behind your subject layer in the Layers panel. This arrangement ensures that your subject remains the focal point.
The process of cleanly separating your subject from its original background, as detailed in the previous steps, is paramount here. Whether you use a layer mask or sophisticated selection tools, the goal is to create a crisp, clean edge around your subject.
After the subject is isolated, you may need to fine-tune the appearance of the new background to ensure it harmonizes with your subject. Adjust its brightness, contrast, and color balance to match the lighting and color temperature of your portrait. This integration is vital for creating a believable composite image.
In many cases, the digital background might appear too sharp or distinct from the subject. To achieve a more natural look, consider applying a slight Gaussian Blur to the background layer. This subtle softening helps to mimic the natural depth of field found in photography, where elements further from the focal plane appear less sharp. Furthermore, for an added touch of realism, you can introduce subtle shadows or depth effects. This might involve creating a soft shadow cast by the subject onto the background, further grounding them within the scene and enhancing the perceived three-dimensionality of the portrait.

The ability to seamlessly blend a new background with your subject is a testament to Photoshop's power. By mastering selection, masking, and color adjustment techniques, you can transform ordinary headshots into compelling portraits that convey a specific mood or narrative, all while maintaining a professional and polished aesthetic. The digital approach not only democratizes high-quality portraiture but also provides an expansive creative canvas limited only by your imagination.
Considerations for Realistic Integration
Achieving a truly convincing digital background replacement involves more than just selecting and coloring. Several subtle factors contribute to the overall realism of the final image.
Lighting Consistency: The most critical element is ensuring the lighting on your subject matches the lighting of the new background. If your subject is brightly lit from the front, and the new background appears to be lit from the side or is significantly darker or lighter, the composite will look artificial. Pay close attention to the direction and intensity of light sources in both your subject and your chosen background. You may need to use Photoshop's Dodge and Burn tools or adjustment layers to subtly alter the lighting on your subject to better match the background, or vice versa.
Color Casting: Light sources often impart a subtle color cast onto their surroundings. If your original background had a warm tone due to incandescent lighting, and you replace it with a cool-toned digital background, your subject might appear to have an unnatural color balance. Conversely, if your new background has a strong color cast (e.g., a vibrant blue), you might need to subtly introduce a hint of that color onto the edges of your subject, especially areas like hair, to suggest that the ambient light from the background is influencing the subject. This is often achieved through selective color adjustments or by using blending modes on a new layer.
Depth of Field: As mentioned earlier, the perceived sharpness of the background relative to the subject is crucial. In most portrait photography, the background is rendered slightly out of focus to help the subject stand out. If your original subject was shot with a very deep depth of field (meaning everything is in focus), and you introduce a background with a very shallow depth of field (heavily blurred), the contrast can be jarring. Applying a subtle blur to the background is often the easiest way to compensate. However, if your subject is also very sharp, you might need to consider if the original capture method is ideal for the background you intend to use.
Shadows and Highlights: The interplay of light and shadow is what gives an image its sense of dimension. If your subject appears to be casting a shadow onto the background, ensure this shadow is consistent with the lighting direction of the new background. Similarly, if the background has strong highlights, consider if there should be any subtle reflections or highlights on the subject that would naturally occur in such an environment.
Resolution and Detail: Ensure that the resolution of your chosen digital background matches or exceeds the resolution of your subject image. Using a low-resolution background with a high-resolution subject will result in a noticeably pixelated or soft background that detracts from the overall quality. Pay attention to the level of detail as well. If your subject is highly detailed, a very simple or abstract background might work well. However, if the background is a complex scene, ensure it doesn't visually compete with or distract from the subject.
By thoughtfully considering these elements, you can move beyond a simple color swap and create headshots with digital backgrounds that are not only visually appealing but also remarkably convincing and professional. The flexibility of Photoshop empowers you to craft the perfect environment for your subject, enhancing their presence and the overall impact of the portrait.
tags: #photoshop #headshot #background