Photoshop's interface can appear daunting at first glance, resembling a complex cockpit with a multitude of tools and options. However, understanding its fundamental components is the key to unlocking its immense creative potential. This guide will demystify Photoshop's workspace, from its core tools and panels to the nuances of screen modes and document management, empowering users of all levels to navigate and utilize the software with confidence.
A General Tour of Photoshop's Features
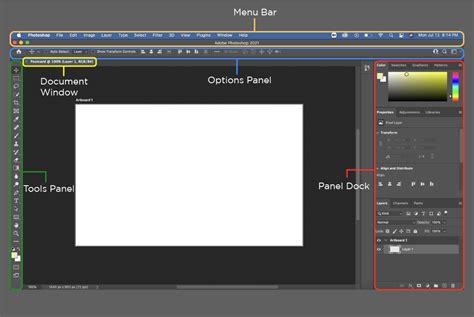
When you first open Adobe Photoshop, you are greeted with a comprehensive environment designed for image manipulation and creation. This interface is built to provide access to a vast array of features, allowing for intricate editing and sophisticated design. The core of the workspace revolves around several key elements: the canvas, where your creative work takes shape; the toolbar, housing all your essential editing instruments; the options bar, which dynamically adapts to your selected tool; and various panels that manage layers, colors, brushes, and more.
Photoshop Interface Tutorial for Beginners | Everything YOU need to KNOW!
The Canvas: Your Creative Playground
The most crucial element of Photoshop's interface is the canvas. This is where all the magic happens - where you draw, paint, design, and edit your images. It's essential to recognize that the canvas is the primary focus, and you should aim to dedicate approximately 90% of your attention and effort to this area. Think of the canvas as the windshield of a car; it provides the clearest view of what's most important - your image, the "road" you're navigating.
The Toolbar: Your Arsenal of Tools
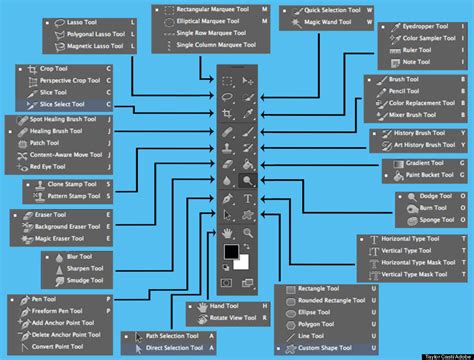
Located by default on the left side of your workspace, the toolbar is a collection of all the tools Photoshop offers. These range from selection tools and painting brushes to retouching instruments and text creators. Efficiency in Photoshop often dictates using keyboard shortcuts to access these tools rather than physically moving your mouse cursor to the toolbar. For instance, pressing 'B' instantly activates the Brush tool.
Navigating and Customizing the Toolbar
Photoshop intelligently nests similar tools together within the Toolbar to conserve screen real estate. This means multiple related tools might share a single shortcut key. For example, the Lasso, Polygonal Lasso, and Magnetic Lasso tools are often grouped under the 'L' shortcut. To cycle through these nested tools, you can press and hold the 'Shift' key in combination with the tool's shortcut (e.g., Shift + L).
If a tool lacks a shortcut, or you wish to assign a different one, you can customize it. Navigate to Edit > Toolbar to access the toolbar editor. Here, you can assign custom shortcuts by clicking in the empty space next to a tool's name. The Toolbar itself can also be displayed as a single or double column, a useful option if you prefer to have a wider array of tools visible simultaneously.
Furthermore, several tools can be temporarily toggled to another related tool by holding down a modifier key. For instance, holding Command (Mac) | Control (Win) can switch between the Slice and Slice Select tools, or the Path and Direct Selection tools. Similarly, Option (Mac) | Alt (Win) can toggle between the Sharpen and Blur tools, or the Dodge and Burn tools.
Spring-Loaded Cursors and Tool Presets
A powerful feature for dynamic workflows is the "Spring Loaded Cursors." By pressing and holding the shortcut key for a tool, you can temporarily access it. Upon releasing the key, Photoshop automatically reverts to your previously selected tool. This is incredibly useful, for example, when painting. If you need to rotate the document for a more natural hand position using the Rotate View tool, you can press and hold 'R' (its shortcut). After rotating and releasing 'R', you'll return to your Brush tool without having to manually reselect it.
Resetting tools to their default settings is also straightforward. If a tool isn't behaving as expected, right-click (or Control-click on Mac) the tool's icon in the Options bar (which also serves as the Tool Preset Picker). You'll find options to "Reset Tool" or "Reset All Tools." This is invaluable for troubleshooting issues that might arise from accidentally altering a tool's blend mode, feathering, or other options.
Toggling Tool and Panel Visibility
To maximize canvas space, you can quickly hide or show the Toolbar and panels. Tapping the Tab key toggles the visibility of both. A further Shift + Tab combination hides only the panels, leaving the Toolbar visible. When panels are hidden, positioning your cursor at the edge of the screen will temporarily reveal them, allowing you to access necessary tools and options. Moving the cursor away will automatically hide them again.
The Options Bar: Contextual Controls
Situated directly below the main menu, the options bar is a dynamic element that changes its content based on the currently selected tool. For example, when the Brush tool is active, the options bar will display settings related to brush size, hardness, opacity, and flow. When you switch to the Type tool, the options bar will present font choices, size, color, and alignment options. This contextual nature means the options bar is a critical area for fine-tuning the behavior of each tool.
Panels: The Command Center for Your Workflow
Most of the intricate work done in Photoshop is managed through its various panels. These panels are the building blocks of the interface, offering specialized controls for different aspects of image editing. There are panels for managing layers, selecting colors and brushes, working with text, adjusting image properties, tracking history, and much more.
Understanding and Arranging Panels
The Layers panel, typically found on the right side of your screen, is arguably the most fundamental. It displays all the layers in your document, allowing you to organize, group, and edit them independently. If you don't see the Layers panel, you can enable it by going to Window > Layers.
Photoshop offers a high degree of flexibility in how you arrange these panels. You can detach them from their default positions, allowing them to float freely on your screen, or dock them to different sides of the workspace. To dock a panel, drag its tab or the grey bar at the top of the panel to a desired location. A cyan highlight will indicate where the panel will be placed upon release. Docking panels close to the toolbar, for instance, can save significant time by reducing mouse travel across your monitor.
Some panels, like the Properties panel, can be set to "Auto-Collapse Iconic Panels." When enabled, these panels automatically collapse to their icon view after you perform an action or select a different tool, freeing up valuable screen space.
Customizing Your Workspace
A "workspace" in Photoshop is essentially a saved layout of the interface, including the arrangement and visibility of panels, the toolbar configuration, and even custom menu items and keyboard shortcuts. Photoshop comes with several pre-built workspaces like "Essentials," "Photography," "Painting," "Motion," and "Graphic and Web." The "Essentials" workspace is a good starting point for new users. If your Photoshop interface looks different from expected, you can reset the "Essentials" workspace by going to the top right of the screen and selecting "Reset Essentials."
You can tailor these workspaces to your specific needs. For example, the panels required for compositing images differ greatly from those used for typography. By configuring the panels you frequently use for a particular task and saving this arrangement as a custom workspace, you can quickly recall it whenever needed. To create a custom workspace, arrange your panels as desired, then use the Workspace Picker (located on the right of the options bar) and select "New Workspace." Give it a descriptive name and save it. For added flexibility, custom workspaces can also incorporate custom keyboard shortcuts and menu items. Workspaces can also be saved via Window > Workspace > New Workspace.
Assigning custom keyboard shortcuts to toggle between your saved workspaces can further enhance efficiency. Navigate to Edit > Keyboard Shortcuts (or Window > Workspace > Keyboard Shortcuts & Menus), select "Shortcuts For: Application Menus," expand the "Window" disclosure triangle, and locate your custom workspace to assign a shortcut.
Efficient Data Entry and Value Adjustment
Photoshop provides several intuitive methods for entering values and adjusting settings within panels and dialog boxes. For most numeric entry fields, clicking on the text label next to the field (e.g., "Feather") will highlight the associated input box, making it easier to type in your desired value. The Tab key allows you to move between these input boxes. Once a field is highlighted, the up/down arrow keys can increment or decrement the value by one unit, while holding Shift with the arrow keys increases or decreases the value by ten units.
"Scrubby Sliders" offer another efficient way to adjust values. When the "Scrubby Sliders" icon (a hand with left and right arrows) appears by hovering over a numeric field's label, you can click and drag left or right to decrease or increase the value. This provides a visual and tactile way to fine-tune settings.
When dealing with width and height values in dialog boxes (like "New File" or "Image Size"), changing the unit of measurement for one dimension will automatically apply the same unit to the other, ensuring consistency.
Renaming Items and Working with Color
Renaming layers, brushes, or other items within panels is as simple as double-clicking the thumbnail or the name of the item. This allows for clear organization and identification of your project elements.
The color boxes, prominently displayed, represent your Foreground and Background colors. These are fundamental to many tools, dictating the color of strokes, fills, and selections.
Managing Multiple Documents and Screen Modes
Photoshop's ability to handle multiple documents and display them in various ways is a significant strength, particularly when blending and compositing images.
Multi-Document Layouts
By default, Photoshop opens each new image in its own separate tabbed document. This allows for easy switching between different projects. However, you can also arrange these documents in different layouts. To view two or more images at once, you can use the Window > Arrange menu. Options like "Float in Windows" or "Float All in Windows" allow you to display documents as individual, resizable windows. This can be particularly useful for moving elements or comparing images side-by-side.
To move an image or content from one document to another, you can simply select the desired content, copy it (Ctrl+C or Cmd+C), switch to the target document, and paste it (Ctrl+V or Cmd+V).
Screen Modes for Optimal Viewing
Screen Modes in Photoshop are designed to maximize the viewing area for your image by selectively hiding parts of the interface. Tapping the F key cycles through different screen modes:
- Standard Screen Mode: Displays the application frame, menu bar, options bar, panels, and the canvas.
- Full Screen Mode with Menu Bar: Hides the panels and toolbar, but keeps the menu bar visible.
- Full Screen Mode: Hides all interface elements, allowing your image to occupy the entire screen. This provides the most immersive viewing experience.
Tapping F again cycles through these modes, and Esc will always return you to the Standard Screen Mode.
Customizing Interface Brightness and View Options
Photoshop offers four "Color Themes" or levels of interface brightness, allowing you to customize the appearance to your preference. You can change these by going to Preferences > Interface > Appearance and selecting from the available color swatches. The default setting is typically the second-to-darkest theme.
For controlling the visibility of non-printing elements and guides on your canvas, you can use Command + H (Mac) | Control + H (Win). This shortcut toggles the visibility of features like selection edges, target paths, Smart Guides, and the Pixel Grid. Be aware that the first time you use Command + H on macOS, Photoshop will prompt you to choose between "Hide Extras" (the Photoshop traditional behavior) or "Hide Photoshop" (the Mac standard behavior). Choosing "Hide Extras" is generally recommended for image editing workflows.
Application Frame (Mac Only)
On Mac, the Application Frame is enabled by default. This feature groups all Photoshop windows, including the menu bar and toolbars, within a single resizable frame. This helps to declutter your workspace by hiding other open applications. You can toggle the Application Frame on or off via Window > Application Frame. If you need to display Photoshop alongside another application, you can resize the Application Frame by dragging its edges.
Enhancing Productivity and Workflow
Beyond the fundamental layout, Photoshop offers numerous features and shortcuts designed to streamline your workflow and boost productivity.
Context-Sensitive Menus
Right-clicking (or Control-clicking on Mac) within the image area or on a panel brings up "context-sensitive" menus. These menus dynamically change their options based on the active tool and the clicked area. For example, when the Move tool is selected, the context menu might list the layers beneath your cursor, allowing for quick layer selection.
Quick Access to Document Information
The Status Bar at the bottom of the document window provides quick access to essential document information, such as the Document Size.
Increasing Photoshop's Font Size
If the interface text appears too small, you can adjust the UI font size. Navigate to Preferences > Interface > Presentation, set the "UI Font Size," and enable "Scale UI To Font" to ensure the entire interface scales accordingly.
Cycle Through Nested Tools
As mentioned earlier, similar tools are often nested. To cycle through them using the same keyboard shortcut, hold Shift while pressing the shortcut. For tools without assigned shortcuts, or if you wish to change them, use Edit > Toolbar.
Tools That Toggle
Certain tools can be temporarily toggled to a related function by holding modifier keys. For example, holding Command (Mac) | Control (Win) can switch between Slice and Slice Select tools, and Option (Mac) | Alt (Win) can toggle between Sharpen and Blur tools.
Resetting Tools
If a tool is misbehaving, right-click its icon in the Options bar and choose "Reset Tool" or "Reset All Tools" to revert its settings to default.
Assigning Keyboard Shortcuts to Tool Options
Some tool options can be assigned custom keyboard shortcuts by going to Edit > Keyboard Shortcuts and selecting "Shortcuts For: Application Menus."
Toggling Document Views
To quickly switch between viewing a single document and seeing all open documents tiled, you can assign custom keyboard shortcuts to the "Tile" and "Consolidate All to Tabs" commands found under Edit > Keyboard Shortcuts.
Hiding Menu Items
If you find the main menu overwhelming, you can hide unused menu items. A "Show All Items" command will be added to the bottom of the menu for easy access to hidden options.
Learning and Mastering Photoshop
The most effective way to learn Photoshop is through hands-on practice. Don't be afraid to experiment with different tools, panels, and settings. Keyboard shortcuts are invaluable for speeding up your workflow and should be learned as you progress. Remember that any workspace can be reset, so there's no risk in moving modules around to find a layout that matches your thinking process.
The interface, while initially complex, is designed to be logical and adaptable. By understanding these core components and utilizing the customization options available, you can transform Photoshop from an intimidating program into a powerful and intuitive creative partner.
tags: #photoshop #interface #screenshot