Have you ever wondered if there's a faster way to draw luscious forest backgrounds in Procreate? Want to download some ready-made pine tree stamp Procreate brushes? If you're learning how to use Procreate, understanding its brush system is key to unlocking your artistic potential. This tutorial will guide you through the process of creating and utilizing custom nature brushes in Procreate, focusing on replicating elements like pine trees and enhancing your landscape artwork. We will delve into the intricacies of the Brush Studio, explore Procreate's built-in brush sets, and discuss efficient ways to manage your digital art tools.
Creating Custom Stamp Brushes in Procreate
One of the most powerful features of Procreate is its ability to create custom brushes. This allows for a highly personalized workflow, enabling artists to develop tools that perfectly suit their style and needs. For nature-themed art, custom stamp brushes can be invaluable for quickly adding elements like trees, leaves, or rocks.
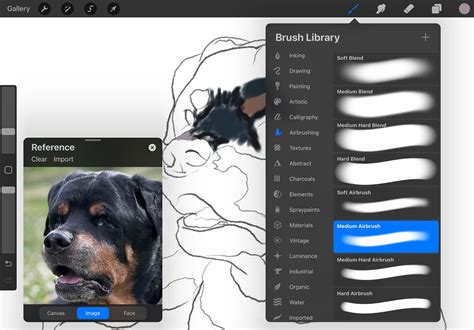
To begin, open up Procreate and tap the + icon in the top-right corner. This will create a new canvas, which you will need to do in order to access the Brush Library. Once your canvas is open, tap on the brush icon at the top right of the screen. This opens the Brush Library, where you can browse existing brushes or create new ones.
The first step in creating a custom stamp brush is defining its shape. For instance, if you want to create a pine tree stamp, you'll need to draw a white silhouette of a pine tree on your canvas. The shape must be white before importing it into the Brush Studio. Once you have your white shape, tap 'Create new brush' to create a new brush and open up the Brush Studio to customize your new brush.
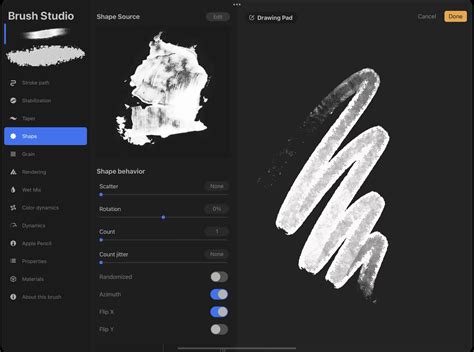
Within the Brush Studio, navigate to the "Shape" section of the menu. Here, you'll tap "Edit" and then "Import" to bring in your custom shape. Select "Import a file" and choose the white tree shape you created. The tree shape will now be imported into the brush shape. It's now time to start editing the rest of the settings to create a stamp brush.
The "Spacing" slider in the "Stroke Path" section determines how frequently the brush shape is stamped along a path. A larger spacing value means more space between each stamp, which is ideal for creating distinct elements like individual trees. If you'd like to test out your brush as you edit the settings, you can do this by drawing on the "Drawing Pad," which is located to the left of the screen in the Brush Studio.
Next, select the "Apple Pencil" section of the menu. You will need to disable the "Opacity" setting by moving the slider down to "None." This ensures that each stamp has a consistent opacity, preventing lighter stamps from appearing when the stylus pressure is reduced.
Now we can head to the "Properties" section of the menu. Here, we are going to move the "Smudge" slider to "None." This is crucial for stamp brushes, as smudging can distort the intended shape. We are then going to move the "Maximum size" to "Max" and the "Minimum size" to "None." This ensures that the stamp brush will appear at its full size whenever it is used, without scaling down unexpectedly.
The last crucial step is to name your brush. Head to the "About this brush" section of the menu and tap on the text circled in red to rename your brush. A descriptive name, such as "Pine Tree Stamp," will make it easier to find later.
Utilizing and Organizing Procreate Brushes
Once you've created your custom brushes, or downloaded pre-made ones, understanding how to use and organize them becomes paramount for an efficient workflow. Procreate offers robust tools for managing your brush libraries.
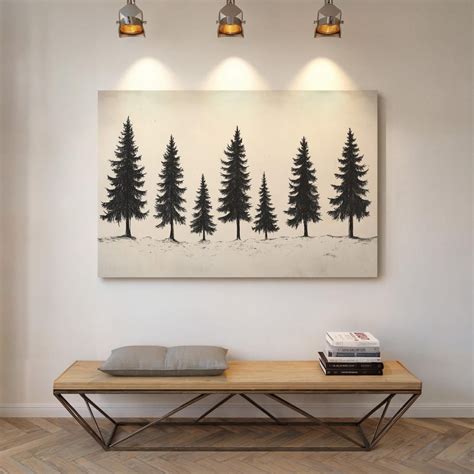
To use your newly created pine tree stamp, select it from the Procreate Brush Library. You can then tap on the canvas to place a tree. For creating backgrounds, it's often beneficial to layer elements. Add the first row of trees in a dark shade of green. Create a new layer behind the first row of trees, and make the brush color a few shades lighter and decrease the size slightly. This layering technique adds depth and realism to your forest scenes.
FULL Winter Street Painting PROCESS [PROCREATE TIMELAPSE]
Procreate's brush organization is now integrated with the iPad's Files app. Brush libraries are stored either in "On My iPad" → "Procreate" → "Brushes" or "iCloud Drive" → "Procreate Brushes," depending on your storage settings. You can import individual .brush files by bringing them into a brush set folder in the Files app. Because brushes, brush sets, and brush libraries are now files and folders, certain characters cannot be used in names due to operating system restrictions. When you make changes to brushes in Procreate, the changes will also be reflected in the Files app, and vice versa.
There are two primary ways to access your brush libraries: through the Brush icon in Procreate's interface, or by navigating directly within the Files app. To import a brush library from the Files app, locate the .brushset or .brushlibrary file and tap on it. Procreate will automatically import it into your library. You can rename your brush library by tapping on it twice in the Files app and selecting "Rename," or by going to the "About this brush" section in Brush Studio for individual brushes. Deleting a brush library or set is also done through the Files app or by swiping left on the brush/set in Procreate and selecting "Delete." Always ensure you have backed up any important brushes before deleting them, as deletion is permanent from both Procreate and Files.
You can find your "Recent" brushes at the top of the brush library sets. Access these by tapping "Paint," "Smudge," or "Erase," and then tapping "Recent." To find the original set a brush in "Recent" belongs to, swipe left on the brush and tap "Find." You can also "Pin" a brush to keep it permanently at the top of your "Recent" set by swiping left and tapping "Pin." Pinned brushes are identifiable by a pin symbol. To remove a pinned brush or delete any brush from "Recent," swipe left and tap "Clear."
Exploring Procreate's Built-in Brush Sets
Procreate comes with a comprehensive library of 18 handcrafted brush sets designed to offer a wide range of useful tools for various artistic styles. Experimenting with these sets is crucial to understanding their capabilities and finding those that best complement your workflow.
- The General Set: This set is for clean and simple, mostly rounded brushes, suitable for a variety of tasks.
- The Ink Set: Your go-to for comic or manga-style brushes with inks, halftones, and more.
- The Artistic Set: Clean and purpose-built to allow for projects with a more technical lean, designed for practical drawing, planning, sketching, and quick studies.
- The Painting Set: This set of brushes offers a range of rendering brushes for artistic drawing.
- The Dry Media Set: Ideal for cleaning up artwork and drawing in ink-centric styles like sumi-e.
- The Wet Media Set: These brushes encompass a range of realistic and digital painting effects.
- The Elements Set: This selection of brushes covers mediums from acrylic to stucco to oil.
- The Texture Set: Texture is the focus of this fascinating brush set. These brushes offer a range of effects from watery to clumpy.
- The Typography Set: These brushes all have Streamline enabled, allowing letterers to create smooth and even calligraphic forms.
- The Essentials Set: A staple of classic digital art, these brushes lay down large areas of texture fast.
- The Creative Set: This playful set demonstrates the unique capabilities of Procreate’s versatile Brush Studio. Included are brushes that change color, create smoky effects, and generate chaotic shapes.
- The Rendering Set: A variety of Material brushes featuring metallics and roughness created for 3D Painting.
- The Effects Set: This mind-blowing brush takes full advantage of the power of digital art, designed to add realistic grunge textures to your art.
- The Organic Set: The Organic brush set offers all things natural. It includes a range of scatter brushes to add grass, leaves, and bark textures to concept pieces. It also offers brushes that mimic the strokes created by handmade mediums.
- The Watercolor Set: This set offers several realistic watercolour brushes.
Beyond these core sets, Procreate offers the ability to create new brush sets and import them from external sources. To create a new brush in your current brush set, tap the '+' icon within the Brush Library. To create a new brush set, tap the '+' icon at the top of the brush set list. You can also import new brushes from outside the app by locating a .brush, .brushset, or .brushlibrary file in the Files app. A set called "Imported" is created when you import a single brush.
Advanced Brush Management and Sharing
Procreate's integration with the Files app extends to advanced management features like duplicating, moving, and sharing brushes and brush sets.
To duplicate a brush, swipe left on it in the Brush Library and tap "Duplicate." To duplicate a brush set, tap it twice (or tap and hold) and select "Duplicate." An exact copy of the set will appear below the original. Renaming can be done directly in the Brush Studio's "About this brush" section or through the Files app.
Sharing individual brushes or entire custom brush sets is straightforward. Swipe left on the brush thumbnail and tap "Share." To share a custom brush set, tap it twice and select "Share." This is incredibly useful for collaborating with other artists or backing up your creations.
If you are looking to back up your brushes or brush sets, consider saving them to an iPad-compatible external hard drive or a dedicated spot in a cloud service.
Moving brushes and brush sets between libraries is also streamlined. Tap and hold the brush or brush set you want to move; after a moment, it will ‘lift up’ and fade slightly. You can then drag it to its new location. To move multiple items, pick up the first item, and with another finger, tap any other items you want to add to the stack. A green icon will indicate the number of items in your stack. When you move brushes and brush sets in Procreate 5.4 and above, this completely moves the files across to their new positions; it does not copy them.
However, there's a nuance when copying brushes within the same library: if you hover brushes over the title of a brush set and drop them on the title itself, this action will copy the brushes and place those copies in the set. This is the only instance where a brush is copied across instead of moving completely.
Tips for Creating Realistic Nature Scenes
Creating believable nature scenes in Procreate involves more than just placing individual elements. It's about understanding light, shadow, depth, and texture.
When using your pine tree stamp brushes, vary their size and placement to avoid a repetitive look. Consider rotating them slightly to break up uniformity. For added depth, place darker, larger trees in the foreground and lighter, smaller trees in the background. You can also use the smudge tool with a textured brush to softly blend distant trees, creating atmospheric perspective.
FULL Winter Street Painting PROCESS [PROCREATE TIMELAPSE]
Think about the environment. Are the trees in a dense forest, or are they scattered across an open field? This will influence the lighting and the density of the undergrowth. Use different brush sets for different elements. For instance, the "Organic" set is excellent for adding grass, leaves, and bark textures. The "Watercolor" set can be used to create soft, atmospheric backgrounds or dappled light effects filtering through the trees.
Remember to utilize layers effectively. Separate elements like the sky, distant mountains, mid-ground trees, and foreground foliage onto different layers. This allows for easier adjustments and editing without affecting other parts of your artwork.
The "Elements" set offers brushes that can mimic various mediums, which can be useful for adding unique textures to tree bark or rocky surfaces. For instance, a stucco-like brush might be perfect for rough bark, while a more fluid brush could represent moss or damp surfaces.
Ultimately, the most effective way to create natural-looking scenes is through practice and experimentation. Download various brush packs, explore Procreate's built-in options, and don't be afraid to create your own custom brushes tailored to the specific elements you frequently draw. The Envato Tuts+ YouTube channel is a fantastic resource for discovering new techniques and downloading ready-made brush sets that can significantly speed up your workflow and enhance the quality of your digital art.