This tutorial is designed for beginners and offers a straightforward approach to transforming any photograph into a convincing jigsaw puzzle effect within Adobe Photoshop. We will guide you through each step, from preparing your image to adding realistic details like shadows and detached pieces. This process leverages Photoshop's built-in filters and a readily available texture to achieve a professional-looking result with relative ease. While the process is accessible, proficiency with the Pen Tool is beneficial for more advanced manipulation of puzzle pieces.
Preparing Your Workspace and Image
Before we begin manipulating the image, it's crucial to set up our Photoshop environment correctly. We'll start by opening the provided image, in this case, "Beach," and then create a foundational layer for our puzzle effect.

To establish a base, create a new layer by pressing Ctrl + Shift + Alt + N (Windows) or Cmd + Shift + Option + N (Mac). Fill this newly created layer with a light gray color, using the hex code #a2a2a2. This gray layer will serve as a consistent background and will be instrumental in later steps for masking.
Next, we need to convert the "Background" layer, which is a special, locked layer in Photoshop, into a regular, editable layer. Double-click on the "Background" layer in the Layers palette. A "New Layer" window will appear; simply press "OK" to convert it. This action unlocks the layer, allowing for more flexible editing. It's good practice to rename this layer to something descriptive, such as "Puzzle."
Applying the Jigsaw Texture
The core of our puzzle effect relies on applying a jigsaw texture to the image. Photoshop includes a useful texture for this purpose, but it needs to be loaded manually.
First, navigate to the provided link to download the necessary plugins folder. Once downloaded, open the archive. Inside, locate and open the "Presets" folder. Within "Presets," you will find a file named "Puzzle.psd." This file contains the texture we need.
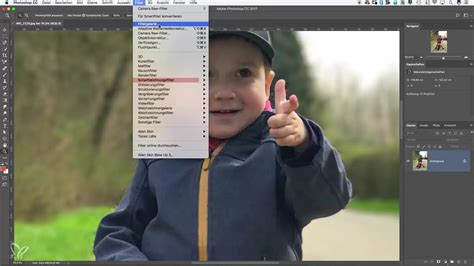
Return to your Photoshop document with the beach image. Ensure the "Puzzle" layer is selected. Go to Filter > Filter Gallery. In the Filter Gallery window, navigate to Texture > Texturizer. Click the small arrow icon pointing downwards next to the "Texture" dropdown menu. Select "Load Texture" from the options. This will open a dialog box where you can navigate to the texture file.
The "Puzzle" texture is typically located within your Photoshop installation directory. On Windows, this is usually C:\Program Files\Adobe\Photoshop [Version Name]\Presets\Textures. On a Mac, it's often found within your Applications folder under Adobe Photoshop [Version Name]\Presets\Textures. Once you've located the "Puzzle" texture, select it and click "Open."
With the "Puzzle" texture loaded, the "Texture" option in the Texturizer dialog should now display "Puzzle." Adjust the settings to your preference. For a more pronounced puzzle piece appearance, consider setting "Scaling" to 200% and "Relief" to 6. These values can be fine-tuned based on your image and desired effect. Click "OK" to apply the texture to your "Puzzle" layer.
Creating and Detaching Puzzle Pieces
Now that the jigsaw texture is applied, we need to simulate the appearance of a partially completed puzzle by removing or repositioning some pieces. This involves creating selections and manipulating layers.
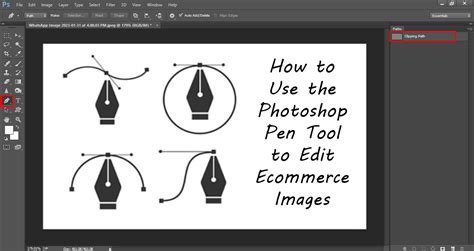
To begin hiding pieces, we'll use a layer mask. First, let's hide all pieces in the upper and left rows. To do this, we need to create a selection. This advanced selection method utilizes the Pen Tool. If you are unfamiliar with the Pen Tool, it is recommended to follow a separate tutorial on its usage.
Press D to reset your foreground and background colors to their default black and white. Click on the layer mask icon of your "Puzzle" layer to make it active. Using the Pen Tool, create a path around the areas you wish to hide, such as the upper row of puzzle pieces. Once the path is complete, convert it into a selection by pressing Ctrl + Enter (Windows) or Cmd + Return (Mac). With the selection active and the layer mask selected, fill the selected area with black by pressing Ctrl + Backspace (Windows) or Cmd + Delete (Mac) while black is the foreground color. This will effectively hide those puzzle pieces. Repeat this process for the left row of pieces.
To make the puzzle look even more realistic, let's detach individual pieces and have them appear to float above the main puzzle. Select the "Puzzle" layer. Use the Pen Tool to draw a precise path around a single puzzle piece you wish to detach. Zoom in using Ctrl + Spacebar (Windows) or Cmd + Spacebar (Mac) for accuracy. Once the path is drawn, convert it to a selection (Ctrl + Enter or Cmd + Return).
With the piece selected, press Ctrl + J (Windows) or Cmd + J (Mac) to create a new layer from this selection. This command copies the selected puzzle piece onto a new layer, above the "Puzzle" layer. Rename this new layer to something like "Puzzle1."
Learn The Pen Tool In Photoshop - All You Need To Know!
It's important to hide this detached piece from the original "Puzzle" layer to avoid duplication. Click on the "Puzzle" layer to select it, then click on its layer mask to make it active. Using the Pen Tool, create a selection of the area where the piece was originally located. With the layer mask active and the selection made, fill this area with black (Ctrl + Backspace or Cmd + Delete). If you turn off the visibility of the "Puzzle1" layer, you will see that the hole has been successfully created in the "Puzzle" layer.
Create three more detached puzzle pieces by repeating steps 12 to 14 (creating a selection with the Pen Tool, copying to a new layer with Ctrl + J/Cmd + J, renaming, and then masking the original area on the "Puzzle" layer). Name these new layers "Puzzle2," "Puzzle3," and "Puzzle4." Remember to mask out the original positions of these pieces on the "Puzzle" layer by filling the selection with black on its layer mask.
Arranging and Enhancing Detached Pieces
With our detached puzzle pieces created, we can now position them to create a more dynamic and realistic effect.
Select the "Puzzle1" layer. Press Ctrl + T (Windows) or Cmd + T (Mac) to activate the Free Transform tool. This will bring up a bounding box around the puzzle piece. You can now rotate the piece by clicking and dragging outside the bounding box, or move it by clicking and dragging inside the box. Position "Puzzle1" where you want it to appear, perhaps slightly askew or rotated. Press Enter (Windows) or Return (Mac) to commit the transformation.
Repeat this transformation process for "Puzzle2," "Puzzle3," and "Puzzle4." Experiment with different rotations and positions for each piece to create a visually interesting arrangement. You can place them overlapping, scattered, or even partially off the main puzzle area.
Adding Realistic Shadows
To give the detached puzzle pieces a sense of depth and make them appear to float above the main puzzle, we need to add shadows.
Create a new layer by pressing Ctrl + Shift + Alt + N (Windows) or Cmd + Shift + Option + N (Mac). Name this layer "Shadow." Fill this new layer with black by pressing Ctrl + Backspace (Windows) or Cmd + Delete (Mac) if black is your foreground color.
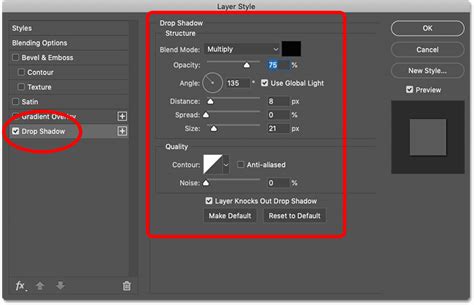
Double-click the "Shadow" layer to open the Layer Style dialog box. Select "Drop Shadow" from the options in the middle column. Adjust the settings for a realistic shadow: lower the "Opacity" to around 60% to make the shadow less intense. Uncheck "Use Global Light" and set the "Angle" to 120°. Increase the "Distance" to approximately 16 px and the "Size" to also around 16 px. Click "OK" to apply the shadow effect.
Now, we can efficiently apply this same shadow effect to each of the detached puzzle pieces. Instead of re-applying the settings for each layer, you can simply hold down the Ctrl key (Windows) or Cmd key (Mac), click and drag the "fx" icon (representing the layer style) from the "Shadow" layer onto each of the "Puzzle1," "Puzzle2," "Puzzle3," and "Puzzle4" layers in the Layers palette. This copies the exact drop shadow effect to all the pieces, ensuring consistency.
Refining the Puzzle Effect (Optional Enhancements)
For an even more refined and dynamic look, you can consider removing additional pieces or creating a border effect.
If you wish to remove more pieces entirely from the main puzzle, ensure you have the "Puzzle" layer selected. Use the Pen Tool to create a selection around a piece and simply press the Delete key. Deselect by pressing Ctrl + D (Windows) or Cmd + D (Mac).
You can also create a more elaborate border by removing edge pieces. Use the Pen Tool to draw a continuous path along the inside edges of all the puzzle pieces that form the outer border of your image. With the "Puzzle" layer selected and the path converted to a selection, you might need to invert the selection (Select > Inverse or Shift + Ctrl + I/Shift + Cmd + I) to ensure you have the edge pieces selected. Then, press Delete to remove them.
If you prefer a white background instead of black for the base layer, select the layer you designated as the background (initially filled with light gray or potentially a black layer added earlier) and use Edit > Fill to change its color.
The process of creating a convincing jigsaw puzzle effect in Photoshop is now complete. By following these steps, you can transform any photograph into a visually engaging puzzle, complete with detached pieces and realistic shadows, offering a unique and artistic presentation of your images. The flexibility of Photoshop's tools, especially layer masks, the Pen Tool, and layer styles, allows for significant customization to achieve your desired outcome. This tutorial provides a solid foundation, and further experimentation with different textures, piece arrangements, and lighting effects can lead to even more impressive results.