The quest for a truly authentic pencil feel within digital art software is a familiar one for many illustrators and designers. While Photoshop offers a vast array of tools, achieving that nuanced, organic pencil stroke often requires a bit of customization. This guide will walk you through the process of creating your own effective pencil brush in Photoshop, drawing inspiration from various techniques and offering insights into the underlying principles of brush dynamics. We'll explore how to transform a basic Photoshop brush into a versatile tool that can mimic the feel of traditional graphite, from light, feathery strokes to bold, expressive lines.
The Foundation: Selecting and Modifying a Standard Brush
The journey to a convincing digital pencil begins with a fundamental brush. Photoshop provides a wealth of built-in options, and for our pencil brush, one of the standard Photoshop brushes serves as an excellent starting point. This foundational brush offers a neutral base upon which we can build our desired characteristics.
The key to transforming this standard brush into something resembling a pencil lies in understanding and manipulating its "dynamics." These settings control how the brush behaves as you draw, responding to factors like pressure, tilt, and even the inherent randomness of digital input.
Sculpting the Stroke: Shape Dynamics and Spacing
Within the Brushes palette, the "Shape Dynamics" section is paramount. Here, we can dictate how the size of our brush stroke changes. For a responsive pencil effect, setting the "Size Control" to "Pen Pressure" is crucial. This ensures that the harder you press with your stylus, the thicker the line, and the lighter your touch, the finer the stroke - mirroring the way a real pencil behaves on paper.
Furthermore, the "Angle Jitter" plays a significant role in emulating the varied angles at which a pencil can be held. Setting this to 100% introduces a dynamic randomness to the orientation of the brush tip as you draw. This prevents strokes from appearing too uniform and mechanical, adding a subtle organic quality that is characteristic of hand-drawn lines.
Equally important is the "Brush Tip Shapes" section. The "Spacing" setting here directly influences the perceived texture and continuity of the stroke. By increasing the spacing to around 20%, we begin to simulate the subtle grain of paper. Each individual stamp of the brush tip becomes more distinct, preventing a perfectly smooth, digital line and introducing a characteristic "paper-grain" look. It's important to note that excessively low spacing, while potentially creating a smoother line, can significantly impact brush performance, especially with larger brush sizes, leading to lag and a bogged-down drawing experience. Finding the right balance is key to both visual fidelity and practical usability.
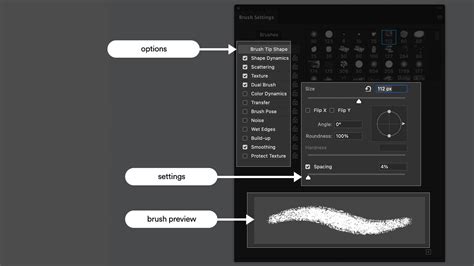
Adding Nuance: Opacity Control and Texture
While the basic shape dynamics provide the core pencil feel, further refinements can elevate the brush's realism. Many artists find it beneficial to incorporate opacity control. This is typically found within the "Other Dynamics" section. By linking "Opacity Control" to "Pen Pressure" (similar to "Size Control"), you gain the ability to create incredibly subtle strokes. A light touch will result in a faint, almost transparent line, much like a lightly sketched pencil mark, while increased pressure will build up opacity. This layered opacity is fundamental to achieving depth and nuance in digital sketching.
The incorporation of texture is another powerful technique for mimicking traditional media. Within the brush settings, the "Texture" option allows you to overlay a pattern onto your brush strokes. This can be a digitized scan of paper grain, a subtle noise pattern, or any other texture that evokes the feel of drawing on a physical surface. Within the texture settings, you can adjust the "Scale" to control the size of the texture pattern and the "Brightness" to manage how prominently the texture appears within your strokes. This step is vital for moving beyond a flat digital line and achieving a tactile, paper-like quality.
Refining the Stroke: Softness and Saving Your Preset
The "Transfer" option in the brush panel offers further control over opacity. While "Other Dynamics" might control the overall opacity based on pressure, "Transfer" can introduce additional variations, allowing for more complex fading and buildup of color. Adjusting the settings here can fine-tune how the color intensity changes as you draw.
For those seeking a softer, more blended pencil effect, the "Smoothing" option can be employed. This setting helps to reduce jaggedness in your strokes, creating a smoother, more fluid line. The degree to which you use smoothing will depend on the specific aesthetic you are aiming for - a crisper, more defined pencil line will require less smoothing than a softer, more gestural sketch.
Once you have meticulously adjusted these settings to achieve your desired pencil effect, it is essential to save your new brush. Within the brush panel's menu (typically accessed through a top-right corner icon), you will find an option to "New Brush Preset." This action saves your customized brush to your Photoshop library, allowing you to easily recall and utilize it for future projects. The ability to save and organize these custom brushes is a cornerstone of an efficient digital workflow, ensuring that your preferred tools are always at hand.
The Pencil Tool in Photoshop Elements: A Different Approach
It's worth noting that Photoshop Elements offers a distinct tool called the "Pencil Tool." Unlike the Brush Tool, which can be softened and blended, the Pencil Tool in Photoshop Elements is designed to draw hard-edged lines on raster layers, similar to how pixels are directly manipulated. It shares many options with the Brush Tool but cannot be used for airbrushing effects. An additional "Auto Erase" option is also available in the Tool Options Bar for the Pencil Tool in Photoshop Elements, offering a unique way to refine lines by erasing as you draw. While this tool has its specific applications, for the nuanced, pressure-sensitive, and textured feel of a traditional pencil, the custom brush creation method described above is generally preferred.
🖋️How to Create a Realistic Pencil Brush in Photoshop | Step-by-Step Tutorial 🖋️
The Significance of Sketching in the Design Process
The creation of a realistic digital pencil brush is not merely an exercise in technical customization; it is deeply connected to the fundamental importance of sketching in the creative process. Transferring initial ideas to a digital canvas using a tool that feels familiar and responsive, like a well-crafted pencil brush, is essential. This initial visual representation allows for a first glimpse of what will eventually become the final work. It provides a crucial space to make changes, remove elements, and iterate on designs, illustrations, artwork, or architectural plans before committing to more complex stages. The tactile feedback of a good pencil brush can inspire more fluid ideation and a less inhibited exploration of concepts.
Mercedes de Bellard, a Spanish illustrator renowned for her colored-pencil portraits and animal drawings, exemplifies the value of traditional media in informing digital techniques. Her developed methods for creating digital textures that mimic traditional pencils highlight a bridge between the physical and digital realms of art. This cross-pollination of techniques enriches the digital artist's toolkit and allows for a broader spectrum of artistic expression. The ability to capture the essence of traditional tools within a digital environment empowers artists to maintain a connection to their craft while leveraging the flexibility and power of digital software. The careful configuration of workspace, brush tip shape, dynamics, texture, and opacity, as detailed in this tutorial, allows digital artists to harness this connection, bringing the organic feel of a pencil into their digital creations.